DMX Output Mapping
There are various ways to connect fixtures to the console. As well as the XLR sockets on the console, you can connect fixtures using Ethernet and wireless links.
All consoles can output up to 16 universes except T1 which is limited to one single universe and T2 to two universes.
If you need to output more universes, you can network the console to one or more Avolites TitanNet Processing (TNP) nodes. This off-loads the DMX processing, allowing the console to control up to 64 universes of DMX in total.
The software does not actually limit the number of universes from a single console to 16, but performance of the console will be degraded. A warning will be shown in the processing load section of the TitanNet overview.
Configuring DMX Outputs
From the System menu (press Avo + Disk) select DMX Settings.
The window will initially show the node tab relating to the console itself. It shows a list of available DMX nodes (places where you can send the DMX to) on the left, and a list of the available DMX lines (outputs generated by the console) on the right. Each DMX line can send data to one or more nodes. If you assign more than one node to a line, those nodes receive duplicated data. If you have Art-Net/sACN nodes or TNP units connected they will show on the left hand side.
On the right hand side, under each DMX line there is a list of which nodes are linked to that line. The default setting on a new show is for the physical DMX outputs on the console to be linked to the first DMX lines.
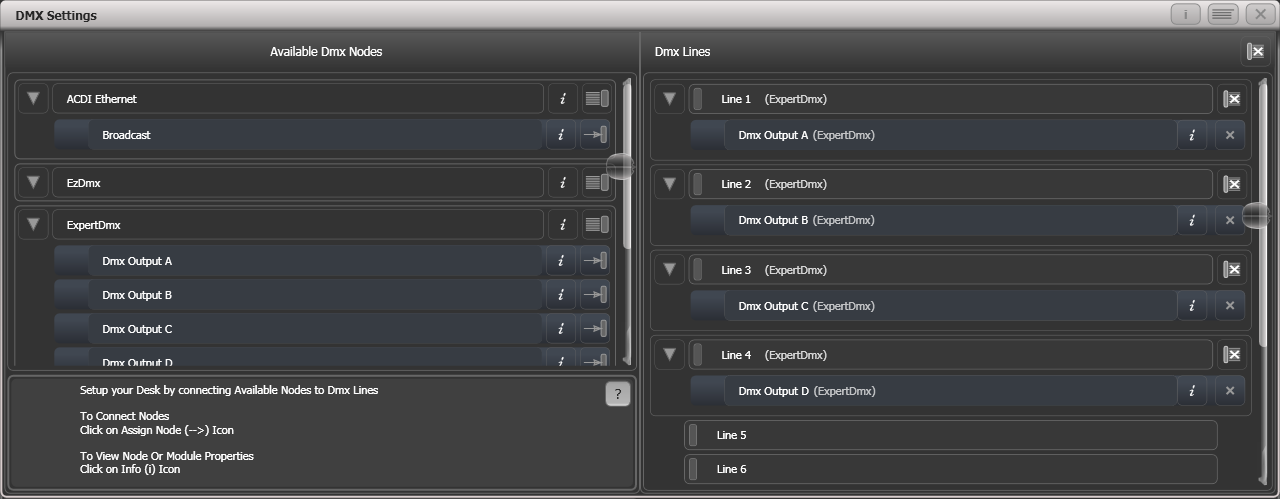
To assign a node to a line, click on the node on the left hand side (e.g. on Expert DMX A) and then on the line (right hand side) you want this node to be assigned to. The node will be removed from the pane on the left hand side as it is not unassigned any more, and will appear on the right hand side under the line it is assigned to.

To delete a node from the DMX lines, click on the button. To delete all nodes from a line, click on the Group delete button (the button on the DMX line). To delete all nodes from all lines, click on the button close to the header DMX lines.
In order to change the assignment, i.e. to assign a node to a different line, you need to delete it from the line it is assigned to (by clicking on the ) first - the node now appears as unassigned on the left hand side - and can now assign it to a different line.
When patching Art-Net and sACN nodes you can patch a number of universes in one go: select the first node you want to assign (i.e. sACN: Universe 1) on the left hand side enter values for Universe and Quantity with the softkeys, and then click on the line from which on you want to assign this. Titan will then patch the number of universes on consecutive lines.
You can show information about the DMX nodes once they are assigned, or the DMX output modules, by clicking the button. For Ethernet/network type nodes, this allows you to set detailed properties such as IP address ranges and net masks.

If you have TNPs connected, these can be individually configured using the tabs across the top of the screen.
When transferring shows between different console types, and especially when you have used the simulator, it's a good idea to check the DMX output settings to make sure the settings are what you expected. If you created a new show on the simulator, no outputs will be connected.
Module Properties
A module is a method of sending DMX (such as Art-Net, or sACN) and can be thought of as a collection of nodes.
You can set properties for DMX512 outputs, Art-Net or sACN by going to the DMX Settings window (from the System menu (press Avo + Disk) select DMX Settings) and then click the icon at the right hand side of the module name.
This allows you to adjust settings for each module, and for the network protocols to select which network adapter to use to output the protocol. All consoles except Quartz and Expert have two network adapters, Quartz has one, and on Titan Mobile and Simulator this depends on your computer; many laptops will have a wired network adapter and also a WiFi (wireless) adapter, both of which will be shown.
DMX Output Properties
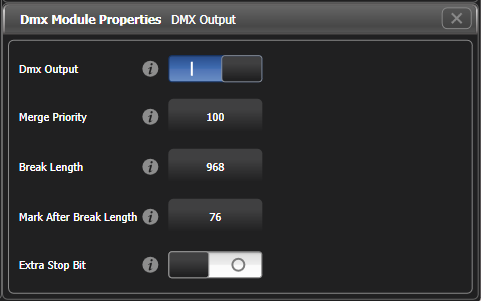
DMX output: Allows you to temporarily disable the output
Merge Priority: A value between 0 and 200 where higher numbers have priority. Allows a node to chose which console to follow where multiple consoles are transmitting to this output.
Break Length: Adjusts the DMX spacing which can be helpful for slow fixtures. If fixtures or dimmers show an occasional glitch try increasing this number. Some dimmers will require this to be 4000us in order to work smoothly. Default 968uS.
Mark After Break Length: Usually this will not need to be adjusted, but it can be increased to give fixtures a bit more time to receive the first DMX channel. Default 76uS.
Extra Stop Bit: Enabling this adds an extra Stop Bit to each byte which gives slow fixtures a bit more time to receive the DMX data. This option can sometimes solve issues where fixtures can be seen regularly glitching.
sACN Properties

DMX output: Allows you to temporarily disable the output
Merge Priority: (0-200) The sACN specification allows multiple consoles to send out DMX on the network. The priority value tells the receiving node which console to listen to if it gets DMX from more than one, higher values take priority.
You would normally use this to connect a backup console with a lower priority setting.
Block RDM: If enabled, RDM traffic is blocked on this module.
Synchronization Address: If not zero, sets the universe used to synchronise the DMX frames sent from the console. Listening devices will receive all DMX frames and then wait for a packet on the synchronisation universe before using or retransmitting the DMX frames. Synchronous sACN reduces tearing effects which can result from non-synchronised universes. If set to zero, synchronisation is disabled.
Ethernet xxx: Selects whether you want this protocol outputting on this Ethernet adapter. If there are multiple adaptors in the system you can select more than one, and identical information will be sent out on each one.
Art-Net Properties
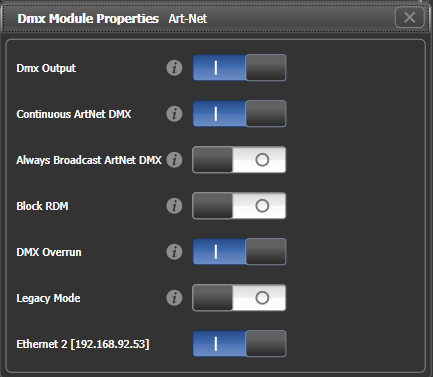
DMX output: Allows you to temporarily disable the output
Continuous Art-Net DMX: The Art-Net specification allows the console to only send out changes in the DMX. This setting makes the console send the Art-Net packets continuously even if there is no change.
Always Broadcast Art-Net DMX: Sets all Art-Net packets to Broadcast mode, meaning they are sent to all nodes. Otherwise the packets are addressed to the specific node they are intended for, which reduces network traffic but requires more careful setting up of network addresses.
Block RDM: If enabled, RDM traffic is blocked on this module.
DMX Overrun: Some Art-Net nodes ignore changes until they are sent more than once. If this option is enabled then at least 3 packets are sent for every change
Legacy Mode: If enabled, Art-Net is broadcast continuously from the console at a high rate. May affect console performance.
Ethernet xxx: Selects whether you want this protocol outputting on this Ethernet adapter. If there are multiple adaptors in the system you can select more than one, and identical information will be sent out on each one.
DMX Overview
If you select the DMX Overview tab at the top of the window, you can see all the TNPs which are connected and which output lines they are allocated to.
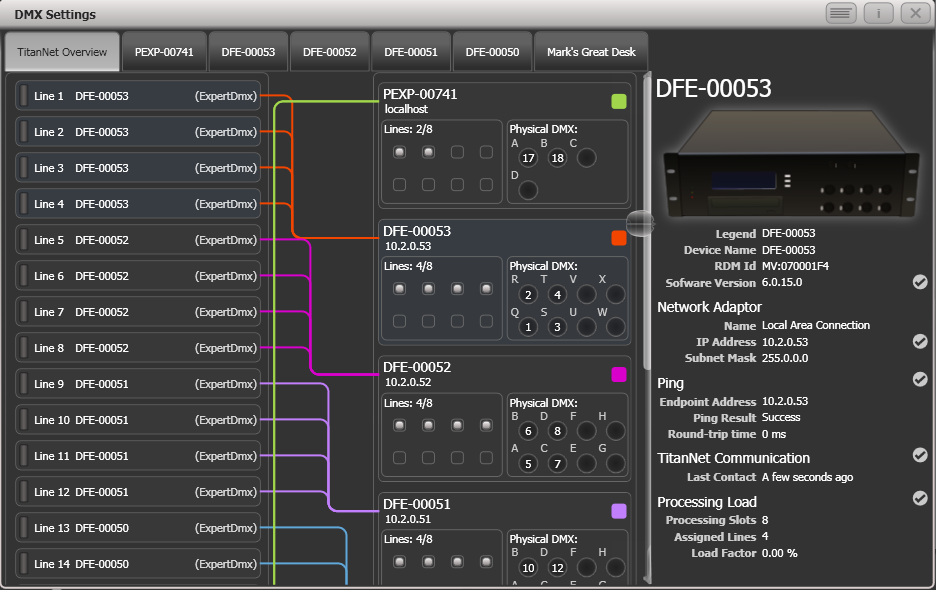
The left side of the window shows the 64 possible DMX output lines on the console. To the right of this are the processing nodes which are connected, the top one being the console itself. Each node shows how the lines are allocated to the physical outputs on the device. Clicking this area will open the detail tab for the node.
Clicking any one of the nodes will show detailed information about that node on the right, including the IP address, number of available processing slots, number of lines assigned, status of the connection with the node, and the processing load of the device. If more lines are assigned than the maximum number of slots, a warning will be displayed.
If a show is loaded that had fixtures and lines assigned to processing nodes which are no longer found on the TitanNet network, a dialog will appear listing nodes in use and available nodes, giving you the option to reassign the lines.
DMX Merge
The DMX merge window allows you to set up where DMX will be output in a system where you have multiple consoles or processing nodes connected.
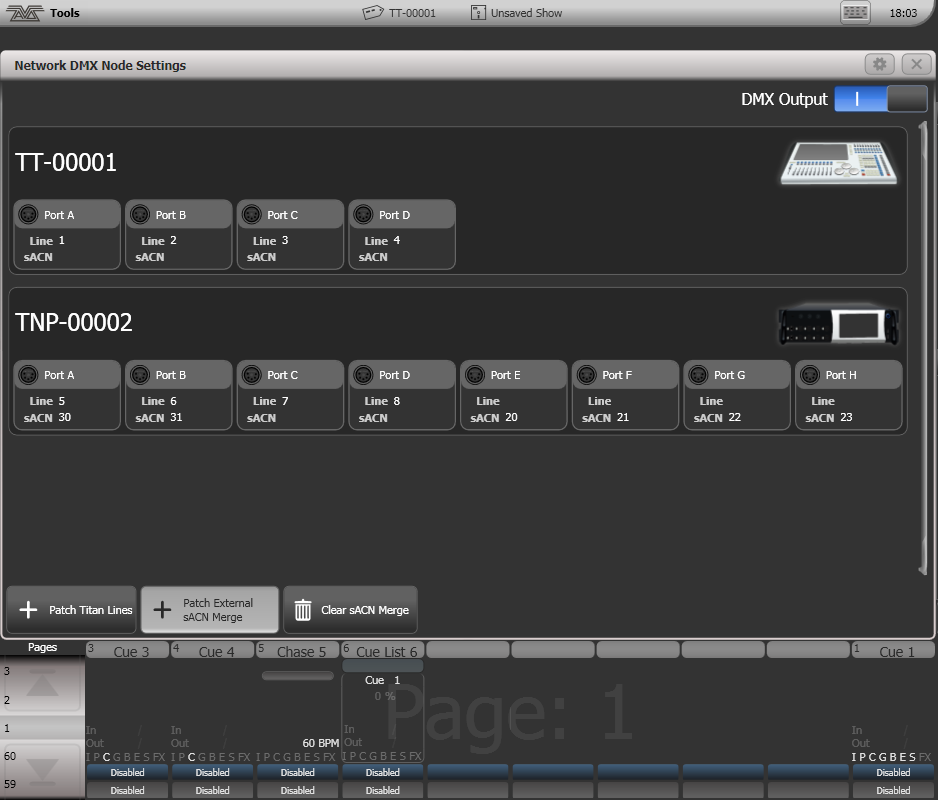
To configure an output port, click on Patch Titan Lines, enter universe number then click on a port to assign.
To remove an assignment, click on Clear sACN Merge then select a port.
The DMX Output switch can be used to disable all DMX output.