Controlling Fixtures over a Network
Before the console can talk to another device over the network, it has to be given a unique network address. This is called its "IP address".
Setting the console's IP address
We recommend that you use the console's automatic IP setting function. However, if you need to you can also set a manual IP address. See Setting your IP address for details of how IP addressing works.
- Go to the System menu (press Avo + Disk) and press Network Settings
- Press Local Area Connection (some consoles have more than one network connection, so you may have different connections to choose from)
- Check Subnet Mask is set to
255.255.255.0 - Press Set IP
2.*.*.* - Press Save settings
- Press Exit to leave the system menu.
Some Art-Net equipment may operate on a fixed IP address range of
2.*.*.*or10.*.*.*, in which case you will need to also set the console within the same range, but most equipment can be set to any address.If you need an address range other than
2.*.*.*or10.*.*.*you can press IP Address = ... and enter the address with the numeric keypad.
If the console has more than one network adapter, make sure they are set on different IP ranges (for example set one to
2.*.*.*and the other to10.*.*.*). If they are both in the same range this will cause problems with Art-Net and sACN.
Setting up DMX outputs
The Titan system can control up to 64 DMX lines/universes (though some consoles are limited to fewer lines - see DMX Settings for details). The Titan Go software (with AvoKey) will output one universe over Art-Net or sACN. The Titan Simulator software (with AvoKey) will output all universes over Art-Net or sACN, but periodically random DMX values will be sent down all DMX outputs as a "spoiler".
Within the console, you patch fixtures to one of the output lines. You connect console output lines to network universes using the DMX Settings menu. Often you will start at line 1 / universe 1, but there are times (for example if using a house rig with a touring show) when you will need to number the lines differently. Lines/universes may be numbered from 1-9999.
Example of a simple Art-Net system
There are two main systems for sending lighting control information over a network, Art-Net and sACN. Titan supports both; in this section we will describe how to set up a system using Art-Net.
Art-Net is not specific to one range of products, and is recognised and implemented by a growing number of manufacturers. Many products (such as Dimmers and Moving lights) can accept the Art-Net signal directly, so there is no need to convert the signal to DMX. Most people will, however, need to output DMX to their equipment and this can be done using an Art-Net to DMX converter (often called a Node).
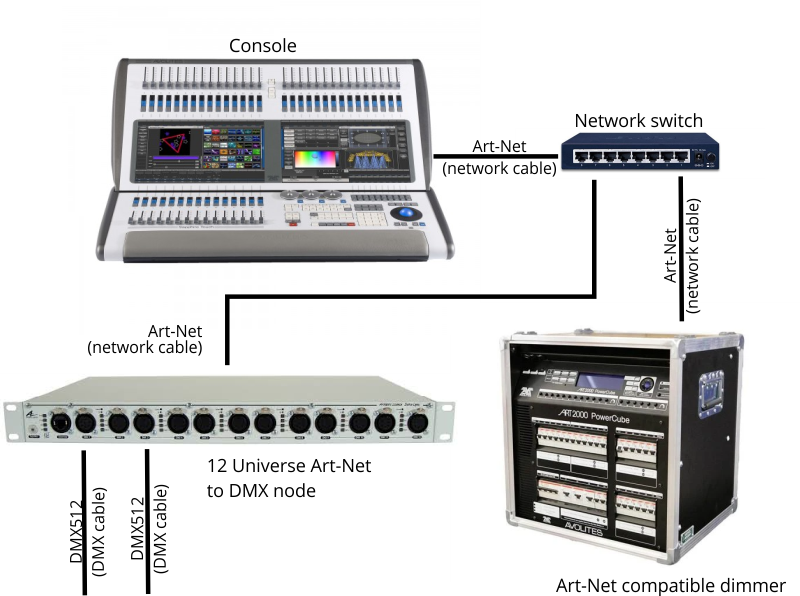
In the following diagram, an Art-Net compliant Console (such as a Titan console) is connected via a network switch to an Art-Net compatible dimmer and a rackmount DMX conversion node.

Once the system is connected together, the devices can be configured.
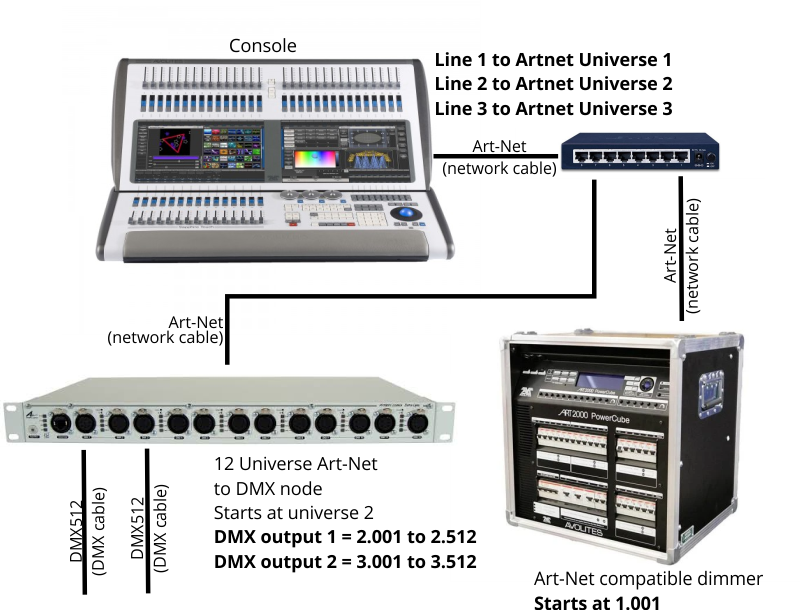
On the Dimmer, set the start address of 1.001 (Address 001 on universe 1)
On the DMX node, set start at universe 2 so it will convert universes 2-13 to DMX512 on its 12 outputs
The DMX Settings menu on the console is used to set which DMX line on the console is output to each Art-Net universe (1-256). Each console line may be output to multiple universes (including the physical connectors on the console) depending on how your devices are connected.
If everything is connected right, you should see each universe of the Dimmer and the DMX node show up as connectable devices on the left hand side of the DMX Settings window. The devices will tell the console what universe they are set to receive.
So we do the following:
Click on the first universe of the dimmer on the left of the window, then click Line 1 on the right to connect it.
Click on the first universe of the DMX node on the left of the window, then click Line 2 on the right to connect it.
Click on the second universe of the DMX node on the left of the window, then click Line 3 on the right to connect it.

Now on the console when you patch, you will patch the dimmer channels on addresses 1.001 - 1.024, the fixtures on the first output of the 12-way DMX node will be on addresses 2.001 - 2.512 and the fixtures on the second output will be on addresses 3.001 - 3.512.
- Press the small button on the Art-Net device to show a properties window. See Art-Net settings for an explanation of the settings.
"Unpolled" and "unknown" devices may appear as Art-Net nodes.
An unpolled device is a 'rolling extra' which allows more than 4 connections to be made to a particular Art-Net device. The Art-Net specification only allows each device to advertise a max of 4 universes so if you need to add more the console has to invent the 5th, 6th, etc universes.
An unknown device is one which doesn't format an Art-Net poll reply properly so the console doesn't known if it is an input or output device.
Additional Art-Net Resources
To find out more information about Art-Net please refer to the Art-Net Standard published by Artistic Licence.