Zeiten für Cues
Es lassen sich viele verschiedene Zeiteinstellungen für Cues vornehmen.
Einstellen von Überblendzeiten und Geräteversatz
Beim Programmieren von Cues lassen sich Verzögerung, Ein- und Ausblendzeit für den Cue insgesamt oder aber für einzelne Attribute und Geräte getrennt einstellen. Sind in dem Cue auch Shapes vorhanden, so werden diese, abhängig vom Fade Mode, davon auch beeinflusst.
Gibt man längere Zeiten als 60 Sekunden ein, so wird die Eingabe von der Software automatisch in Minuten und Sekunden aufgeteilt. Gibt man z.B. 115 ein, so wird das als 1:15 (also 1 Min 15 Sek) gewertet. Gibt man noch mehr Stellen ein, so werden diese als Stunden:Minuten:Sekunden interpretiert.
Die Überblendzeiten lassen sich zwischen den einzelnen Geräten verzögern, so dass der Cue nacheinander auf die einzelnen Geräte eingeblendet wird. Dies bezeichnet man als Fixture Overlap (Geräteversatz), und es gestattet, vielfältige Effekte ohne großen Programmieraufwand zu realisieren.
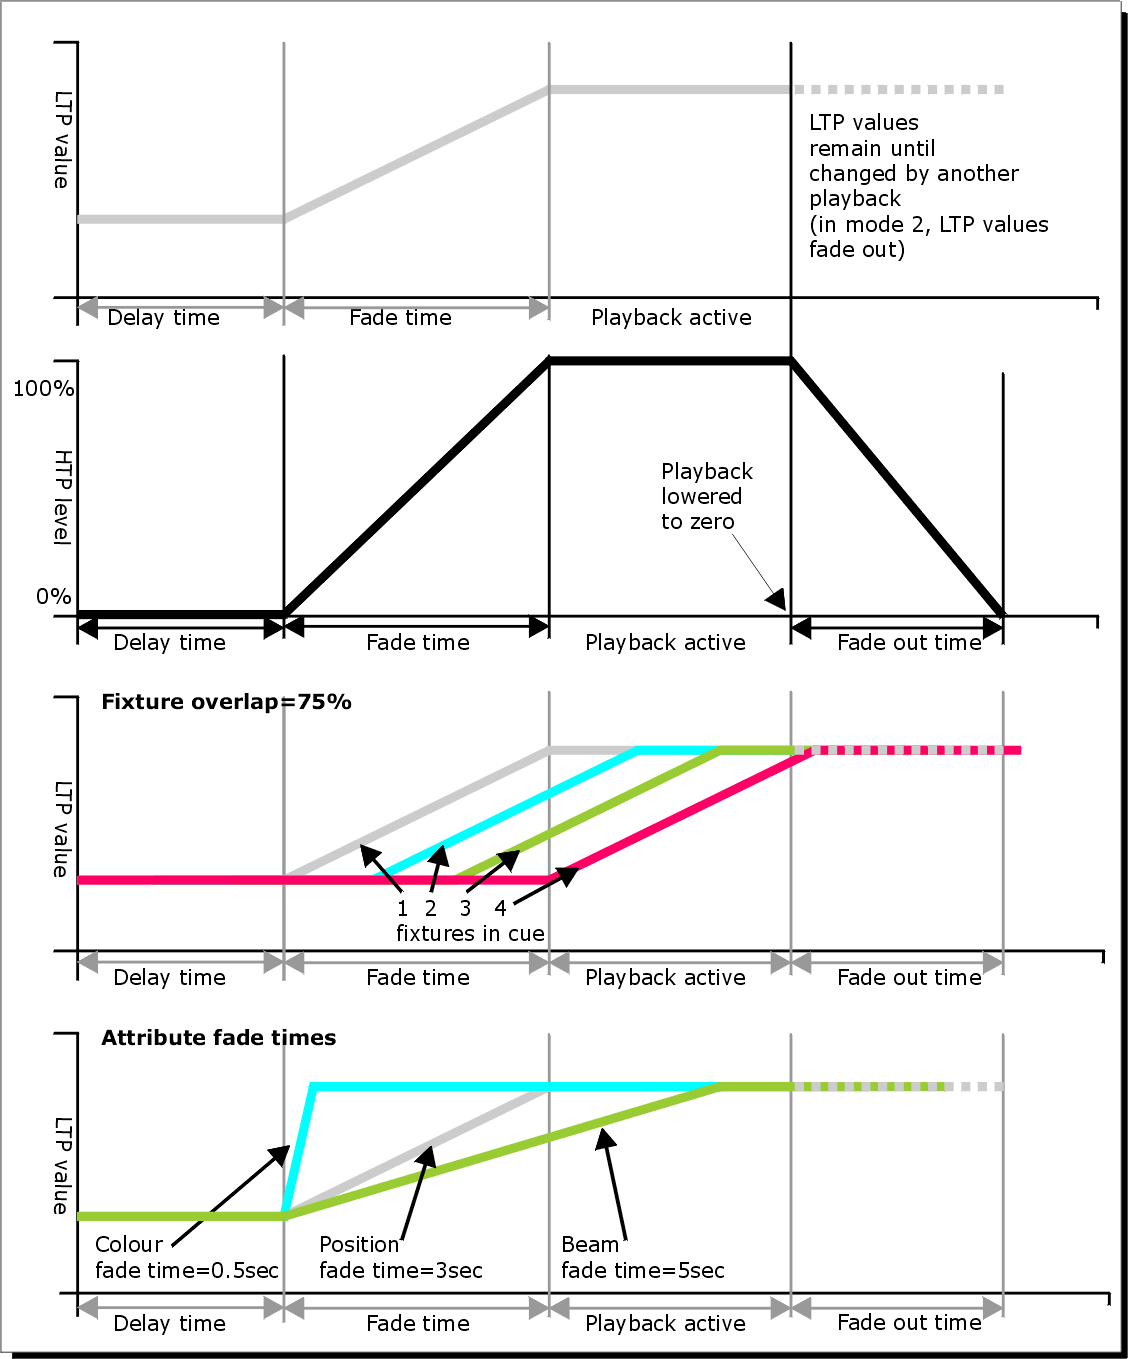
Im nachfolgenden Schema zeigt das obere Bild den Wechsel eines LTP-Kanals unter Berücksichtigung von Verzögerungs- und Überblendzeiten. Das zweite Diagramm zeigt den entsprechenden Wechsel eines HTP-Kanals. In den beiden letzten Bildern sind 'Fixture Overlap' sowie das separate Faden einzelner Attribute dargestellt.

Alle beim Programmieren des Cues eingestellten Zeiten werden in den Cue gespeichert.
Gespeicherte Zeiten lassen sich wie folgt ändern:
- Drücken Sie Edit Times im Hauptmenü.
- Drücken Sie die Auswahltaste des Cues.
- Drücken Sie Fade Mode x, um den 'Fade Mode' (Überblendmodus) einzustellen. Das bestimmt, wie die Zeiten verwendet werden, siehe unten.
- Drücken Sie Delay time, um die Verzögerungszeit vor Beginn des Cues einzugeben, Fade time für die Einblendzeit, sowie Fade out time für die Eingabe der Ausblendzeit.
- Geben Sie die jeweilige Zeit mit den Zifferntasten (in Sekunden) ein, und schließen Sie die Eingabe mit Enter ab.
- Drücken Sie Fixture Overlap zur Einstellung des Geräteversatzes,
gefolgt von einem Wert 0...100 auf den Zifferntasten.
100% bedeutet: alle Geräte blenden gemeinsam über.
0% bedeutet: das vorherige Gerät muss die Überblendung abgeschlossen haben, bevor das nächste damit beginnt.
50% bedeutet: das nächste Gerät beginnt mit der Überblendung, wenn das vorherige seine Überblendung zur Hälfte abgeschlossen hat.
Die Reihenfolge der Geräte wird bestimmt durch die Reihenfolge beim Anwählen der Geräte (kann aber später geändert werden, siehe Ändern der Geräte-Reihenfolge). - Drücken Sie Exit zum Verlassen des Menüs.
Ebenso lassen sich sowohl für die IPCGBES-Attributgruppen als auch für jedes Attribut einzeln gesonderte Zeiten vergeben, siehe Ändern der Attribut-Fadezeit.
Mit der Taste TIME lassen sich Zeiten sehr komfortabel mit dem Ziffernblock eingeben, z.B. ergibt TIME 5 AND 2 5s Ein- und 2s Ausfadezeit (auf früheren Pulten liegt die Times-Funktion auf der Taste SET (Titan Mobile/Sapphire Touch) bzw. NEXT TIME (Tiger Touch/Pearl Expert)).
Fade Modes
Die eingegebenen Zeiten werden abhängig vom 'Fade Mode' (Überblendmodus) wie folgt interpretiert (auch erreichbar über Options auf dem Reiter Fader):
- Mode 0 - die Kanäle blenden in der vorgegebenen Zeit über, die Ausblendzeit wird dabei ignoriert. Stehen die Zeiten auf '0', so werden HTP-Kanäle direkt mit dem Fader eingeblendet, während LTP-Kanäle 'hart' umschalten.
- Mode 1 - die Kanäle blenden in der vorgegebenen Zeit ein, HTP Kanäle blenden in der vorgegebenen Ausblendzeit aus (LTP-Kanäle behalten ihre Werte). Stehen die Zeiten auf '0', so werden HTP-Kanäle direkt mit dem Fader eingeblendet, während LTP-Kanäle 'hart' umschalten.
- Mode 2 - die Kanäle blenden in der vorgegebenen Zeit ein, die Ausblendzeit wird ignoriert. Das Überblenden stoppt, sobald die Position des Fader erreicht ist; steht dieser etwa auf 50%, so erfolgt das Überblenden nur zur Hälfte. Bringt man den Fader wieder auf '0', so kehren die Kanäle zu den vorherigen Werten zurück. Stehen die Zeiten auf '0', so werden HTP- und LTP-Kanäle direkt mit dem Fader gesteuert.
In diesem Modus kehren LTP-Kanäle generell zu den vorherigen Werten zurück, sobald der Cue deaktiviert wird.
Mit Mode 2 lässt sich z.B. auch eine manuelle Verfolgersteuerung etwa für einen Laufsteg realisieren, indem der Cue nur Pan/Tilt enthält und dann auf Mode 2 gestellt wird. Dieser Modus bietet sich auch für die Steuerung der einzelnen Farben bei RGB-Lampen an.
- Mode 3 - Crossfade (Überblendung). Sämtliche Kanäle, einschließlich der Helligkeit, blenden zu den Einstellungen des neuen Cues über, alle anderen noch aktiven Cues werden ausgeblendet und deaktiviert. Wird ein anderer Cue wieder benötigt, so bringen Sie dessen Regler auf '0' und dann wieder auf den gewünschten Wert.
Enthält der Cue Shapes, so ändern sich diese mit den eingestellten Überblendzeiten. Im Mode 1 ändern sich die Shapes abhängig von den Zeiten, in Mode 2 abhängig von der Faderstellung. Damit lassen sich etwa Shapes realisieren, die abhängig vom Fader schneller oder größer werden.
Ändern der Reihenfolge der Geräte
Die Reihenfolge der Geräte in einem Cue lässt sich nachträglich ändern. Normalerweise wird diese mit der Reihenfolge der Auswahl der Geräte beim Erstellen des Cues oder der Gruppe, sofern eine angewählt wurde, festgelegt, aber ggf. möchte man diese später ändern (etwa, um Geräte bei der Nutzung von Fixture Overlap paarweise zusammenzufassen).
- Drücken Sie Edit Times im Hauptmenü.
- Drücken Sie die Auswahltaste des zu ändernden Cues.
- Drücken Sie Fixture Order.
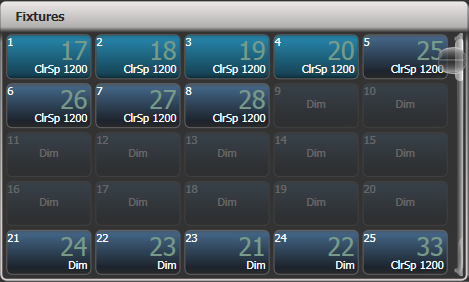
- Wählen Sie die Schrittnummer, ab der Sie beginnen möchten, mit der Menütaste Step Number.
- Soll die Schrittnummer automatisch erhöht werden, so stellen SieAutoincrement auf **On**. Sollen mehrere Geräte die gleiche Schrittnummer bekommen, stellen Sie diese Option auf **Off**.
- Betätigen Sie die Schaltfläche des Gerätes, das Sie an dieser Stelle
in der Sequenz haben möchten. Die Schrittnummer wird (in grün) jeweils oben rechts
in den Geräte-Schaltflächen angezeigt.

- Drücken Sie Exit, um das Menü zu beenden.
Ebenso kann man mehreren Geräten die gleichen Schrittnummern geben. Damit lässt sich erreichen, dass bei Verwendung des Geräteversatzes (Fixture Overlap) mehrere Geräte gleichzeitig beeinflusst werden.
Einzelne Geräte kann man auch komplett aus der Folge entfernen; schalten Sie dazu Autoincrement auf 'Off' und klicken Sie die Geräteschaltfläche zweimal (daraufhin wird statt der Schrittnummer ein 'X' angezeigt). Betätigen Sie die Geräte-Schaltfläche nochmals, um das Gerät wieder in die Folge aufzunehmen.
Eingeben von Überblendzeiten für einzelne Attribute
Es lassen sich spezifische Überblendzeiten für die einzelnen Attributgruppen vergeben (etwa für 'Position'). Wird eine solche Zeit eingegeben, so überschreibt diese die allgemein vergebenen Zeiten.
Zur Eingabe der Überblendzeit für Attributgruppen gehen Sie wie folgt vor:
- Drücken Sie Edit Times im Hauptmenü.
- Drücken Sie die Auswahltaste des jeweiligen Cues.
- Drücken Sie die Taste der Attributgruppe (IPCGBES Buttons, oder rechts auf dem Pult bei älteren Pulten) des Attributes, das Sie ändern möchten.
- Drücken Sie Delay = zur Eingabe einer Verzögerung oder Fade = zur Eingabe einer Überblendzeit.
- Geben Sie die gewünschte Zeit mit den Zifferntasten, gefolgt vonEnter, ein, oder drücken Sie Use Global, um die gesonderten Attributzeiten zu löschen und die allgemeinen Zeiten des Cues zu verwenden.
- Drücken Sie Enter zum Speichern der Änderungen.
Dies lässt sich weiter verfeinern, indem man etwa jedem einzelnen Gerät unterschiedliche Zeiten gibt. Sobald Sie einen Cue zum Ändern auswählen, sehen Sie, dass automatisch alle Geräte des Cues angewählt sind. Um nur die Zeiten einzelner Geräte zu ändern, ändern Sie die Geräteauswahl mit den entsprechenden Auswahl-Schaltflächen.
Das Fenster Cue View erscheint, sobald die Zeiten editiert werden. Innerhalb dieses Fensters kann man direkt Geräte und Attribute zum Editieren auswählen.
Betätigen Sie die Taste ALL, um wieder alle Geräte in dem Cue auszuwählen.
Innerhalb des Menüs 'Set Attribute Times' lassen sich nur Geräte auswählen, die bereits in dem Cue enthalten sind.
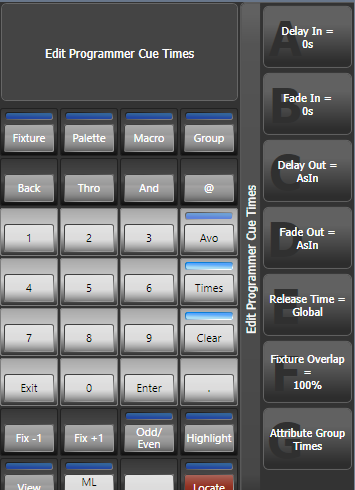
Editieren der Zeiten im Programmer
Die Zeiten im Programmierspeicher lassen sich vor dem Speichern eines Cues überprüfen und ändern. Ebenso lassen sich Zeiten einstellen und in bestehende Cues verschmelzen (mergen), genau wie man Attribut-Werte verschmilzt.
Drücken Sie die Taste TIME, um in dieses Menü zu gelangen.
Auf dem Titan Mobile und dem Sapphire Touch liegt diese Funktion auf der Taste oberhalb der Clear-Taste (Taste SET). Auf dem Tiger Touch und dem Pearl Expert ist es die Taste NEXT TIME.
Es lassen sich Zeiten für den gesamten Cue, für einzelne Geräte, für Attributgruppen oder einzelne Attribute einstellen.

Unter Verwendung der Taste TIME gibt es folgende Tastatur-Syntax:
- Time 5 = 5 s Einfadezeit.
- CUE 3 Time 5 = 5 s Einfadezeit für Cue 3 der verbundenen Cueliste.
- Time FIXTURE 5 = 5 s Einfadezeit für alle Attribute der gewählten Geräte.
- Time FIXTURE G 5 = 5 s Einfadezeit für die Gobo-Kanäle der gewählten Geräte.
- Time FIXTURE \@B 5 = 5 s Einfadezeit für das momentan auf Rad B liegende Attribut der gewählten Geräte.
- 5 @ 3 = 5 s Einfadezeit, 3 s Delay.
- 5 AND 2 = 5 s Ein-, 2 s Ausfadezeit.
- 1 THRO 10 = Auffächern der Zeit zwischen den gewählten Geräten in der Reihenfolge deren Auswahl.
Zeiten für einzelne Attribute lassen sich auch mit den Encodern einstellen; wählen Sie dazu mit der Funktionstaste Wheels im Hauptmenü die gewünschte Arbeitsweise der Räder.
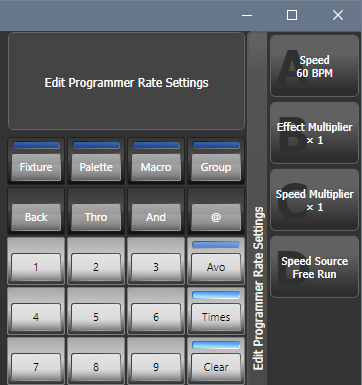
Mit der Taste Options lassen sich, während die Zeiten angezeigt werden, die Parameter Speed, Effect Multiplier, Speed Multiplier und Speed Source im Programmer, so dass sie einfach direkt in die nächsten Playbacks gespeichert werden können. Speed und Speed Multiplier haben nur Auswirkungen auf Chaser, nicht auf einzelne Cues.
