Timelines introduction
Timelines allow you to create a precisely timed sequence which you can either run from the console's internal timer or synchronise to an external timecode source. This can be useful for an opening sequence for a corporate event, a complex song in a show where the song is pre-recorded or run to a click track or timecode, or a multimedia event run to a playback track. You can also use it to create complicated one-shot effects for busking.
You can also create timed shows by creating timecoded cues in cue-lists, but Timeline recording allows much easier creation and editing of a timed show.
Timelines are stored on a handle using the button in a similar way to a cue or cue list - they can be built either from playbacks you have already recorded, or by creating new playbacks as you go along. You can record actions in real time by operating the console or by adding them manually at specific times. You can think of a timeline as an automatic replay system to push the faders and buttons on the console. The actions recorded in a timeline are called triggers.
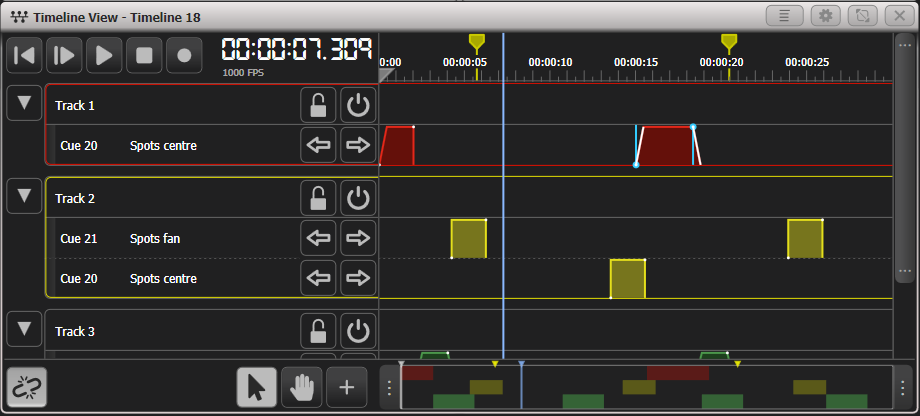
Once you have recorded a timeline there is a Timeline View window to show and edit the triggers - press Open/View then the select button of the handle containing the timeline, or tap the playback legend area above the fader. The view also opens automatically when you record a new timeline.
Triggers
To program a timeline you record actions at specific times which can then be replayed by the console with the same timing. These are called Triggers.
The following types of trigger can be created. You can record these actions in real time using Live Record or enter them as manual triggers at specified times using the touch screen.
| Trigger | Action |
|---|---|
| Set Level | Fades up a playback to a set level over a time. This has the same effect as you pushing up a fader. If the playback has fade times programmed these also run. |
| Go to cue | Go to a cue in a cue list. You can either specify a cue number or just record a Go trigger to run the next cue. The cue will follow the fade times programmed in the cue list. |
| Flash | Flash a playback (see Flash and Swop) |
| Timed Flash | Flash a playback with programmed fade times |
| Timed Flash and Go | Timed flash followed by Go action, for a cue list |
| Swop | Swop a playback (see Flash and Swop) |
| Preload | Preload the LTP values of a playback over a number of seconds (see Preload) |
| Marker | Mark a point in the timecode for information |
| Wait for go | Pause the timeline until you press Go to resume (only on internal timecode) |
- Wait for go triggers are useful when you have a timed sequence followed by an unknown delay, for example a win/walk-up sequence for an awards ceremony when you don't know how long the winner will take to reach the stage. Shapes will continue to run while the timeline is paused. The timeline needs to be connected for the Go button to work, if the timeline is not connected you can use the transport button to resume the timeline.
Tracks
The timeline is split into Tracks which can be used to organise triggers into different groups or sections. Each different playback in the timeline gets its own row in the track.
- You can mute tracks to prevent them playing back using the button.
- You can lock tracks to prevent accidental changes to sections you've finished using the button.
- Tracks can be collapsed so they take up less room on the screen, using the arrow button to the left of the track name. See more details here.
Selecting timecode source
You can select one of the four available timecode sources to control your timeline from the Timeline Options.
To set up and enable each of the timecode sources as Internal, MIDI, Clock or SMPTE use the Timecode softkey at the top level main menu or double press Open/View and open the appropriate Timecode window.
Timecode linking and local timecode controls
The button at the bottom left of the Timeline View window can be used to temporarily unlink the timeline from its timecode source.
When using external timecode, often the timecode source will be sent to you from elsewhere in the show and will not be under your control - in this situation it's useful to be able to temporarily control the timecode yourself when recording and editing. When this button is set to unlinked, you can control the timeline playback using the transport buttons in the top left corner of the Timeline View window as you would with an audio player.
- If you are using Internal Timecode or Winamp as a timecode source then these buttons will also operate the local Timecode source while linked (and will play/pause Winamp if that is the timecode source).

- sets the live timecode back to zero.
- Play from cursor starts playing from the cursor (or the start time if the cursor is not within the start/end times).
- and are play / pause controls.
- stops playing and sets the live timecode back to zero.
- enters live record mode but doesn't start timecode playback.
When you are linked to a timecode (except Internal Timecode and Winamp), the first four buttons are replaced by the timecode source name and only the Record button is shown.

If timecode is disabled in the Timecode menu or the Timecode windows, the time is shown in red.
If the timecode time is within the start and end times but the timeline is not active, the time is shown in orange.

- If your timecode source starts at a big number, you can set a time offset to allow you to use zero-referenced times on your timeline. You can also add or subtract a few frames for synchronisation if the timecode source is slightly off. See Time Offset.
The overview bar
The overview bar at the bottom of the screen gives you a view of the whole timeline from start to end. Triggers and markers are shown in miniature on the bar. You can make the main view zoom in and out by dragging the end markers of the bar to enclose a particular section. It's a good way of moving quickly around the timeline. See Using The Overview Bar for more details.

Moving around the timeline view with the wheels
Using the context menu option Timeline Wheels you can set the wheels to control your view, when no triggers are selected. The wheel functions are
- Wheel A: Horizontal scroll
- Wheel B: Vertical scroll
- Wheel C: Zoom
If any triggers are selected, the wheels control Time, Level and Fade of the selected trigger(s).
Cursor
The grey cursor on the Timeline View sets the entry position for new triggers. It can also be used as a "play head" to manually move the play position along the timeline while testing. You can position the cursor by tapping the screen in the ruler area at the top of the Timeline View.
Tapping on the arrow at the top of the cursor, or using the Select Cursor context menu option sets Wheel A to control the cursor position.
Selection tool types
The and buttons let you choose different selection tools for editing.
- is for marquee editing, where you select items by drawing a marquee selection box around them (or direct clicking).
- allows you to drag the timeline left and right or select by direct clicking.
You can also select the tool using the Tool Pan/Tool Select context menu button.
Table view
Using the Open Table View context menu button, you can open the timeline as a table which shows details for each trigger in time order, in the same format as a cue list. Buttons down the left hand side allow you to filter which tracks are shown in the list. See Table View.
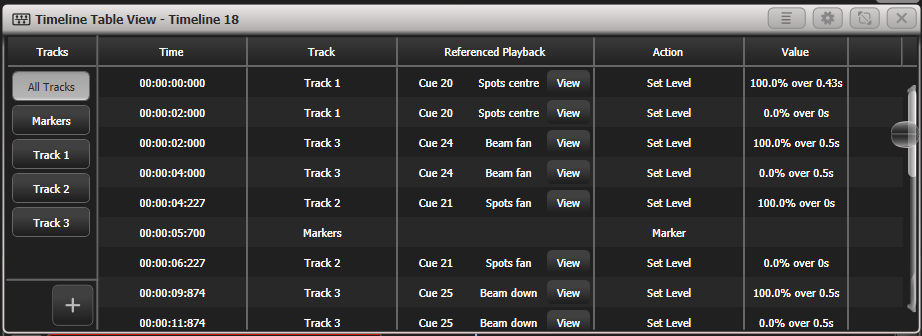
- You can show both the Timeline Table View and the graphical Timeline View at the same time.