Erstellen von Paletten
Attribute zum Speichern in Paletten
Obwohl ein Paletteneintrag mehrere oder alle Attribute eines Geräts beinhalten kann, ist es deutlich einfacher, mit getrennten Paletten zu arbeiten, so dass man etwa Paletten nur für Positionen und andere Paletten nur für Farben hat. Diese Vorgehensweise wird durch getrennte Fenster für Positions-, Farb- und Gobopaletten unterstützt.
Beim Speichern einer Palette werden nur die im Programmierspeicher befindlichen Attribute (die seit dem letzten Clear veränderten Werte) verwendet. Zum Erstellen einer Farb-Palette stellen Sie einfach die gewünschte Farbe ein, ohne die anderen Attribute zu verändern. Ebenso lassen sich Paletten mit Shapes und Pixelmapper-Effekten anlegen. Ferner werden auch Zeiten für Attribute und Geräte in den Paletten gespeichert, und es lassen sich sogar Paletten nur mit Zeiten - ohne Attributwerte - anlegen.
Sind mehrere Attribute im Programmierspeicher, so erstellen Sie eine Maske, mit der die zu speichernden Attribute ausgewählt werden.
Paletten können Globale, gemeinsame (shared) oder normale (einzeln verwendete) Paletten sein:
- Globale Paletten funktionieren mit allen Gerätetypen (die diese Attribute physikalisch steuern können).
- Shared Paletten speichern identische DMX-Werte für alle Geräte des gleichen Typs, z.B. ‚Rot' für alle Martin MAC2000.
- Normale Paletten wiederum speichern für jedes Gerät andere DMX-Werte, etwa fast immer beim Programmieren von Positionen.
Beim Verschmelzen (merge) von Paletten können auch Paletten entstehen, die sowohl globale, shared als auch normale Attribute enthalten.
Generell können nur Dimmer, Pan/Tilt und Colour global sein. Wird für ein Gerät mit Farbmischung eine globale Farb-Palette erzeugt, so werden Werte für CMY und für RGB sowie ein 'dynamischer' Wert für Geräte mit Farbrad gespeichert; mit letzterem wird dann versucht, die passendste Farbe auf dem Farbrad (bei Geräten mit festen Farben) auszuwählen.
Mit der Benutzereinstellung "Minimum Palette Mode" kann festgelegt werden, dass auch beim Schnellspeichern Paletten immer als Shared oder Normal erstellt werden, auch wenn das Pult sie sonst als globale Palette speichern würde.
Speichern einer Palette
Zum Speichern einer Palette in eines der Palettenfenster gehen Sie wie folgt vor (werden die Palettenfenster nicht angezeigt, so klicken Sie auf den Workspace-Button Groups and Palettes):
- Drücken Sie Clear, um den Programmierspeicher zu löschen.
- Wählen Sie die Geräte, für die eine Palette gespeichert werden soll.
- Mit den Attribut-Tasten und Rädern stellen Sie nun die gewünschten Werte ein.Es lassen sich einzelne oder alle Attribute in einer Palette speichern.
- Drücken Sie und dann Palette oder drücken SiePalette und wählen Record Palette.
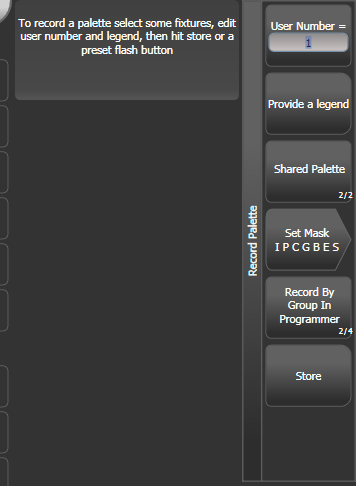
- Erstellen Sie die Palettenmaske; diese bestimmt, welche Attribute in der Palette gespeichert werden. Wählen Sie die zu speichernden Attribute mit den Attribut-Tasten: jedes mit einer leuchtenden LED gekennzeichnete Attribut ist zum Speichern vorgesehen. Set Mask undRecord by dienen ebenfalls zum Einstellen der Maskierung (s.u.).
- Klicken Sie auf eine freie Paletten-Schaltfläche zum Speichern (wählen Sie stattdessen einen bereits mit einer Palette belegten Button, so gibt es weitere Optionen), oder vergeben Sie eine Nummer und drücken Sie Store.
- Beim Schnellspeichern von Paletten sind Schritt 4 und 5 nicht erforderlich - doppelklicken Sie einfach auf eine freie Schaltfläche in einem der Palettenfenster. Dabei wird die Palettenmaske anhand des Fensters festgelegt: Positionspaletten enthalten nur P, Farbpaletten nur C, und Paletten im Fenster Gobos&Beams enhalten IGBES.
Möchten Sie Paletten auf die Tasten des Pultes speichern, so drücken Sie ebenfalls und dann Palette: daraufhin leuchten alle noch freien Tasten auf, und zum Speichern muss einfach eine davon betätigt werden.

Das Pult legt die Palette automatisch als global, shared (gemeinsam genutzt) oder normal an (dazu wird überprüft, ob alle Geräte gleichen Typs die gleichen Attributwerte haben). Diese Einstellung kann mit Menütaste C geändert werden. Die Automatik ist weiter unten näher beschrieben.
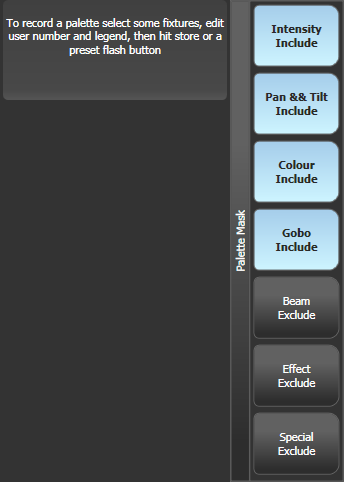
Mit Set Mask lassen sich die in der Palette zu speichernden Attribute auswählen. Ebenso können dazu die Attribut-Tasten bei den Encodern genutzt werden.
Ist eine Attribut-Gruppe zum Speichern vorgesehen, so erscheint die entsprechende Funktionstaste invertiert (wie für 'Colour' in Bild), und die LED der entsprechenden Attribut-Taste leuchtet. Beim Verwenden der Schnellspeicherfunktion wird die Maske automatisch erstellt, abhängig vom Fenster, in dem die Palette gespeichert wird: Paletten im Fenster 'Positions' enthalten nur P, im Fenster 'Colours' nur C und im Fenster 'Gobos and Beams' nur IGBES. Wird die Palette hingegen mit gespeichert, muss die Maske manuell eingestellt werden.
Mit der Taste Attribute Options (auf neueren Pulten Options) können alle Attributgruppen zwischen 'Include' und 'Exclude' umgeschaltet werden.

Record By... steuert, wie die erstellte Maske beim Speichern der Palette verwendet wird:
- Channel in programmer - es werden nur Kanäle gespeichert, die sich im Programmierspeicher befinden (also vorher verändert wurden)
- Group in programmer speichert alle Kanäle in jeder Attribut-Gruppe, von der sich ein oder mehrere Kanäle im Programmierspeicher befinden. Ist etwa ein Wert für Cyan im Programmierspeicher, so werden sämtliche Einstellungen aller Farbkanäle abgespeichert, auch wenn sie nicht im Programmierspeicher sind.
- Group in mask speichert sämtliche Werte für alle in der Maske ausgewählten Attribute
- Mixed speichert Positionen und Farben als Attributgruppen, alle anderen Kanäle jedoch einzeln.
Das Pult vergibt automatisch eine Bezeichnung für die Palette (außer die Benutzereinstellung Auto Legend wurde deaktiviert).
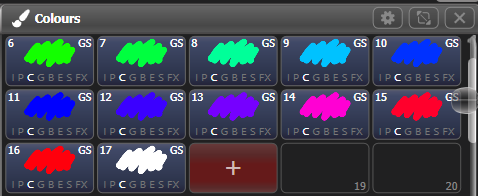
- Bei Farb-Paletten werden die enthaltenen Farben angezeigt - sind mehrere enthalten, so werden verschiedenfarbige Streifen angezeigt.
- Bei Gobo-Paletten werden die Gobos grafisch dargestellt, sofern das in der Personality hinterlegt ist (ggf. müssen die Personalities aktualisiert werden).
- Für CITP-Paletten (von einem Medienserver) werden die übertragenen Vorschaubilder angezeigt.
- Für Pan und Tilt werden allgemeine Bezeichner vergeben.
- Für alle anderen Attribute wird der zuletzt veränderte Wert angezeigt.

Ebenso kann man beim Speichern mit Provide a legend der Palette eine Bezeichnung geben. Zum späteren Ändern der Bezeichnung siehe Paletten beschriften und bemalen.
Wird eine Palette auf einen bereits belegten Speicherplatz gespeichert, so bietet das Pult die Optionen Cancel (Abbruch), Replace(Ersetzen) und Merge(Kombinieren).
- Mit Replace wird die bisher gespeicherte Palette gelöscht und durch die neue ersetzt.
- Bei der Wahl von Merge werden die beiden Paletten miteinander verschmolzen.
- Quick Merge ist das Verschmelzen ausschließlich der Attribute, die bisher schon in der Palette enthalten sind. Damit lassen sich etwa einzelne Werte zu einer existierenden gemeinsam genutzten Palette hinzufügen, oder enthaltene Werte einfach verändern. Wird die gewählte Paletten-Auswahltaste erneut betätigt, erfolgt automatisch ein Quick Merge.
Wenn nicht explizit vorgegeben, wählt das Pult automatisch, ob eine globale, shared oder normale Palette erzeugt wird: eine globale Palette wird gespeichert, wenn alle ausgewählten Geräte im Programmer die gleichen Werte haben und die Attribute für globale Paletten verfügbar sind. Sind die Werte zwar gleich, die Attribute aber nicht für globale Paletten geeignet, so wird eine shared Palette gespeichert. Sind einige Attribute für global geeignet und einige nicht, so wird eine Palette mit den geeigneten Attributen als global und mit den anderen als shared gespeichert. Sind schließlich die Werte unterschiedlich, so wird eine normale Palette erstellt. Diese Automatik lässt sich mit der Benutzereinstellung Minimum Palette Mode überschreiben bzw. deaktivieren.
Nested palettes -- Verknüpfte Paletten
Paletten können Bezüge auf andere Paletten enthalten. So kann z.B. eine Palette 'odd/even' erstellt werden, bei der die ungeraden Geräte eine Farbe und die geraden Geräte eine andere Farbe zugewiesen bekommen, wobei die konkreten Farben aus anderen (Master-) Paletten referenziert werden. Werden nun die Master-Paletten geändert, so ändert sich die 'odd/even'-Palette entsprechend.
Die Option Record/Don't Record Nested Palettes im Menü "Record Palette" bestimmt, ob der Verweis auf die Masterpalette (Vorgabe) oder aber der jeweilige absolute Wert gespeichert werden soll.
Wurde eine Palette mit Verknüpfungen zu anderen Paletten gespeichert, so lässt sich das Aufrufen der verknüpften Paletten deaktivieren, so dass nur die direkt in der Palette gespeicherten Werte verwendet werden. Dies kann beim Updaten der verknüpften Paletten sinnvoll sein.
- Drücken Sie Options.
- Wählen Sie die Palette..
- Auf dem Reiter Palette der Optionen deaktivieren Sie die Einstellung Fire Nested Palettes.
- Wird nun die Palette aufgerufen, so werden nur die direkt in dieser gespeicherten Werte verwendet, nicht aber die aus verknüpften Paletten.
- Der vorige Zustand lässt sich wieder herstellen, indem man die Option Fire Nested Palettes wieder aktiviert.
Schnellspeichern
In den Paletten-Fenstern gibt es ebenso eine Schnellspeicher-Funktion. Dazu betätigen Sie einfach die gewünschte Schaltfläche - diese wird daraufhin rot und zeigt ein + -Zeichen. Nun lässt sich eine Bezeichnung vergeben sowie die Maskierung ändern. Mit einer weiteren Betätigung der Schaltfläche wird die Palette gespeichert.

Beim Verwenden der Schnellspeicherfunktion wird die Attributmaske automatisch abhängig vom jeweiligen Fenster eingestellt; so werden im Fenster Positions nur Pan/Tilt-Werte (P), bei Colours nur Farben (C) und bei Gobos and Beams die anderen Attribute (IGBES) abgespeichert. Dies geschieht nicht beim Speichern mittels der -Taste.
Schnellspeichern funktioniert auch bei Gruppen und Arbeitsumgebungen (Workspaces).
Wird eine Show geladen, die auf einem Pearl Expert programmiert wurde, so lassen sich die dort auf die Tasten programmierten Paletten über das Fenster Groups and Palettes erreichen, siehe Compatibility windows -- Die Kompatibilitäts-Fenster.
Paletten beschriften und bemalen
Für jede Palette lässt sich eine Beschriftung vergeben, die auf der Paletten-Schaltfläche angezeigt wird.
- Drücken Sie im Hauptmenü Set Legend.
- Klicken Sie auf die zu ändernde Palette.
- Geben Sie die Bezeichnung mit der Tastatur ein.
- Schließen Sie die Eingabe mit Enter ab.
Auf den Schaltflächen wird die Palettennummer oben links angezeigt. Die enthaltenen Attribute (IPCGBES) werden unter der Beschriftung eingeblendet, etwa ein P für Positions-Paletten. In der oberen rechten Ecke steht ein G für eine globale, ein N für eine normale bzw. ein S für eine Shared (gemeinsam genutzte) Palette.
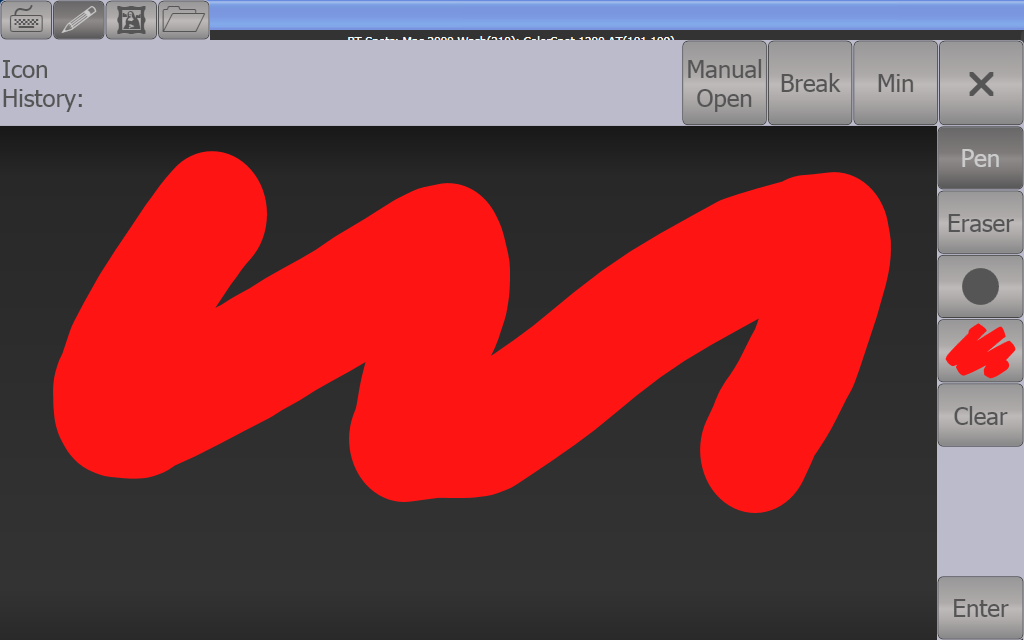
Ebenso lassen sich Paletten bemalen, um etwa auf einen Blick die Farbe oder das Gobo zu erkennen. Drücken Sie dazu wiederum Set Legend, wählen die Palette aus, und wählen dann Picture - daraufhin öffnet sich der Picture-Editor:

Oben links gibt es Reiter für die Bildschirmtastatur (damit wird aus der Bemalung wieder eine Beschriftung), zum freien Zeichnen, für die Bilder-Bibliothek sowie zum Laden einer separaten Datei. Im Zeichenfeld hat man rechts Werkzeuge zur Auswahl von Stift oder Radierer, für die Strichstärke und die Auswahl der Farbe. Clear löscht die ganze Zeichnung, Enter schließt den Zeichenvorgang ab und übernimmt das Bild. Mit Min/Max oben rechts lässt sich der Editor verkleinern oder vergrößern.
Bei Auswahl der Bibliothek kann man ein Bild aus einer großen Zahl vorgefertigter Zeichnungen verwenden. Die Vorlagen sind in verschiedene Kategorien (links) eingeteilt.
![]()
Erstellen einer Effekt-Palette
Paletten mit Shapes oder Pixelmapper-Effekten können sehr praktisch sein. (Keyframe-Shapes können allerdings nicht in Paletten gespeichert werden).
Dabei empfiehlt es sich, selektiv so vorzugehen, dass die Palette ausschließlich Effekt-Informationen enthält; so wird dann z.B. eine Palette mit einem Circle-Effekt die Geräte sich um den gerade aktuellen Pan/Tilt-Wert bewegen lassen. Dazu nutzen Sie entweder die Maskierung des FX-Attributs, oder Sie achten darauf, beim Speichern der Palette keine anderen Attributwerte in den Programmierspeicher zu schreiben.
- Drücken Sie Clear, wählen Sie einige Geräte aus, und drücken SieLocate. *Sie können auch deren Position verändern, um das Ergebnis besser zu sehen*.
- Drücken Sie Shapes and Effects, dann Shape Generator, und starten Sie einen Shape. Siehe Shape Generator zum Erstellen von Shapes.
- Ändern Sie die Parameter des Shapes nach Belieben.
- Drücken Sie , dann Palette (Quick Record funktioniert nicht bei Shape-Paletten).
- Haben Sie in Schritt 1 die Position oder weitere Attribute verändert, so drücken Sie Set Mask und deaktivieren alles außer FX.
- Klicken Sie auf eine Palettenschaltfläche, um die Palette zu speichern.
Effekt-Paletten lassen sich nicht als Quick Palette verwenden. Es müssen immer Fixtures angewählt sein, um eine Effekt-Palette anzuwenden.
Erstellen einer Palette mit Zeiten
Es lassen sich Paletten erstellen, die ausschließlich Zeiten, aber keine Werte enthalten. Dies ist sinnvoll beim Speichern von Cues oder bei Zeiten für einzelne Attribute, um die Zeit nicht jedes Mal neu eingeben zu müssen. Auch für Zeiten gilt, dass Paletten beim Speichern als Referenz abgelegt werden: wird später die Zeit in der Palette geändert, so wirkt sich das auf alle damit erstellten Cues aus.
- Drücken Sie Clear, wählen Sie einige Geräte aus, und drücken SieLocate. *Sie können auch deren Position verändern, um das Ergebnis besser sehen zu können*.
- Drücken Sie TIME (auf früheren Pulten SET (Mobile/Sapphire) bzw. Next Time (Expert/Tiger)).
- Setzen Sie die Fadezeit auf 2 s. Damit wird dies als globale Fadezeit in den Programmierspeicher geschrieben.
- Drücken Sie , dann Palette.
- Haben Sie in Schritt 1 die Position oder weitere Attribute verändert, so drücken Sie Set Mask und deaktivieren alles außer Time.
- Klicken Sie auf eine Palettenschaltfläche, um die Palette zu speichern.