Das Patch ändern
Die Patch-Ansicht (Patch View)
Mit der Patch-Ansicht hat man einen kompletten Überblick über die aktuelle gepatchten Geräte; ebenso kann man diese dort parken, umpatchen, invertieren, austauschen und bezeichnen. Müssen mehrere Geräte auf einmal geändert, etwa umadressiert, werden, so ist dies in der Patch-Ansicht besonders einfach zu realisieren.
Zum Öffnen der Patch-Ansicht wählen Sie Open/View, dann Patch, oder drücken Sie zweimal auf Open/View und wählen das Fenster Patch View.
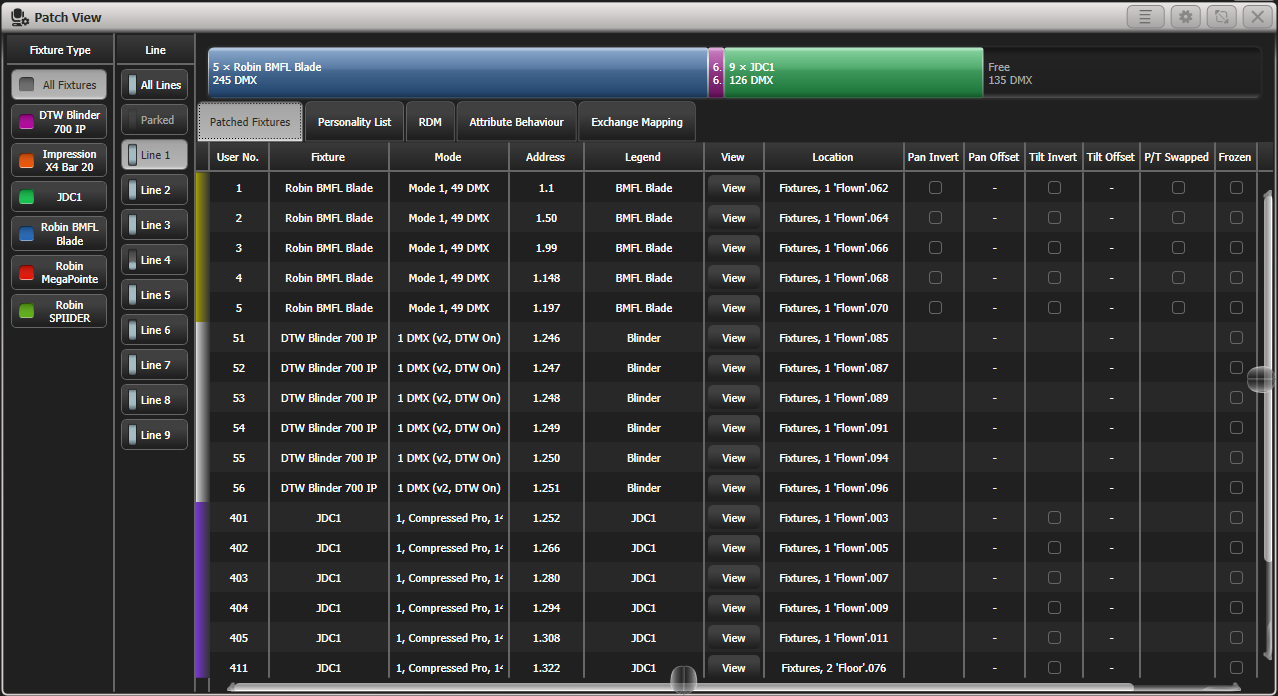
In der Spalte Fixture Type sind die verschiedenen Gerätetypen aufgelistet; dabei hat jeder Typ eine andere Farbe. Beim Klick auf diese Buttons werden nur Geräte dieses Typs angezeigt.
Line: die verfügbaren DMX-Linien. Die Balkenanzeige zeigt die Auslastung der einzelnen Linien an. Klickt man auf die jeweilige Schaltfläche, werden Details der Linien angezeigt.
Der farbige Balken oben zeigt, wie die einzelnen Gerätetypen auf der aktuell ausgewählten Linie verteilt sind. Klickt man auf einen Bereich, so werden die betreffenden Geräte unten ausgewählt.
In der Tabelle werden Details der ausgewählten Geräte angezeigt; einige Parameter sind direkt in der Tabelle durch Anklicken änderbar; weitere Möglichkeiten ergeben sich durch die Multifunktionstasten.
Es lassen sich für mehrere Geräte gleichzeitig Änderungen vornehmen, indem man in der Tabelle den entsprechenden Bereich auswählt, oder indem man auf einer optionalen Tastatur Strg gedrückt hält und die einzelnen Geräte anklickt. Nehmen Sie dann die Änderungen mit den Multifunktionstasten vor und drücken Sie den Button Set oder die Enter-Taste.
Zur besseren Übersicht lassen sich einzelne Tabellenspalten ausblenden. Dazu dient der Eintrag Choose Columns aus dem Kontextmenü. Daraufhin lassen sich einzelne Spalten aus- und wieder einblenden.
Einzelnen Geräten lassen sich Notizen hinzufügen. Dazu klicken Sie auf die Zelle 'Notes' und geben den Text mit der Tastatur ein.
Die Reiter am oberen Rand schalten die Anzeige wie folgt um: Personality List listet alle im Pult vorhandenen Personalities auf; RDM erlaubt die Anzeige und das Patchen von Geräten via RDM; Attribute Behaviour gestattet es, Attribute zu fixieren, zu invertieren, zu limitieren oder die Kennlinie zu verändern. Weitere Informationen dazu finden sich in im nächsten Abschnitt.
Mittels Kontext-Option können geparkte Geräte angezeigt oder ausgeblendet werden. Werden diese angezeigt, so erscheinen sie ausgegraut an der Stelle, an der sie ursprünglich eingefügt waren.
Anzeige weiterer Patch-Details
Zur Anzeige der Details einzelner Geräte drücken Sie in der Patch-Ansicht in der Tabelle auf die betreffende View-Schaltfläche, oder drücken Open/View, gefolgt von der entsprechenden Geräte-Schaltfläche. Darauf öffnet sich ein weiteres Fenster und zeigt die Patch-Details des jeweiligen Gerätes. Hier lassen sich z.B. auch einzelne Attribute invertieren oder fixieren.

Wenn die Geräte über DIP-Schalter adressiert werden, so zeigt dieses Fenster die entsprechende Schalterstellung im Reiter 'DIP-Switches'.

Weiter gibt es einen Reiter 'Personality' (ohne Abb.); auf diesem werden Details der jeweiligen Personality angezeigt. Dies ist insbesondere hilfreich für Geräte, die in verschiedenen Versionen verfügbar sind oder gepatcht werden können.
Ändern der DMX-Adresse in der Patch-Ansicht
Die Zuordnung eines Gerätes zu einer DMX-Adresse und/oder DMX-Linie kann in der Patch-Ansicht auf einfache Weise geändert werden. Wählen Sie dazu die Adress-Zellen, die Sie ändern möchten:
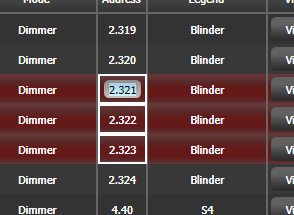
Geben Sie nun die neue Adresse des ersten ausgewählten Gerätes ein und drücken Enter. (Verwenden Sie bei der Eingabe das Format Universum.Adresse - lassen Sie Universum und den Punkt weg, so wird nur die Adresse geändert).
Alle angewählten Geräte werden daraufhin entsprechen umadressiert, wobei der jeweilige Offset (also etwaige Lücken zwischen den Adressen) erhalten bleibt.
Mit der Kontext-Funktion Swap Fixture Addresses können die Adressen mit denen bereits gepatchter Geräte vertauscht werden, wobei zwischen den Modes One for One (1:1) und Retain Layout (Layout erhalten) gewählt werden kann. Wählen Sie wie gehabt die zu ändernden Geräte, klicken auf Swap Fixture Addresses und wählen die Geräte, mit denen getauscht werden soll.\ Im Modus One to One (1:1) muss die Anzahl der zu tauschenden Geräte mit der Anzahl der Ziel-Geräte übereinstimmen, ansonsten wird eine Fehlermeldung ausgegeben. Im Modus Retain Layout (Layout erhalten) versucht die Software, durch automatisches Hinzufügen/Weglassen von Geräten die Anzahlen anzupassen. Funktioniert dies nicht, kann man mit
Cancel abbrechen oder mit Park Conflicting die Geräte, die momentan 'im Weg' sind, parken.Ändern der DMX-Adresse im Patch-Menü
Die Zuordnung eines Gerätes zu einer DMX-Adresse und/oder DMX-Linie kann auch im Patch-Menü geändert werden, wobei die Programmierung erhalten bleibt.
- Drücken Sie Patch (wenn Sie sich nicht ohnehin im Patch-Modus befinden).
- Drücken Sie Repatch Fixtures.
- Betätigen Sie die Schaltfläche des zu ändernden Gerätes.
- Zum Ändern der DMX-Adresse drücken Sie Address, geben mit den
Zifferntasten die neue Adresse ein, und drücken Enter. Falls die
neue Adresse bereits anderweitig verwendet wird, wird eine Warnung
angezeigt.
- Zum Ändern der DMX-Linie drücken Sie DMX Line=x und geben die Zahl der neuen DMX-Linie ein.
- Drücken Sie Enter oder Repatch, um die Änderungen zu bestätigen.
- Wiederholen Sie den Vorgang ab Schritt 3, um weitere Geräte zu ändern.
Sie können auch Geräte 'parken' (mit der Funktion Park). Damit wird das Gerät aus dem Patch entfernt, aber die Programmierung bleibt erhalten. Die ursprüngliche DMX-Linie und --Adresse werden gespeichert und können mit Unpark wiederhergestellt werden.
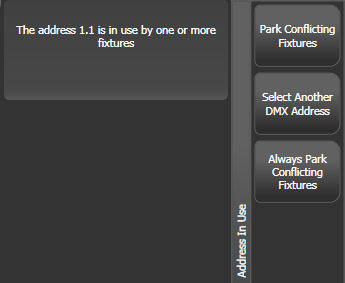
Wenn die neue DMX-Adresse bereits anderweitig in Verwendung ist, gibt das Pult eine Warnung aus (sofern das nicht in den Benutzereinstellungen deaktiviert ist,). Sie können dann entweder Select another DMX address (eine andere DMX-Adresse auswählen) anwählen, um den Vorgang abzubrechen, oder mit Park Conflicting Fixtures das Gerät zur späteren Änderung parken. Damit bleibt die existierende Programmierung erhalten, aber das Gerät muss zur weiteren Verwendung auf eine freie DMX-Adresse gepatcht werden (siehe oben).
Mit der Auswahl Always Park Conflicting Fixtures werden sämtliche Geräte mit bereits belegten DMX-Adressen automatisch geparkt, ohne eine Warnung auszugeben (kann in den Benutzereinstellungen geändert werden).
Legenden/Bezeichnungen eingeben
Jedes gepatchte Gerät lässt sich mit einer Bezeichnung versehen, die auf der entsprechenden Geräte-Auswahltaste angezeigt wird, um das Gerät später identifizieren zu können.
- Drücken Sie die Taste Legend (nur auf dem D9) oder klicken Sie im Hauptmenü Set Legend.
- Betätigen Sie die Auswahltaste des Gerätes, für das Sie eine Legende vergeben wollen.
- Geben Sie die Legende mit der (Bildschirm-)Tastatur ein.
- Klicken Sie Enter, um die Eingabe abzuschließen.
Es lässt sich auch eine Zeichnung oder ein Bild als Gerätelegende wählen.
Mehrere Geräte lassen sich mit der gleichen Bezeichnung versehen; dazu wählen Sie nach der Betätigung von Set Legend einfach mehrere Geräte aus.
Die Gerätenummer lässt sich im Menü Set Legend (Legende eingeben) mit der Menütaste User Number =... ändern. Insbesondere bei der Verwendung der numerischen Geräteauswahl ist es sinnvoll, die Gerätenummern systematisch zu vergeben.
Mehreren ausgewählten Geräten lassen sich automatisch Gerätenummern (User Numbers) zuordnen, indem man alle Geräte auswählt und mit dem o.g. Menü eine Nummer eingibt. Dem ersten Gerät der Gruppe wird die eingegebene Nummer zugeordnet, und alle weiteren fortlaufend werden nummeriert.
Ebenso lässt sich eine Bezeichnung für die aktuelle Seite im Geräte-Auswahlfenster vergeben. Dazu wählen Sie Set Legend aus dem Hauptmenü, dann Page Legends, dann die zu ändernde Seite (wenn die Seiten nicht angezeigt werden, können Sie das im Kontextmenü durch einen Klick auf Pages Hide aktivieren). Die vergebene Bezeichnung wird auf der Auswahltaste für die Seite sowie im HUD angezeigt.
Halo für Fixture-Buttons
Für Fixture-Buttons (Geräte-Schaltflächen) kann ein Halo, also ein farbiger Rand, eingerichtet werden, um diese noch übersichtlicher darzustellen. Als Vorgabewert kann man den Halo manuell einstellen. Alternativ kann der Halo automatisch die Farbe annehmen, die im Patch-Fenster verwendet wird.
Um den Halo manuell einzustellen, drücken Sie die Taste Legend (nur auf dem D9) bzw. klicken Sie auf Set Legend, wählen das/die Fixture(s) aus und klicken auf die Option Halo. Darauf öffnet sich ein Colourpicker, um die Farbe auszuwählen. Mittels System Colours hat man Zugriff auf vordefinierte Farben, und mit Remove Halo lässt sich der farbige Rand wieder entfernen.
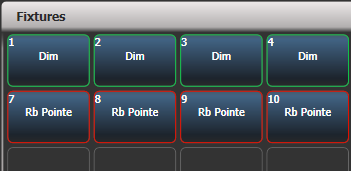
Zum Aktivieren der automatischen Halo-Farben halten Sie die
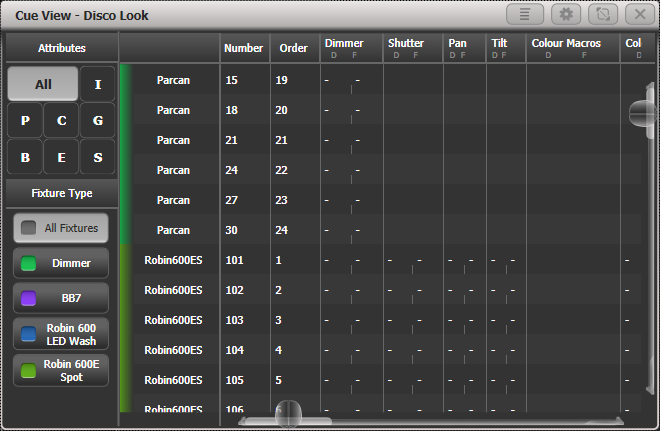
Avo-Taste gedrückt und wählen User Settings (Benutzereinst.), dann Handles, und ändern schließlich die Einstellung für Fixture-Halos (Geräte-Halos) auf Auto. Daraufhin wird automatisch der Halo in der gleichen Farbe dargestellt, die auch im Fixtures-Fenster verwendet wird.Diese Geräte-Halos werden auch in der Intensity-Ansicht und in der Show-Library verwendet. In Listen-Ansichten wie dem DMX-Fenster, dem Channel Grid, der Cue- oder der Paletten-Ansicht werden diese Farben für die Filter links im Fenster verwendet. Ist eine Farbe manuell definiert, wird diese dargestellt, anderenfalls die automatische. Die o.g. Benutzereinstellung ist für diese Listendarstellung ohne Belang.
Das Fenster 'DMX View'
Insbesondere zur Fehlersuche empfiehlt es sich, die tatsächlich vom Pult gesendeten DMX-Werte zu überprüfen. Dazu gibt es ein gesondertes Fenster: drücken Sie zweimal auf open/View und wählen DMX.
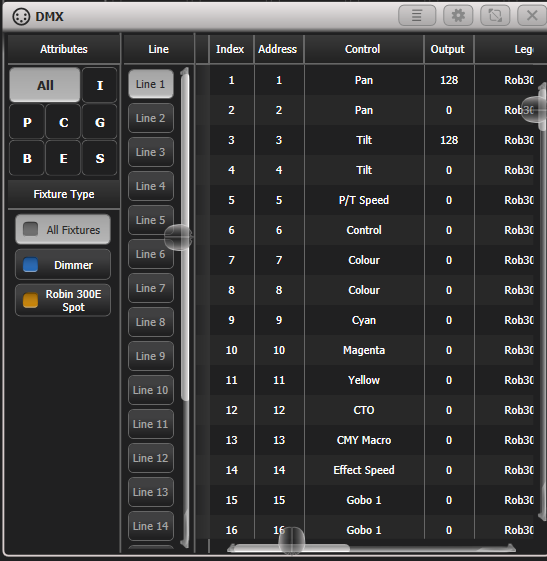
Mit den Schaltflächen in der linken Spalte lässt sich die Anzeige nach Attributen und Gerätetypen filtern sowie das anzuzeigende DMX-Universum wählen. Durch Scrollen nach rechts lassen sich weitere Informationen pro Kanal anzeigen.
Geräte austauschen
Die Funktion 'Fixture Exchange' (Geräteaustausch) erlaubt es, in einer bestehenden Show Geräte mit anderen Modellen zu ersetzen und dabei wesentliche Elemente der Programmierung (z.B. Zeiten, Bewegungsabläufe und Legenden) zu erhalten. Dies ist zweckmäßig etwa auf Tourneen oder in Hallen mit häufig wechselnden Veranstaltungen.
Der Austausch von Geräten funktioniert am besten, wenn die Programmierung über Paletten erfolgte. Damit müssen verbleibende kleinere Abweichungen nur in ein paar wenigen Paletten, statt in einer Vielzahl von einzelnen Cues vorgenommen werden. Cues mit absoluten Werten dagegen müssen neu programmiert werden, vorzugsweise unter Verwendung von Paletten.
Die Kanäle Pan, Tilt und Dimmer werden immer von einem Gerät auf das andere übernommen. Für andere Attribute versucht das Pult, eine sinnvolle Zuordnung zu erreichen, die per Exchange Mapping (siehe nächster Abschnitt) editiert werden kann. Alle anderen programmierten Dinge - Zeiten, Effekte, Paletten etc. - werden übernommen, so dass man mittels Aktualisieren der Paletten schnell die Show anpassen kann.
Der Geräteaustausch eröffnet ferner einen interessanten Weg, neue Geräte in bereits bestehenden Shows zu verwenden, was zu einer nicht unerheblichen Zeitersparnis führen kann.
- Es empfiehlt sich eine Sicherung der Show vor größeren Änderungen (wie dem Geräteaustausch). Sollte man sich doch anders entscheiden, oder kommt es zu Problemen, so lassen sich mit einer Sicherung alle Änderungen rückgängig machen.
- Drücken Sie Patch, um in den Patch-Modus zu gelangen.
- Wählen Sie das neue Gerät aus, das Sie verwenden möchten.
- Betätigen Sie die Auswahltaste des Gerätes, welches ersetzt werden soll.
- Das Pult zeigt eine Warnung, dass das Gerät in Gebrauch ist. Wählen Sie die Option Exchange Fixture.
- Wiederholen Sie die Schritte 3 und 4 für weitere Geräte, die Sie mit dem ausgewählten Typ ersetzen möchten.
Nach dem Austausch von Geräten müssen die von diesen verwendeten Paletten aktualisiert werden. Ist das Deaktivieren einzelner Werte in der Palette nicht möglich, empfiehlt es sich, aktuelle Werte für alle Attribute der betreffenden Attribut-Gruppe einzustellen und die Palette neu abzuspeichern. Nun können einzelne Attribut-Gruppen deaktiviert werden.
Exchange Mapping
Werden Geräte ausgetauscht, so werden durch das Pult die Funktionen der alten Geräte auf die der neuen Geräte soweit wie möglich abgebildet, um möglichst das gleiche Ergebnis zu erzielen.
Dennoch ist es möglich, dass das nicht perfekt funktioniert. In diesem Fall ist es möglich, mit Exchange Mapping die Zuordnung zwischen alten und neuen Funktionsbereichen zu bearbeiten. So lassen sich z.B. Gobos der alten Geräte durch Gobos der neuen Geräte ersetzen, auch wenn das gewünschte Gobo auf einer anderen Position des Goborades sitzt. Ebenso lässt sich z.B. die Geschwindigkeit der Goborotation so anpassen, dass die bisherigen Cues weitestgehend identisch funktionieren.
Alle Änderungen wirken sofort auf die Show. Diese Mappings werden gespeichert und können auch künftig verwendet werden. Natürlich kann man mit dem Button Clear All Mappings auch wieder zu den Werkseinstellungen zurückkehren.

Das Mapping wird wie folgt eingerichtet:
- Drücken Sie Open/View, dann Patch, um die Patch-Ansicht zu öffnen.
- Wählen Sie den Reiter „Exchange Mapping".
- In der ganz linken Spalte wählen Sie den zu bearbeitenden Gerätetyp.
- Im Hauptfenster befinden sich nun links die Funktionen und Attribute der alten und rechts die der neuen Geräte. Mit der Option Sort lässt sich die Sortierung zwischen alphabetisch und nach DMX-Kanal umschalten.
- Wählen Sie ein Attribut aus, um dessen Mapping zu bearbeiten. Das gewählte Attribut wird nun bei beiden Geräten hellblau markiert. Braun markierte Einträge sind gar nicht zugeordnet, etwa weil das andere Gerät eine entsprechende Funktion nicht hat. In der Fenstermitte werden die jeweils vorhandenen Attributfunktionen angezeigt, farbige Linien zeigen die vorhandene Zuordnung.
- Um eine Funktion neu zu mappen/zuzuweisen, klicken Sie auf die entsprechende Funktion des alten Gerätes, dann auf die gewünschte Funktion des neuen Geräts. Vorherige Zuweisungen werden dabei gelöscht. Es lassen sich mehrere alte einer einzigen neuen Funktion zuweisen.
- Um eine Zuweisung zu löschen, doppelklicken Sie (links) auf die Funktion des alten Gerätes. Bestehen mehrere Zuweisungen, so doppelklicken Sie (rechts) auf die Funktion des neuen Geräts.
- Um eine Zuweisung zu ändern, klicken Sie (rechts) auf die bisher zugeordnete Funktion des neuen Geräts, dann (rechts) auf die neu gewünschte Funktion.
Wurden mehrere alte Gerätetypen durch den gleichen neuen Typ ersetzt, so können Sie ganz links in der Spalte 'Exchanged From' nach Originaltyp umschalten.
Wird das Mapping geändert, so erscheint am unteren Bildschirmrand die Anzeige 'Unsaved Changes' (ungesicherte Änderungen). Hier können Sie mit Apply die Änderungen speichern und übernehmen, mit Cancel die Bearbeitung abbrechen oder mit Reset die Werkseinstellungen wiederherstellen. Alle diese Befehle müssen mit Confirm bestätigt werden.
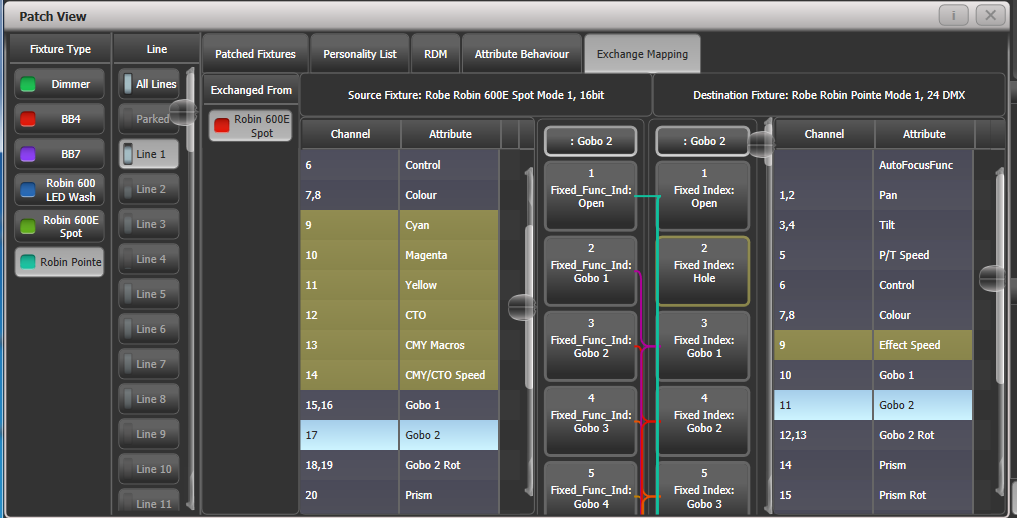
Range mapping -- Zuweisen von Bereichen
Umfasst die neue Funktion einen ganzen Bereich, z.B. 0...100%, so lässt sich ein bestimmter Bereich daraus auswählen, auf den das Mapping erfolgen soll.
Sind mehrere Funktionen des alten Gerätes auf einen neuen Bereich zugewiesen, so werden dort mehrere 'Ziel'-Schaltflächen eingeblendet, so dass man für jede Ausgangsfunktion den Zielbereich einzeln festlegen kann.
Um diese Festlegung zu treffen, wählen Sie zunächst den entsprechenden Ziel-Bereich. Klicken Sie dann unten auf Edit Ranges und wählen die Funktion aus, die Sie bearbeiten möchten. (Es lassen sich nur bereits erfolgte Zuweisungen bearbeiten; nicht gemappte Funktionen werden ausgegraut dargestellt). Es lassen sich nun die Unter- und Obergrenzen des Ziel-Bereiches mit den Encodern, mit den Rad-Schaltflächen oder - numerisch - mit den entsprechenden Funktionstasten einstellen.
Sind die gewünschten Einstellungen erfolgt, so klicken Sie auf Apply, dann auf Confirm. Mit Cancel und Confirm dagegen werden die Änderungen verworfen.
Bereits gepatchte Personalities aktualisieren
Mit dieser Funktion lassen sich die Personalities der in der Show verwendeten Geräte aktualisieren. Normalerweise sind Kopien der Personalities mit in der Show-Datei gespeichert, so dass beim Aktualisieren der Personality-Bibliothek des Pultes bereits gepatchte Geräte nicht verändert werden.
- Es empfiehlt sich, vor dem Aktualisieren der Personalities eine Sicherung der Show vorzunehmen. Sollte man sich doch anders entscheiden, oder es kommt zu Problemen, so lassen sich mit einer Sicherung alle Änderungen rückgängig machen.
- Installieren Sie die neueste Personality-Library auf dem Pult bzw. dem Computer (siehe Aktualisieren der Personality-Bibliothek des Pultes)
- Drücken Sie Patch, um in den Patch-Modus zu gelangen.
- Drücken Sie Edit Fixtures.
- Drücken Sie Update Personality.
- Titan zeigt alle Gerätetypen, die in der Show gespeichert sind und für die Updates in der installierten Gerätebibliothek vorliegen. Wählen Sie den oder die Typen, die Sie aktualisieren wollen, oder klicken Sie auf Update All, um alle Gerätetypen zu aktualisieren.
- Sollen viele Geräte aktualisiert/geupdatet werden, so kann das eventuell einige Sekunden dauern.