Pearl Expert and Touch Wing

The Pearl Expert has four main control areas:
A The Master faders set overall levels on the console
B The Preset faders/handles select and control individual fixtures (and you can store cues and chases here too)
C The Playback faders and rollers select and control cues and programs
D The Programming and setup controls configure and program the console
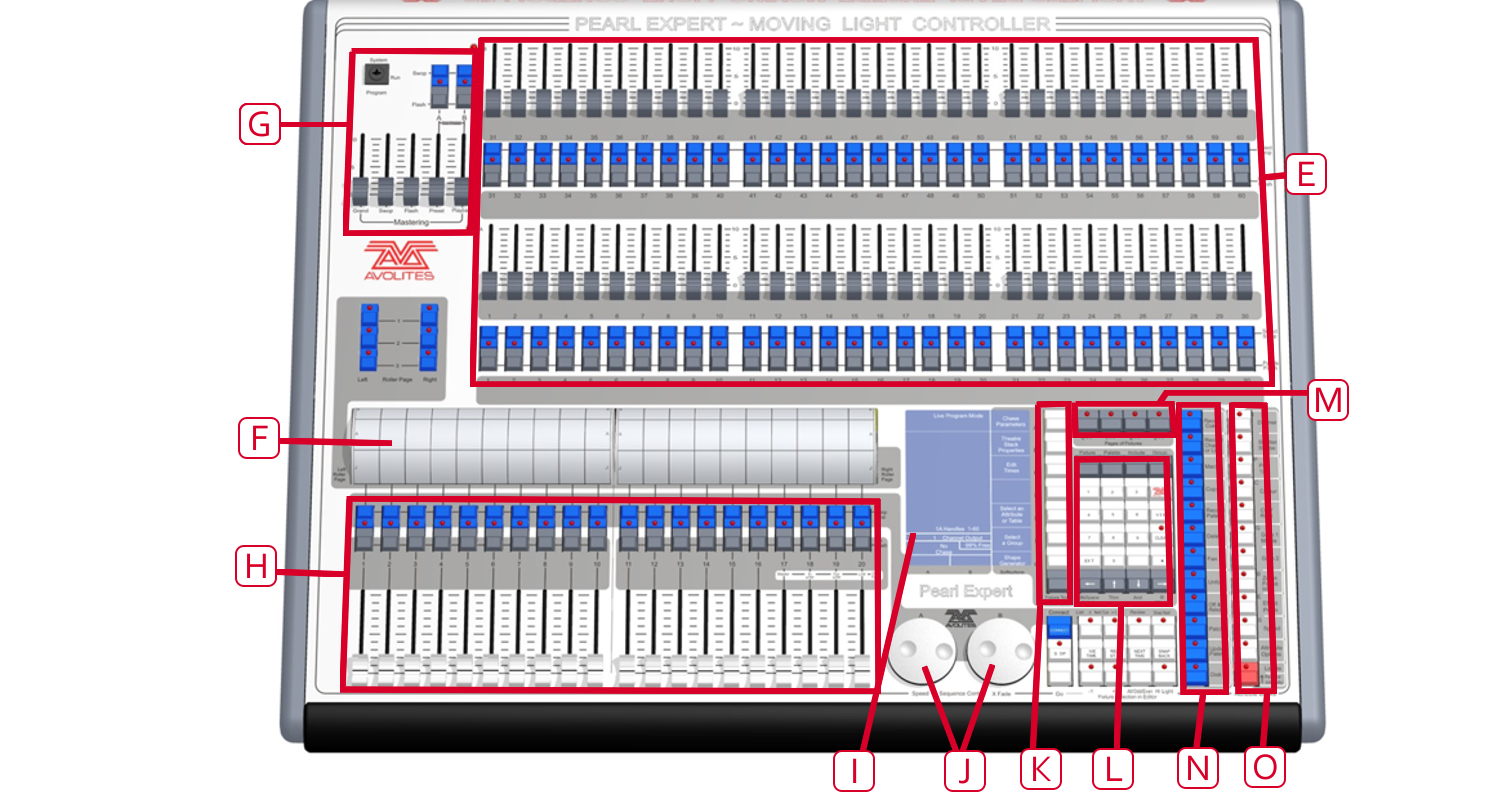
The Main Controls
E The Preset Faders are used to control individual dimmer channels and fixture intensities. Cues and chases can also be stored on these faders. The 2 buttons below the faders are used to select and flash whatever is stored on the fader. Each fader and buttons is called a \'Handle\'.
F The Page select rollers let you select different pages of playbacks, and you can write the playback names on the rollers so you know what's in them. There are 2 rollers each controlling 10 playback faders
G The Master faders control the overall output of the various parts of the console. You will normally have these set at Full.
H The Playback faders and flash buttons are used to play back cues or chases you have programmed, when you are running a show.
I The Main display is the nerve centre of the console and shows you what is going on. The display can show various screens of information.
J The Control wheels are used to set control values on the fixtures, and to set chase speeds and fades.
K The Menu softkeys (labelled A -- G) are used to select control options. The display next to the buttons shows what each one will do. The options for each key change depending on what the console is doing. Softkey commands are shown in the manual like this:Edit Times
L The Numeric keypad and other control buttons are used to enter values and change controls on the console.
M The Fixture Page buttons are above the keypad, and allow selection of 4 pages for the Preset Faders.
N The blue Command buttons are used to carry out functions such as storing cues, copying, saving to disk, etc. These buttons have lights on to indicate when they are active.
O The Attribute select buttons are used to select which attributes of a fixture (e.g. colour, gobo, pan, focus) are going to be controlled using the Control wheels. The buttons have lights on to show you which attributes are active. The bottom (red) button allows you to locate fixtures, which sets them to a known start position while programming.
The main Power switch is on the front of the console to the left.
A QWERTY keyboard and mouse touchpad is provided in a drawer on the front of the console.
The Back Panel

All the connections required for the console are found on the back panel. Most are self-explanatory.
P Four DMX outputs are provided on XLR. MIDI in and out is provided.
Q The Panel reset switch may be pressed to restart the front panel electronics if something odd happens with the switches and faders. The main board will continue running but the DMX output will be interrupted until the restart is completed.
R The USB reserve sockets and switches are for future expansion. The switches should be set to \'Normal operation\'.
S The power switch on the rear panel is to isolate the power supply, do not switch the console off using this switch. The switch on the front edge of the console should be used to start it up and shut it down properly. ## The Pearl Expert Touch Wing
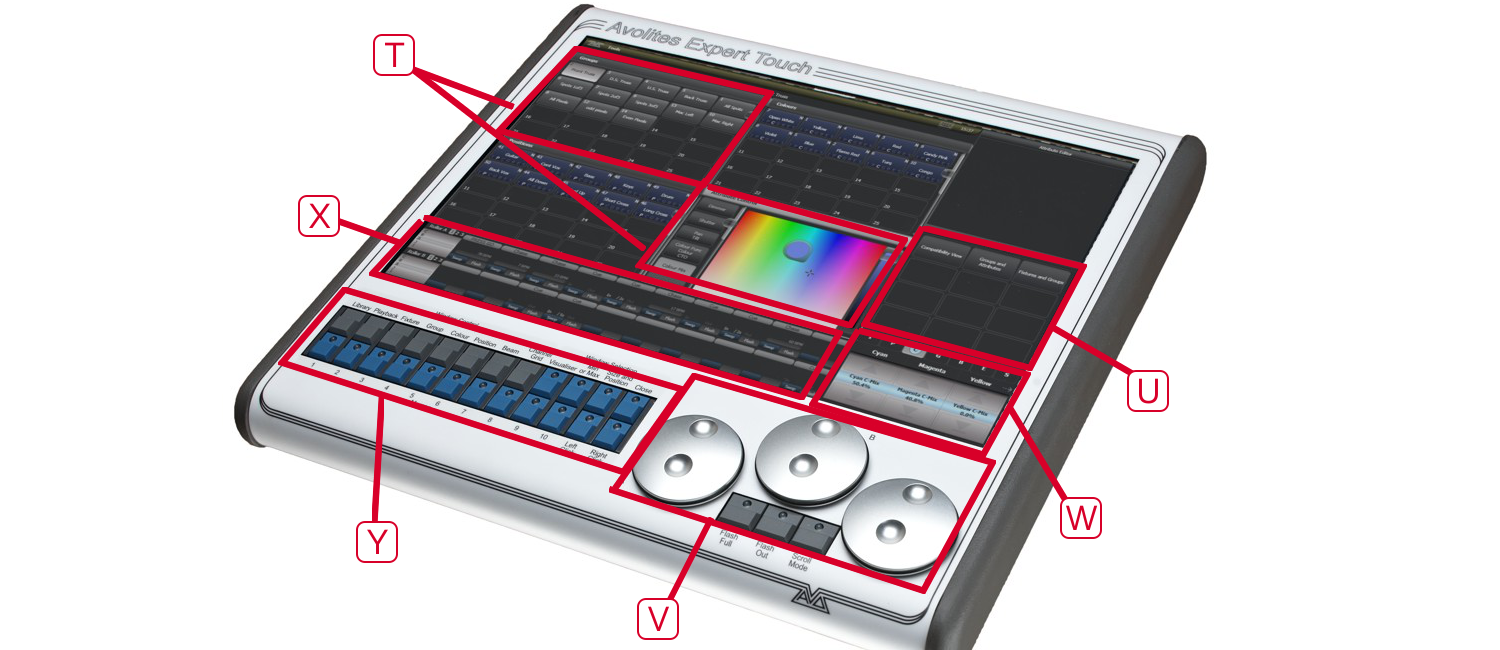
The optional Pearl Expert Touch Wing uses a touch screen and additional wheels to provide the standard Titan interface for selecting fixtures, palettes, groups and setting attributes. It can only be used with the Pearl Expert and connects to the DVI port and the 9-pin D connector on the rear of the console, just above the panel with the rear USB/network sockets.
T The main area of the Touch Wing shows up to 4 workspace windows. You can select the content and configure the size and layout of these windows using the Window Selection and Size/Position buttons below the screen.
U The arrangement of windows can be saved and recalled using the Workspaces touch buttons on the right of the screen.
Some windows have additional command buttons which are displayed in the Context touch buttons area on the top right of the screen when the window is active.
V The three Attribute Wheels take over attribute control from the wheels on the console, which are then used for speed/fade control of chases. Below the wheels the Scroll Mode Button to switch the wheels into scroll mode - this is used to move a selection box around the screen when editing.
W The Attribute Display shows which attributes are being controlled by the wheels, and the current settings. Touching the roller graphic will set the attributes to min or max.
Across the bottom of the screen there is an area showing information about the playbacks on the current roller pages.