Using the Select Buttons and Wheels
Selecting Fixtures and Dimmers for Control
To select the fixtures or dimmer channels that you want to control, you use the Fixture Select buttons to select the fixtures into the Editor. You can select fixtures or dimmers individually, or several at once. You can also use Groups to select multiple fixtures.
If the fixture is patched on a fader handle, press the blue button to select the fixture.
Press the Select buttons for the fixtures you want. Touch buttons will light up pale blue when selected, physical buttons will light brightly.
To select a range of fixtures, slide your finger across the touch buttons to draw a selection box. For fixtures patched on faders, hold down the Select button for the first fixture then press the Select button for the last fixture.
Here are some other useful things to know:
Press Locate to light up the selected fixtures in open white and move them to a central position. Locate options are described in detail in the next section.
You can deselect a fixture by pressing the select button again.
In the top bar of the screen, the console will show you which fixtures are currently selected.
Press Clear (right of numeric keys) to deselect all fixtures and remove all changes from the programmer. See the next section for more Clear options.
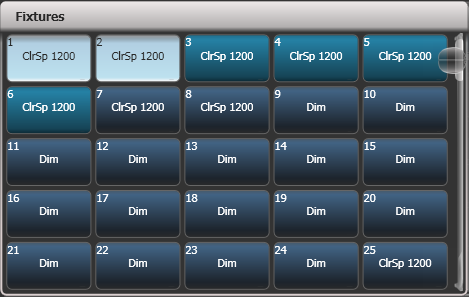
Once you have changed any attribute, pressing a Select button will deselect all fixtures and start the selection process again. All previously selected fixtures (since you last pressed Clear) stay in the programmer. Once a fixture has been edited, Fixture buttons show a darker blue. The picture above shows the first two fixtures selected, with the second three in the programmer and the others unselected.
You can select fixtures on another page by touching one of the page buttons to the left of the fixture buttons, if you have \'Pages\' set to Show (using the context button). Otherwise you can use the scroll slider to show more buttons. On fader handles, Page buttons are provided to change pages -- on the Pearl Expert these are above the numeric keypad, on other consoles they are next to the faders.
Using Key Profiles you can set the fixture touch button to latch mode so that it turns the fixture's dimmer channel on (like putting a preset fader to full).
Setting Fixtures to a Start Position (Locate)
The Locate button is used to put the fixture into a known position with light coming out, so that you can start programming it.
A quick press of the button will move all selected fixtures to a central position and reset all the attributes so that you get a white light. However you sometimes might not want to move the fixture, or may want to keep some other attributes unchanged. By holding down the Locate button rather than a quick press, you get some more options
You can mask off some of the Locate settings (such as only turning the fixture on, but not changing its position or colour) by holding down Locate and pressing Set Mask to Exclude All. Then (still holding Locate) turn on the Attributes you want to change using the Attribute buttons. Only the lit attributes will be changed by Locate. Pressing the Options/Attribute Options button will clear the mask.
Option Auto Reset Mask sets the mask to be automatically reset to include everything each time Locate is pressed, or you can toggle the option to Remember Mask which will keep the mask setting you used last time.
Option Clear/Don't Clear Located Attributes sets whether the attributes changed by the Locate function will be saved into any cues you store. If the option is set to "Clear" then the Located attributes will not be stored in the Programmer unless you modify them using the wheels. This is useful if for example you want to program a cue which sets the position of fixtures, but does not turn them on. The Locate button will light up the fixtures for programming, but the lit state will not be stored in any cues you save.
To quickly locate without changing pan/tilt, hold Locate and press the Pan/Tilt (or Position) button, then release Locate.
To quickly locate pan/tilt only, hold Locate, press Options (Attribute Options on some consoles), then press Position (Pan/Tilt on some consoles), then release Locate.
Changing the Locate State
You can change the default locate state of each fixture in a show by recording a new Locate State. This can be shared (you set the values for one fixture, and then it applies to all fixtures of the same type) or individual (you can set different values for each individual fixture). To store, set up the desired locate state on the fixture(s) you want to change, then press , then Locate. Select Shared or
Individual from the softkeys. Press or Locate a second time to confirm.Clearing Selection
The Clear button (on the right of the numeric keypad) is used to remove all changes from the Programmer and deselect all fixtures. A quick press of the Clear button just clears everything, however if you hold down the Clear button, then more options are available.
You can mask which attributes are to be cleared (for example, leaving the pan/tilt in the programmer but clearing everything else) by holding down Clear and pressing Set Mask to Clear Nothing. Then (still holding Clear) turn on the Attributes you want to change using the Attribute Bank buttons down the right hand side, or press Set Mask and use the softkeys. Only the lit attributes will be cleared. Pressing the Options/Attribute Options button will clear the mask. The Time mask option allows you to clear or retain the fade/delay times in the programmer for all attributes (clearing individual attributes will also clear times for that attribute, for example setting a P mask will clear position times).
Hold Clear and press All to deselect all fixtures, but leave the changes in the programmer.
- Clear Options opens a submenu showing some further options (described below).
- Clear All Fixtures/Selected Fixtures sets whether all fixtures will be cleared from the programmer, or if only currently selected fixtures will be cleared. This is useful if you want to clear specific fixtures.
- Individual Attributes allows you to clear individual attributes from the Programmer. When you press the softkey, you are given a list of attributes in the Programmer -- press the appropriate softkey to clear that attribute.
- Clear All Programmers will clear all programmers that are currently active on the console, including Multi-user programmers from other users, and the Titan Remote programmer.
The options in the "Clear Options" submenu are:
- Auto Reset Mask sets the mask to be automatically reset to clear everything each time Clear is pressed, or you can toggle the option to Remember Mask which will keep the mask setting you used last time.
Leave/Zero Preset Fader Levels is used to set whether latched fixtures are cleared (the fixture key profile can be set to "Latch" mode, which turns on the fixture dimmer channel when the fixture button is touched.)
- Freeze current values sets what happens to LTP (non-intensity) channels you have modified. If set to Freeze Current Values the channels remain as you set them. If set to Release To Playback Values the channels will go back to how they are set in the current playback. For example: you have an active playback making some lights green, then you select the lights and change them to red. If you press Clear with this option set to Freeze then the lights remain red. If the option is Release the lights will go back to green.
- Clear/Maintain Cue Times - determines whether or not to clear the cue time information from the programmer (this will not affect fixture attribute times in the programmer).
You can use the Channel Grid window to selectively view and remove attributes from fixtures.
If you type a number then press Clear, HTP values in the programmer will fade out over that time, for example 5 Clear would fade over 5 seconds. This can be very useful if you are trying to be subtle when making changes during a show.
Fixtures with Multiple Cells/Sub-Fixtures
If a fixture has multiple cells of control (for example an RGB LED batten) and its personality supports it, you can select and control the fixture either as a whole or as independent cells. This is particularly useful when using Shapes or the Pixel Mapper.
If you select the fixture using the handle it is patched on, all cells of the fixture will be controlled together.
You can use the buttons which appear at the top of the attribute editor window to select the main fixture, or individual cells for control (use the Open Workspace Window softkey to open the Attribute Editor window).
You can also use Unfold to expand the cells onto individual select buttons. In the Fixtures workspace, the current page of fixtures will be replaced by select buttons for each individual fixture cell. On fader handles, the unfolded fixture cells will start at handle 1.
There are two ways to unfold fixture cells:
Press Unfold then select range of fixtures. The cells will immediately appear on the handles.
Select fixtures, press Unfold, then press Selected Fixtures. This method allows for non-consecutive fixtures to be unfolded.
To go back to normal, press Unfold then Exit Unfold.
You can also use the numeric keypad to quickly select cells. The syntax is as follows: (THRO is called Through on some consoles)
. all sub-fixtures of selection
n. all sub-fixtures of fixture n
. THRO .j sub-fixtures 1 - j of all selected fixtures
n. THRO all sub-fixtures of fixture n - last consecutive of type
n THRO .j shorthand for above
n. THRO i sub-fixtures 1 - i of fixture n
.m sub-fixture m of all selected fixtures
n. THRO i.j sub-fixtures 1 - j of fixtures n - i
.m THRO sub-fixtures m - last of all selected fixtures
n.m sub-fixture m of fixture n
.m THRO .j sub-fixtures m - j of all selected fixtures
n.m THRO sub-fixtures m - last of fixture n
.m THRO j shorthand for above
n.m THRO i sub-fixtures m - i of fixture n
n THRO i. all sub-fixtures of fixtures n - i
n.m THRO i. sub-fixture m - last of fixtures n - i
n THRO i.j sub-fixture j of fixtures n - i
n.m THRO i.j sub-fixtures m - j of fixtures n - i
n THRO .j sub-fixture 1 - j of fixture n
n.m THRO .j sub-fixtures m - j of fixture n
- Fixture cell selection can be saved as a group, this provides a quick way to select cells / sub-fixtures without having to use the Attribute Editor or Unfold.
Changing Attributes Using The Wheels
"Attributes" are the functions of the fixture, like pan, tilt, colour, dimmer, etc. You select which attributes you want to modify using the Attribute Bank buttons and set values using the wheels. The attributes available depend on the fixture type. Dimmer channels only have a dimmer attribute.
You can also select attributes by touching the IPCGBES buttons on the touch screen, and modify them using the Attribute Editor workspace window.
On the Pearl Expert the wheels on the Touch Wing are used instead of the wheels on the console, unless you change this using the User Settings.
Each attribute button controls several attributes, one on each wheel. On Sapphire Touch the trackball always controls pan/tilt of the selected fixtures, with the ring controlling fine tilt.
With some fixtures selected, press the button for the attribute to be changed
Turn the wheels to set the attribute. The display above the wheels shows which attributes are being controlled, and the settings which are available scroll up and down as you turn the wheels.
You can also touch the roller image on the screen to change the attributes up or down by one. For continuously variable controls like a dimmer, touching the roller will set the attribute to full or zero.

- Repeat from 1 to change other attributes of the selected fixtures.
Some other things to know about attributes:
If an attribute is in the programmer, it is highlighted (as shown with the "Green" setting in the screen picture above). This provides a quick way to see which attributes are in the programmer.
You can also select the attribute to be changed from the softkeys by pressing the "Attribute Options" button.
If the display above the wheels does not show the attribute when you press the button, that attribute is not available on the selected fixtures.
If the wheel display shows a small arrow next to the legends, this means that there are further attributes to control. Press the Attribute button again to toggle through the attributes.
The wheels operate in an "acceleration" mode. If you spin the wheel fast, the fixture changes in larger steps. If you move the wheel slowly, the fixture moves in its smallest increment.
Holding down the Avo button while turning a wheel puts the wheel into "Fast" mode. When in this mode, a single rotation of the wheel changes the attribute you are controlling over its full range. For example, if while moving the Pan wheel you hold down Avo the fixture will make a complete pan movement between end stops in one rotation of the wheel.
Some LED colour mixing fixtures have a Virtual Dimmer function (using the Intensity wheel) which offers intensity control by mastering the RGB levels when the fixture itself does not provide an intensity channel.
Attribute Wheel Display
The touch display above the wheels shows the attribute bank (Intensity, Position, Colour and so on) and the current values on the wheels.
Touch the IPCGBESFX attribute bank buttons to change to a different bank. You can also use the physical attribute bank buttons as usual. The current attribute bank is shown with a grey background.
If attributes have been modified, the attribute button has a pale blue highlight.
The Roller display shows the attributes available on each wheel. These may be shown as a percentage value, or named values for attributes with fixed positions such as a colour wheel. If the attribute has been modified, the current value in the programmer is highlighted in blue.
You can touch the roller image to change the attribute to the next/previous value. For continuously variable controls like a dimmer, touching the roller will set the attribute to full or zero.
Attribute Editor Window
For attributes with fixed values such as gobos and fixed colour wheels, the Attribute Editor window can be easier to work with than the wheels. It also offers a colour picker window for fixtures with RGB or CMY colour mixing.
Press View/Open then Open Workspace Window then Attribute Editor to show it. As a shortcut you can also show it by touching the attribute name text just below the on-screen IPCGBES buttons.
The buttons on the left of the window select the attribute to change.

The rest of the window contains buttons or controls to set the attribute value. For attributes such as gobos and fixed colours, a button is provided for each one, making selection a lot quicker than scrolling through on a wheel.
When you apply an attribute, the button turns blue to show that the attribute is in the programmer. If you touch the button again, the attribute will be removed from the programmer.
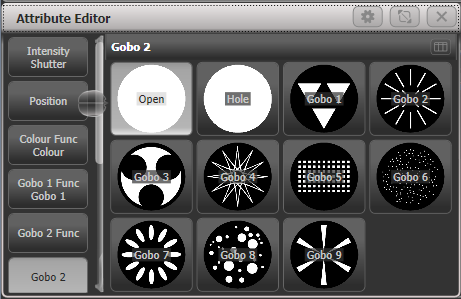
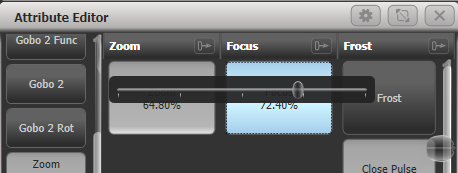
Touching the title of an attribute (such as "Gobo 2") expands the attribute to the full window, displaying more buttons as shown below. Gobo images will be shown if the fixture personality has the information included (not all do).
If an attribute has a range of values, sliding your finger left and right on the button will show a horizontal slider which allows you to adjust the attribute.
When the selected fixture has sub-fixtures or cells, buttons appear at the top of the attribute editor window allowing you to select the whole fixture (left hand button), or individual cells for control. The layout of the cell buttons matches the layout set in the pixel mapper to help you locate the correct cell on the fixture.
Some types of attribute have special displays as follows:
Intensity/Shutter
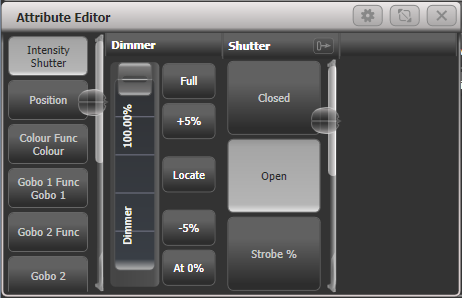
Provides an easy slider for Dimmer, also buttons for 0%, 100%, up and down 5%, and intensity locate (affects only the intensity).
Position
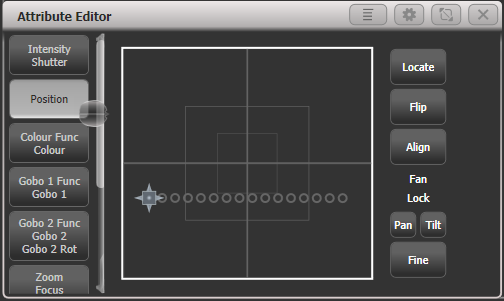
Provides a way to set the position from the touchscreen using an X-Y grid. Positions of selected fixtures are shown as circles on the grid which is useful to check positioning or spacing of fixtures. Other controls are provided:
Locate sets 50/50 position (other attributes not affected),
Flip sets a moving head to its opposite yoke position.
Align sets pan/tilt to match the settings in the programmer of the most recently selected fixture. For example if you want to match the tilt of 4 fixtures to the first fixture, select fixtures in the order 2-3-4-1 and press Align.
Pan/Tilt lock buttons are helpful when setting positions of multiple fixtures using the X-Y grid. For example if you have 10 pan-fanned fixtures and you want to just move the tilt, select Pan lock. Otherwise the fixtures will all move to the position you click on, losing the fan effect.
Fine button switches to fine control mode for more precise positioning.
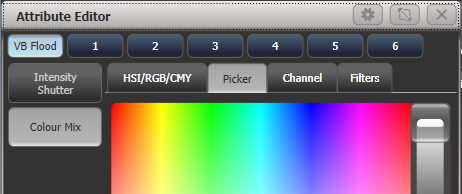
Colour Mix: HSI/RGB/CMY
For fixtures which are capable of colour mixing, there are several ways you can select a colour which are selected by tabs at the top of the Attribute Editor window.
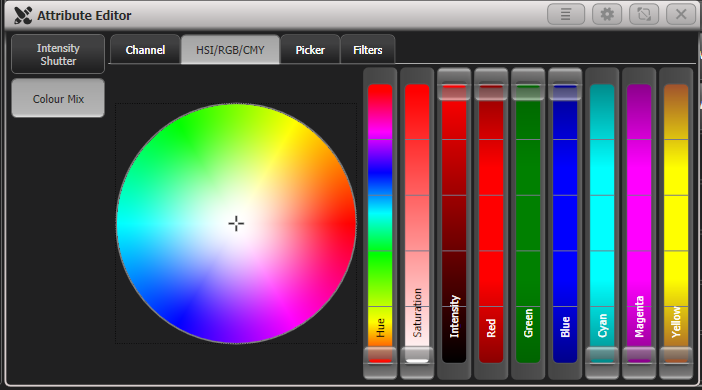
HIS/RGB/CMY provides a colour wheel with interactive sliders for changing Hue/Saturation/Intensity, Red/Green/Blue, and Cyan/Magenta/Yellow. Changing any slider or clicking on the wheel will adjust all other sliders to match that colour, allowing you to make easy small adjustments of colour using whichever control is easiest; for example use the Saturation slider to create a pastel version of a colour without affecting the hue.
All types of slider work for all fixtures, so a fixture with CMY mixing can still be controlled using the RGB or HSI sliders.
Colour Mix: Picker
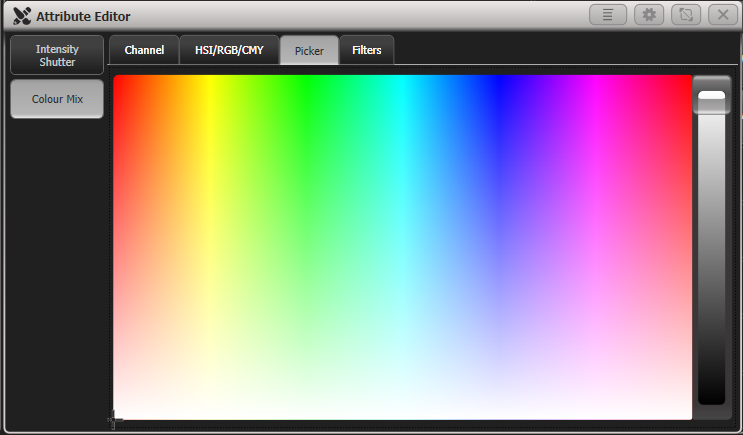
This is the classic colour picker from earlier versions of Titan which provides a picker for hue and saturation, with a slider on the right hand side to set the intensity.
Colour Mix: Channel
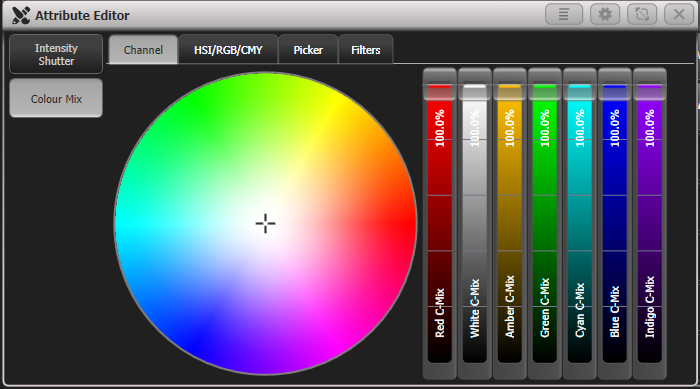
Provides a slider for each colour control channel in the fixture. The sliders shown will vary depending on what is provided in the fixture - this example is an ETC Lustr fixture which has 7 independent LED colours. This mode is useful to obtain colours such as tints of white or UV/Congo Blue which are hard to mix from a picker or colour wheel.
Colour Mix: Filters
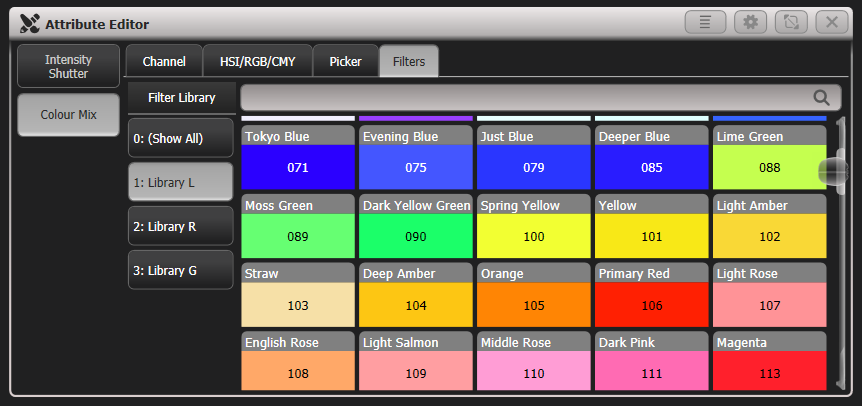
Lets you pick a gel/filter colour from the Lee, Roscolux or GamColor ranges of filters. You can search for a particular colour by name or by number using the search bar. There is a context menu button to Order Filters by Number or Order Filters by Hue.
For LED fixtures with additional emitters for Warm/Cool white, Amber, UV, Lime or Cyan, Colour Mix will automatically control all the colour channels to obtain the colour. In versions previous to Titan v9 only RGB elements were controlled by the colour picker and other colours had to be set independently.
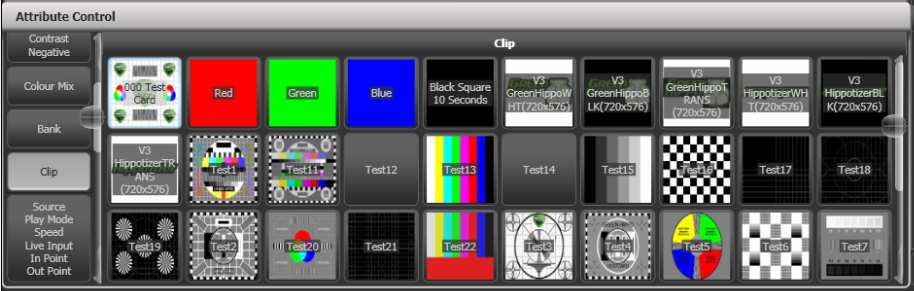
Media Servers/Active Fixtures
Active fixtures such as media servers will display a thumbnail of the media clip in the button. The media server must support CITP and be patched as an active fixture for the thumbnails to work.
For Ai media servers please see the Synergy section for more details of how Synergy allows you to control the setup and media playback.
Shutter Blades/Keystone
Fixtures which support keystoning or blades/shutters can be controlled graphically in the attribute window. Select and drag the corners or sides of the image to control the fixture.
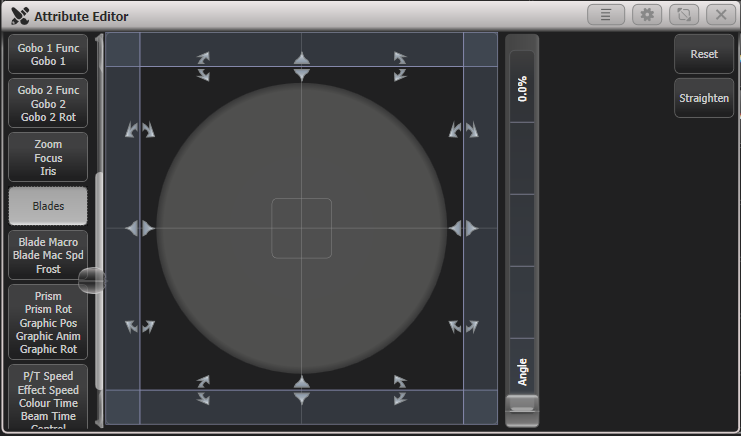
Updated personality files may be required to support the keystone/blade functions. If the functions are not shown in the Attribute View, try downloading and installing the latest personality file, then run the Update Patched Fixtures command.
Setting Attributes from the Softkeys
You can directly enter a numeric value for the attributes which are live on the wheels. You must be at the main Program menu to do this (keep pressing Exit until the vertical menu bar shows "Program Menu").
Type a number on the numeric keypad then press one of the softkeys to set the value to the fixture. The Softkey legend will show what effect your value is going to have (such as Gobo 5, or Deep Blue).

For attributes displayed in percent, such as Dimmer, or Colour Mix, you enter a value from 0-100 to set the percentage output. For attributes where the output is divided up into ranges, such as colour wheels, you enter the index of the range you want. For example to select the 3rd colour (as displayed in the list above the wheel) you would enter 3.
Adjusting Attributes with the @ buttons
Pressing the @ button next to a wheel opens the Adjust Attribute Value menu for that attribute.
You can also open this menu by touching the centre of the on-screen wheel view for the attribute, or by clicking on the attribute in the Channel Grid window.
(On Tiger Touch 1 the three buttons between the wheels act as @ buttons. On the Pearl Expert you will need to use the touch screen method.).
The menu gives you the following functions:
Select Function: gives you shortcuts on the softkeys to the possible settings for the attribute (for dimmers, a range of values is provided).
Touch/Clear: places the attribute in the programmer or removes the attribute from the programmer
Locate: locates the attribute (does not place in programmer)
Release: releases the attribute
Off: sets the attribute to Off. This temporarily disables the attribute, though its value is stored and can be restored with On.
On: sets the attribute to On (when merged to a cue or palette, On will restore a value which has previously been set to Off)
Freeze/Unfreeze: freeze or unfreeze the attribute
Selecting Fixtures and Dimmers by number (Channel)
In some situations, for example when programming lots of dimmers, it can be easier to type in the dimmer channels you want to program. The Channel menu allows you to do this for dimmers or fixtures. To access the Channel menu, press the Fixture button on the top left of the numeric keypad. You can also simply start typing numbers on the keypad, when you press Through, And or @ then the Channel menu will be shown.
Through, And and @ are provided as softkey functions or (depending on console) are buttons adjacent to the numeric keypad.
Fixtures may be selected by User Number, Handle Number or DMX Address, as set by the option on Softkey A.
When using the Channel menu it is helpful to latch it by pressing Menu Latch.
To select a fixture, type the number and press Enter.
To select more than one fixture, press the And softkey between each number. For example 1 And 2 And 5 Enter will select 1, 2, 5.
To select a range of fixtures, press Through. For example 1 Through 8 Enter will select 1-8. If you miss out the last number it will select all remaining fixtures of the same type.
To miss out fixtures in a range, use Not, for example 1 Through 4 Not 3 Enter will select 1, 2, and 4.
The @ softkey sets a dimmer level to the selected fixtures, for example 1 Through 8 @ 5 Enter will set 1-8 at 50%. (You can choose whether 50% is entered as "5" or "50" in the User Settings - When you press @ there are softkey options for Full, Off and +/- (increase or decrease brightness).
You can work with Groups using the Group button, for example Group 1 And Group 2 Not 5 Enter will select all fixtures in group 1 and group 2 except for fixture 5.
You can use Locate instead of Enter, to select fixtures and locate them. For example 1 Through 4 Locate will select fixtures 1 to 4 and locate them.

When entering a command, the command line is shown on the display. You can go back using the grey Back button and you can abandon the line using the grey @ button.
The AND, THRO and @ functions are also provided on the grey buttons either above or below the numeric keypad, as printed on the legend next to the buttons.
Selecting Fixtures using a Pattern
When programming you will often want to select patterns of fixtures. Rather than having to individually select and deselect fixtures, Titan has an easy way of selecting patterns of fixtures within a range.
Select some fixtures.
Press the All button (labelled Odd/Even on some consoles).
Select a pattern from the softkeys. Your selection is modified so you will only be controlling, say, the odd fixtures.
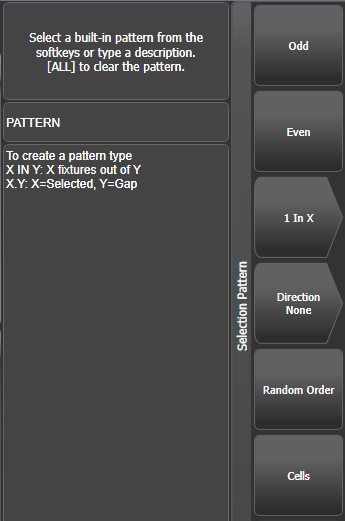
Press the Fix +1 or Fix -1 button to change the selection to the next stage of the pattern (Next and Prev on some consoles).
To end the pattern selection, press All twice.
The Direction option allows you to set the fixture selection order to go in a specific direction (using the group layout). This is useful for selecting symmetrical pairs of fixtures and for quickly creating cues using overlap.
Direction will return to "None" when you press Clear. You can change this by setting Clear / Maintain Direction in the Clear Options menu (hold the Clear button down to see this option).
For example, if you are programming a chase using 16 fixtures and you want every 4^th^ fixture to do the same thing, you just select the 16 fixtures, then press All, then 1 in x, then 1 in 4. You will see that the 1^st^, 5^th^, 9^th^ and 13^th^ fixtures are now selected, and you can create the look for those fixtures. Then press Fix +1, and the 2^nd^, 6^th^, 10^th^ and 14^th^ fixtures will be selected ready for programming. After you have programmed the fourth set of fixtures, the pattern will go back to the first position again, until you press All twice to end.
You can enter your own patterns using the numeric keypad and softkeys, for example "2" In "6" Enter.
You can also get to these options by holding down a group selection button for the fixtures.
Selecting Fixtures which are in a Playback
To select fixtures which are controlled by a particular playback use the Select If function.
To select fixtures used in a playback, press Select If then the playback button. (If the console does not have a Select If button, press Fixture then Select If. The Fixture button is at the top left of the numeric keypad and may be labelled Channel on older consoles.)
You can also use Select If with the @ and Through buttons on the numeric keypad to select fixtures set to a particular intensity.
\@X: fixtures set to intensity X
@ Through X: fixtures with intensity 0 -- X
@ X Through: fixtures with intensity X -- Full
@ X Through Y: fixtures with intensity between X and Y
@@: fixtures with intensity above 0.
Intensity levels may be input as 0-9 or 00-99 depending on the User Setting Channel Levels Set In.
Attribute Groups - IPCGBES-FX
To make life a bit simpler, the console groups together attributes which have similar effects, using the letters IPCGBES-FX.
I-Intensity (dimmer, strobe shutter)
P-Position (pan, tilt)
C-Colour (colour wheel, CMY mixing)
G-Gobo (gobo wheels, gobo rotate, gobo position)
B-Beam (iris, focus, zoom, beam shaper)
E-Effects (prism)
S-Special (motor speeds)
FX-Shapes, Pixel Mapper
These groups are used to select which attributes you want to work with in many of the functions on the console, particularly when you are "masking off" certain attributes from being saved.
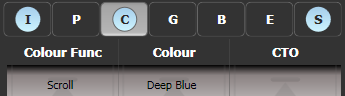
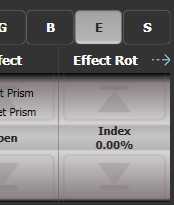
Above the attributes roller on the screen, the console shows you which attribute group you are currently changing (the grey box). The Attribute Group is also highlighted in blue if the programmer contains any of those attributes. For example in the image above we are currently changing Colour attributes, but Intensity and Special attributes have also been modified.
Stepping through selected fixtures one at a time
If you have selected a range of fixtures, or a group, the console has functions to step through the selected fixtures one at a time. This can make it easier to program a range of fixtures because you don't have to select each one manually.
This mode uses the All/HiLight/Fix +1/Fix -1 buttons.
Select a range of fixtures or a group.
The Fix +1 and Fix -1 buttons will select the fixtures in the range one at a time (in the order you selected them). Buttons are labelled Prev and Next on some consoles.
The All button will select all fixtures in the programmer (everything which has been selected since Clear was last pressed).
- The HiLight function can be used to highlight the output of the selected fixture (make it brighter onstage), see the next section.
Highlighting the Selected Fixture with Prev/Next
When stepping through a fixture selection using Fix +1/Fix -1, you can highlight the selected fixture on stage. This makes it very easy to see which fixture you are controlling. The other fixtures in the selection go to a dimmed "lowlight" level.
Press HiLight to enable highlight mode. Press HiLight again to disable. When you are in highlight mode, the highlighted attribute is overridden and any changes you make to it are not stored in the programmer (so if the highlight uses intensity, you cannot change the intensity of the fixture).
You can change the levels used for Highlight/Lowlight by pressing
then pressing HiLight, Store Highlight State orStore Lowlight State.
Turn Off Unselected Fixtures (Remainder Dim)
To turn off all unselected fixtures use the Remainder Dim function by pressing Rem Dim (Avo+All). The zero intensity is placed in the programmer and will be recorded into any cue. This is useful when removing fixtures from cues.
Align Fixtures
You can copy attributes from one fixture to another using the Align Fixtures function. This is very useful, for example, if you've accidentally left a fixture out of a cue you can copy settings from its neighbour.
You can align multiple fixtures to others in one operation, either using groups or individual selection. If you are aligning different numbers of fixtures there are options to set how this is handled, see below.
Select the fixtures you want to Align either manually or using a group.
At the top level menu press Fixture Tools/ML Menu then
Align Fixtures.Set the mask to include the attribute groups you want to copy (using the Attribute Bank buttons, or using the softkey options for exclude and include all attributes).
Touch the select button of the fixture or group you want to copy the settings from.
Press Align
The fixture selection order is used to determine how the aligned values are copied.
The Auto Reset Mask option will always set the mask to Include All whenever you enter the Align Fixtures function. The alternative option Remember Mask will leave the last mask set.
- Spread Attributes will try to spread out the attribute changes if there are a different number of fixtures in the source and target groups (best for positions). Repeat Attributes will repeat the source selection on extra fixtures, or attempt to mirror the fixtures if there are fewer.
- Align Programmer Attributes will only align the attributes which are in the programmer, Align All Attributes will align all the attributes which are enabled by the mask. So for example if you want to align the tilt of some fixtures and you have set the tilt you want on an example fixture, Align Programmer Attributes would only change the tilt; but Align All Attributes would copy the pan setting from the source fixture as well.
- Palette References Maintained will copy palettes from the source fixtures. Palette References Lost will convert the palettes to absolute values in the target fixtures.
If the fixture you are copying the settings from is also one of the fixtures being aligned, it's difficult to tell what you are doing as all the fixture buttons light up red. However if you look at the top line of the screen, there is a list of the fixtures you have selected.
Flip
Moving head fixtures can point at the same stage position from two possible yoke positions. Sometimes to get the fixture moving the same as other fixtures, you need to swap to the opposite yoke position and the Flip function lets you do that.
Select the fixtures you want to Flip.
At the top level menu press ML Menu then Flip Pan and Tilt.
The Position window in the Attribute Editor also has a Flip button which does this.
The settings used for Flip are defined in the fixture personality. If Flip doesn't work you may need to update to the latest personality.
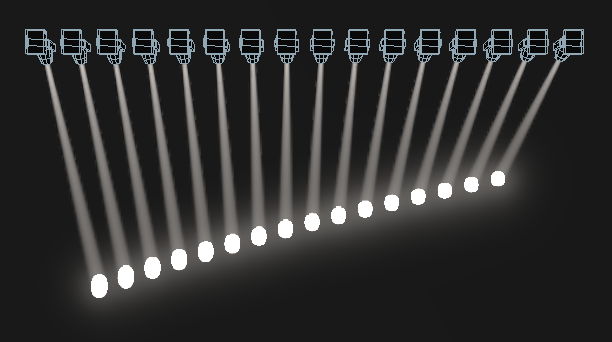
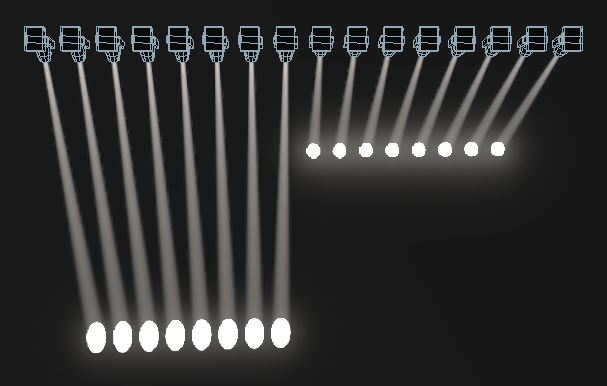
Fan Mode
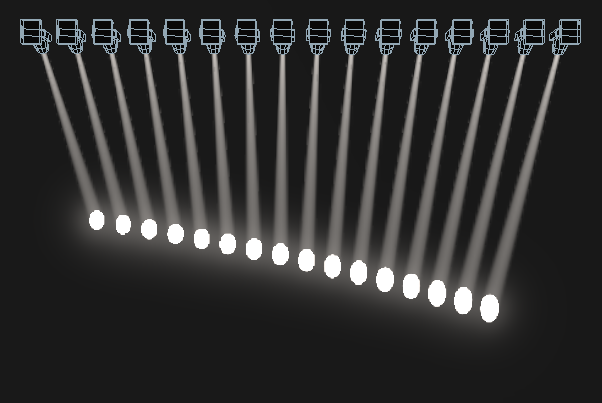
Fan mode automatically spreads out the values on a selected range of fixtures. If used on pan and tilt, the result is spreading out "rays" of light beams. The first and last fixtures of the range are affected most, and the central fixtures are affected least. The amount of fan can be set using the attribute wheels.
As with shapes, the order in which you select the fixtures sets how the fan effect works. The fixtures you select first and last will be the ones which change most. If you use a group to select the fixtures, the order you selected the fixtures when you recorded the group is used.
The fan effect, while normally used on pan or tilt attributes, can be applied to any attribute.
Select the fixtures you want to fan.
Press Fan.
Select the attribute you want to Fan using the attribute bank buttons.
Set the amount of fan using the attribute wheels.
Turn off Fan by pressing the Fan button again when you have finished. Fan will turn off automatically if you change the fixture selection.
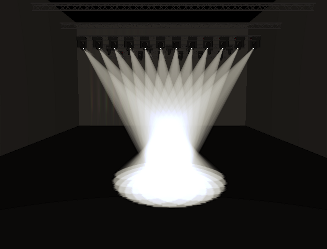
If you have selected fixtures from multiple groups, you can choose whether the fan effect works with or ignores the groups. For example if you have 12 fixtures across the stage in 3 groups of 4, you may want a fan of light beams spread evenly across the stage, or you may want 3 groups of separately fanned light beams.
By holding down Fan you can select:
- Ignore Groups All fixtures are fanned as one large group
- Fan Group as Fixture All fixtures in a group take on the same value.
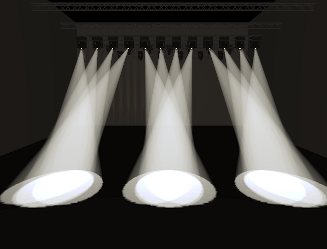
- Fan Within Group Fan runs across individual fixtures in each group.
Holding down Fan also allows you to select the Curve used for the fan. The different curves allow you to obtain different fan effects.
Fan mode needs to be used on at least 4 fixtures to give good effects. If you have an odd number of fixtures, the central fixture will not change in fan mode.
Press Fan again to leave Fan mode. Any effects you have set will remain in the programmer.
It's all too easy to accidentally leave Fan mode turned on and be very confused about why the wheels aren't working properly, so turn it off as soon as you have completed the effect. To avoid this there is a User Setting 'Press and hold Fan'. If enabled, you have to hold down Fan to enable Fan mode.
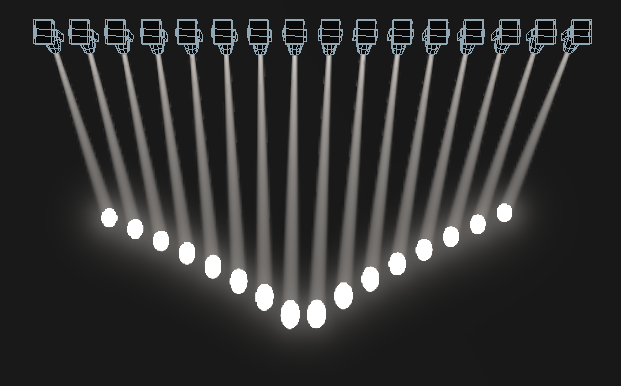
Fan Curves
You can select different curves to use when in Fan mode. Hold down
Fan and select Curve, the options are:- Line: Traditional fan, the first and last selected fixture are affected equally in opposite directions, the midpoint remains unchanged. This is most useful for pan.
- Mirror- Divides the selection into two halves, the position in each half is the mirror of the other half
- Wings -- Divides the selection into three parts, the positions in the outer two parts mirror each other and the central part does not change.
- Arrow - The first and last selected fixture are affected equally to the midpoint fixture but in the opposite direction. This is useful for colour mixing, tilt and dimmer.

- Pull Middle - The first and last selected fixture remain at the current value, the midpoint is affected most. This is useful for colour mixing, tilt and dimmer.
- Pull Ends - The first and last selected fixture are affected most, the midpoint is unchanged. This is useful for colour mixing, tilt and dimmer.
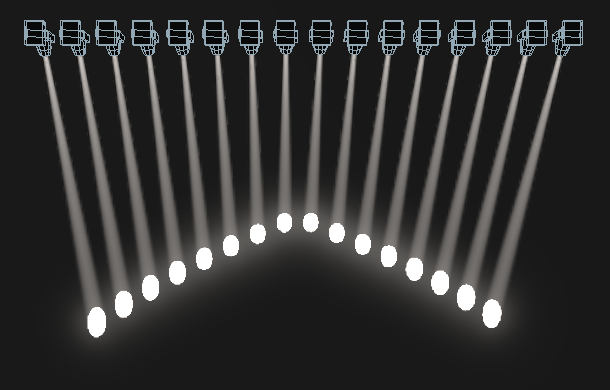
- Pull End -- Like pull ends but only from one end, the other end does not change
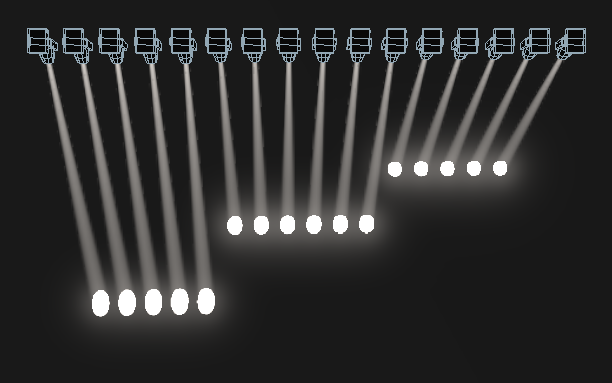
Fan Parts
When using the Fan function you can split the fan into a number of groups. Select all the fixtures, hold down Fan and type a number on the numeric keypad. The Fan will divide into that number of parts, for example:
Normal (1):
2:

3:
Setting Fixture/Attribute Times
Fade and delay timings can be directly set for each fixture or individual attributes of a fixture. When you store the settings into a cue, the time settings will then become part of the cue.
There are a number of ways to set the times:
You can set individual attribute times by switching the wheels to Fade Time / Delay Time mode using the Wheels= softkey on the root menu.
Individual attribute times can also be set using a combination of the wheel @ keys and the Time key.
They can also be set by selecting fixtures and entering into the attribute times submenus from the Time key.
There is also command syntax that allows various options to set attribute time values - e.g. Time Fixture Position 5 @ 3 would set a 5s fade, 3s delay time onto the current fixture selection P group. Wheel @ keys can also be used in the syntax. Fan options are also available through syntax using THRO.
Setting a time attribute value will cause the \'in programmer\' indication to light up.
The Channel Grid window has a Times context menu button which allows you to view or edit all the attribute times currently in the programmer. You can set a time to Off to temporarily disable it; the On option will restore the previous setting.
You can try out time settings by pressing Avo + Time or double tap the Time button. (previously the Set button on Titan Mobile/Sapphire Touch and the Next Time button on Tiger Touch/Pearl Expert).
Clearing Attributes Using "Off"
Once you have changed an attribute, the value you set will be in the programmer and will be stored in any cues or palettes you create. If you've accidentally changed something and don't want to store it, you can use the Off function to remove it from the programmer.
Press Off to display the Off menu.
Use the Attribute Bank buttons to toggle which attributes you want to change. Then press the Attributes Off softkey to set them to Off.
The softkeys also give you options to turn off active attributes, such as Dimmer Off.
- To remove complete fixtures, select the fixtures, press Off thenSelected Fixtures Off.