Setting up the Rig
Setting up the Stage and Rigging
To help you see what your rig will really look like you can add fixed elements of staging and rigging.
Open the Capture Visualiser Settings window from the Open Workspace Window menu, or the Open Settings context button in the Capture window. Click the Stage tab.
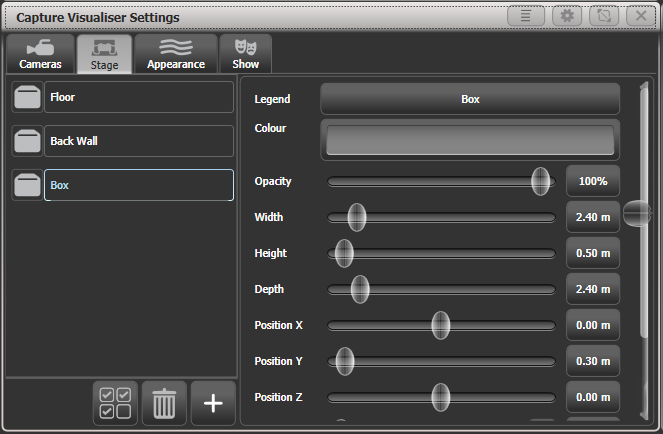
"Floor" and "Back Wall" are provided by default. You can add other objects by clicking the + button at the bottom of the list.
Click on the object in the list on the left hand side to position and angle the object using the controls on the right. You can either type exact numbers by clicking on the buttons down the right hand side or use the sliders. You can set a legend and colour for each object.
Setting up Fixtures
Fixtures are automatically placed into the visualiser when they are patched if the Auto Update switch in the Capture Settings "Show" window is set to On.
If you load a Titan show from a previous version, or have some patched fixtures which are not placed in Capture, use the Edit Fixtures Update Personality option on the Patch menu to place missing fixtures into the visualiser. The Exchange Fixtures function may also be used to help with this situation.
Fixtures are positioned using the wheels. Select one or more fixtures using the Fixture select or Group buttons and turn them on by pressing Locate. Press the Position - Orientation context menu button to switch the wheels to Visualiser mode (or press Softkey G at the top level menu until the display shows Wheels-Visualiser).
Select Position attribute, then use the wheels to change the X/Y/Z position of the fixture(s). If you select multiple fixtures, pressing the Scale-Fan context menu button or the Fan button allows you to evenly spread out the fixtures. The Fan curve/group/split options also work.
Touch above or below the wheel value to nudge the setting up or down by one step. For rotation this will be 45 degrees.
If you are viewing the stage from the front then:
| Axis | Action |
|---|---|
| X | moves left and right |
| Y | moves up and down |
| Z | moves towards and away from you |
Press the Position button again to switch the wheels to Orientation mode. The wheels will now pivot the fixtures in the X/Y/Z axes. Again you can use the Fan button to give a spread of angles on multiple fixtures.
The X/Y/Z rotation operates like a 3-axis camera gimbal - imagine the fixture within three pivoting rings (see left hand picture below). In some orientations, the X and Z rotation will seem to do the same thing and some rotations seem to be impossible to achieve - this is called gimbal lock and happens when two of the "rings" are lined up with each other (right hand picture below). Change the Y rotation by 90 degrees to enable you to achieve other angles.
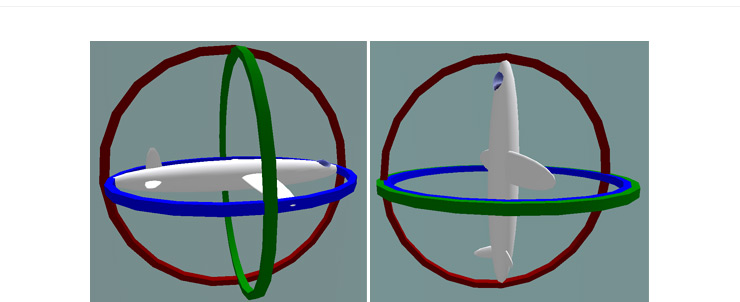
Illustration by MathsPoetry
Press the Position button a third time to switch the wheels to Rotation mode. This is similar to Orientation but if you have multiple fixtures selected, the fixtures rotate as a group about the middle fixture.
It's easier to see what position fixtures are in if you change the tilt angle so they aren't pointing straight down (or up). It's always useful if you can have an actual fixture of each type connected to help you get them pointing the right way, but you can change this later if not.
Setting up Cameras (Views)
Four cameras (selectable views) are provided by default but you can add more.
The context menu buttons provide camera options.

Camera controls are in the Capture Visualiser Settings window which you can open using the Open Workspace Window button or using the Open Settings context button.
The view buttons across the top select the four default views (shown below). Press the + button at the right hand side to add a new view.
The top button on the left toggles between single view or quad split mode. If quad split is selected, the other 4 buttons select which view you are controlling.
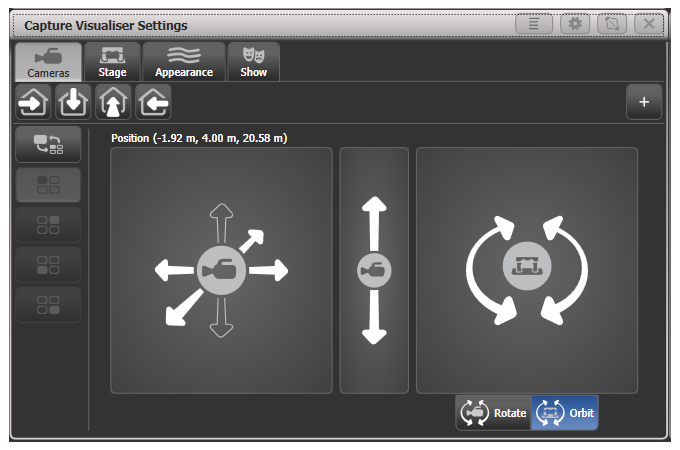
The left hand pad moves the camera left and right, and towards and away from the stage.
The middle pad moves the camera up and down.
The right hand pad can be set to rotate or orbit mode
- Rotate: turns the camera to face left, right, up, down
- Orbit: orbits the camera around the stage in a circular path keeping it pointed at the same object.
Press the Move Camera context button to link camera movement to the wheels. This also opens the Set Coordinates menu with softkeys allowing you to enter numeric camera positions.
Press the Rotate Camera or Orbit Camera context buttons to link camera rotation or orbit to the wheels and allow numeric entry on the softkeys.
Capture Appearance options
The Appearance tab of the Settings window allows you to set the following parameters:
- Ambient lighting (background light level)
- Smoke density (called Atmosphere in full Capture))
- Smoke variation (also called Atmosphere contrast - mix between haze and moving smoke effects - 0%=all haze, 100%=all smoke)
- Smoke speed (also called Atmosphere speed - rate of change of moving smoke effect)
- Exposure adjustment (camera brightness control)
- Bloom amount (visible halo around lights)
- Rendering settings detail (this affects the refresh rate of the simulator. If you have a lot of beams visible you may need to change this to Low to improve the refresh rate).