Changing the Patch
Patch View
The Patch View window gives a full overview of how all the fixtures in your show are patched, and allows you to patch, repatch, legend, renumber, invert, pan/tilt swap, freeze, exchange, park and view fixtures. If you need to change the settings of multiple fixtures (for example, changing the DMX address of several fixtures) then it's really easy to do in one operation in the Patch View.
To show the Patch View window press Open/View then Patch, or double press Open/View and select Patch View from the window select buttons.
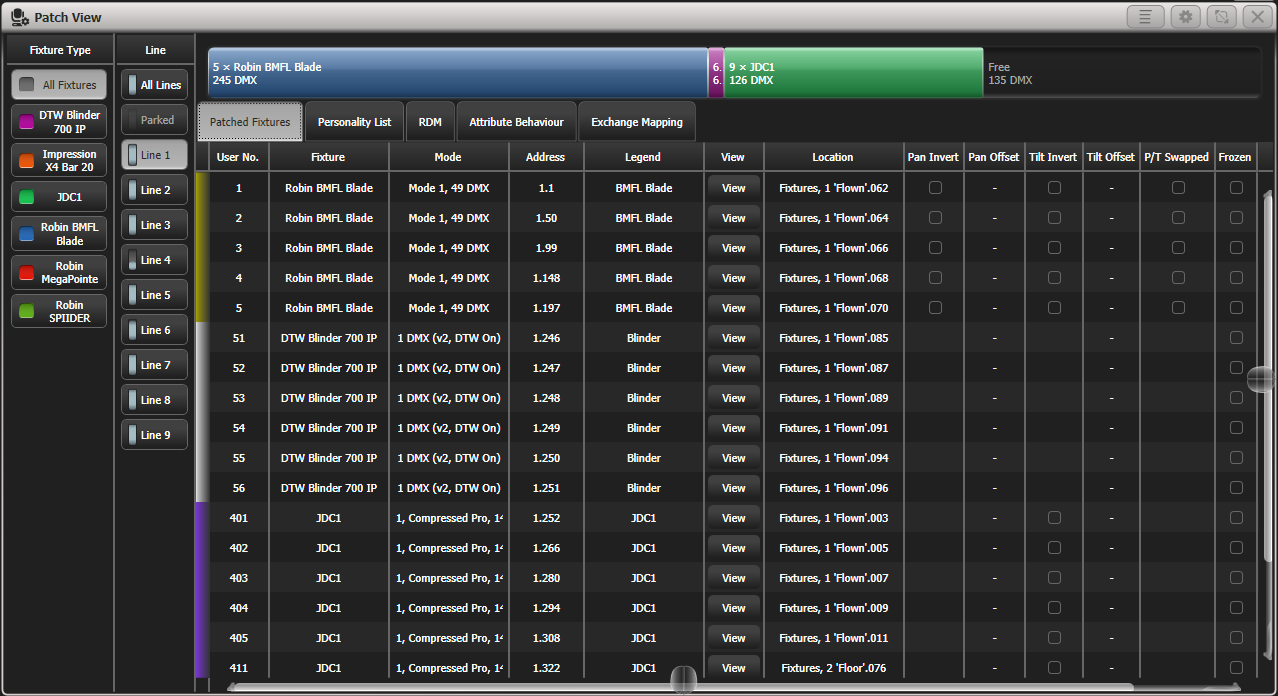
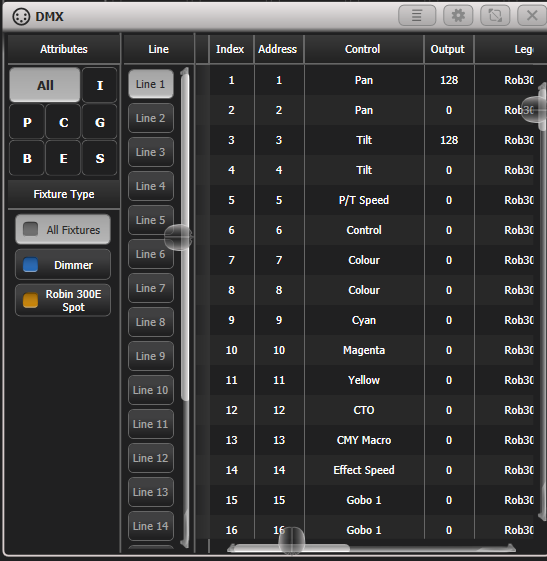
Fixture type: lists the different types of fixture in your show. Each fixture has a unique colour code. Click on these buttons to filter the view so it only shows one fixture type.
Line: lists the available DMX output lines/universes. The blue bar graph in the button shows how much of the line is used by patched fixtures and how much is free. Click a button to show the details of that line in the right hand side of the window.
The coloured bar at the top shows how fixtures are patched on the selected output line, using the unique colour code for each type of fixture. Click on a section of the bar to select those fixtures in the grid below.
The grid area shows details for each patched fixture on the selected output line. Some parameters are editable by clicking in the grid, then the softkeys allow you to change the parameter.
You can change parameters for multiple fixtures by dragging a selection box over the grid, or hold the Ctrl button on the keyboard and click on the required fixtures. Then edit the parameter on the softkeys, and use the Set context button or press Enter to update the selected fixtures.
You can switch off some of the display columns to make the Patch View simpler. Press the Choose Columns context menu button and then use the options on the softkeys to turn columns on and off.
You can add notes to each fixture in the Patch View. Click on the Notes field and enter text using the keyboard.
The tabs across the top allow you to switch the window to Personality List (lists all fixtures available on the console), RDM (allows you to patch devices using RDM) and Attribute Behaviour (allows you to set invert, freeze, curve, and limit. See the detailed fixture information section for Attribute Behaviour.
A context menu option allows you to show or hide parked fixtures. If you show parked fixtures they will appear greyed out in the position they were originally patched.
View Detailed Fixture Information
In the Patch View window click on the View button for the fixture you wish to view, or press Open/View followed by a fixture handle. A Fixture View window will open showing details for that fixture, including the personality and mode used to patch, and the individual DMX channel addresses for each attribute. Attributes can be inverted or frozen by clicking on the checkboxes at the right hand side.
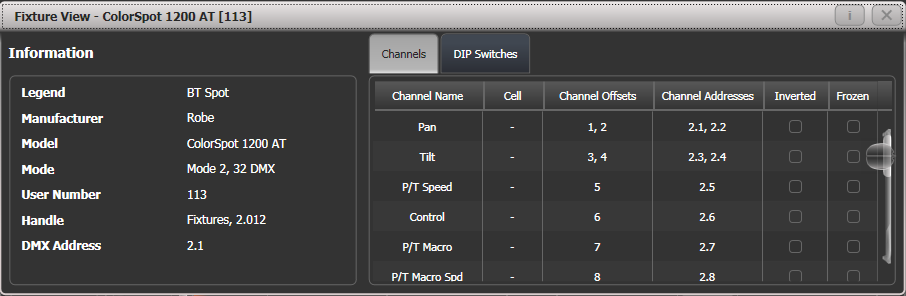
If the fixture address is set using DIP switches, the console can show you how to set the switches by clicking on the DIP Switches tab.

There is also a Personality tab (not shown in the pictures) which shows history information about the personality file for the fixture. This can be useful for checking the version of the personality file.
Changing DMX Addressing using Patch View
You can easily change the DMX address of one or more fixtures from Patch View. Select the DMX address cells you want to modify - draw a selection box over multiple cells to select more than one.

Type the new address for the first fixture in the selection and press Enter (using the format Universe . Address - if you miss out the universe part it will stay unchanged).
All fixtures will be renumbered keeping the addressing offset between the fixtures the same (in other words if each fixture takes 20 channels, the addresses will be set with an offset of 20 channels between each fixture).
The Swap Fixture Addresses softkey lets you swap the addressing between two groups of fixtures. This operates in two modes, One For One or Retain Layout, which you can select by softkey after pressing Swap Fixture Addresses.
Select one group, then press Swap Fixture Addresses and select the target group. In One for One mode the target must be the same quantity of fixtures or the console will display an error. In Retain Layout mode the console will attempt to add or remove fixtures to get the same quantity - if this conflicts with other fixtures it will give you the options to Park Conflicting or Cancel.
Changing DMX address using Patch menu
As well as using the Patch View screen, you can use the Patch menu to re-patch a fixture to a different DMX address or a different DMX output line. All programming is kept.
- Press Patch (if you're not already in Patch mode).
- Press Repatch Fixtures.
- Press the Select button of the fixture you want to change.
- To change DMX press Address, type the new address and press
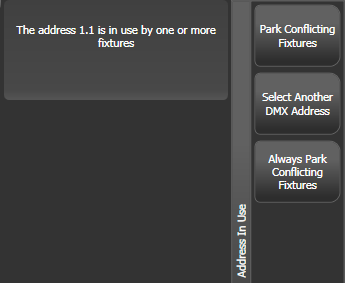
enter. If this address is already in use, a warning icon will be shown.

- To change the DMX output line, press DMX Line=x and enter a new output line number.
- Press Enter or Repatch to confirm the change.
- Repeat from step 3 if you want to change other fixtures.
You can "Park" the fixture using Park. This removes the fixture from the DMX output map, but all programming is retained. The original DMX line and address is remembered and you can restore it using the Unpark option.
If the new DMX address already has another fixture or dimmer patched on it, the console will warn you (unless this is disabled in User Settings). You can either press Select another DMX address to abort the change or Park Conflicting Fixtures. All programming for the parked fixture is preserved, but you need to repatch it to a free DMX address using the above procedure before you can use it again. If you press Always Park Conflicting Fixtures the console will park this and any future conflicting fixtures without warning you (you can change this option back in the User Settings).
Setting Legends
You can set a legend for each fixture or dimmer you've patched which is displayed in the touch button. This can be really useful to help you identify the fixture.
- Press Legend (D9 only) or on the main menu press softkey Set Legend.
- Press the Select button for the fixture you want to legend.
- Type the legend on the keyboard.
- Press Enter when you have finished.
You can also choose to have a picture legend using the softkey options.
You can set the same legend for multiple fixtures by selecting a group of fixtures after pressing Set Legend.
You can change the User Number for the fixture using the User Number softkey on the Set Legend menu. User Numbers are used when selecting fixtures from the keypad theatre-style.
You can automatically allocate User Numbers for multiple fixtures by selecting a group of fixtures, then setting User Number. The first fixture will have the User Number you entered, and the other selected fixtures will be given a number increasing by 1 for each fixture.
You can set a legend for the current page of fixtures using the
Set Legend function from the main Program menu, then Page Legends, then the page tab which you like to change (if pages are not shown you can enable this in the context menu). The legend is shown on the touch button for the page.
Fixture Button Halo
You can configure fixture buttons to have a "halo" colour which helps you to find them quickly. Halo colours can be set manually for each fixture (the default setting), or automatically by fixture type using the same fixture colours used in the patch window..
To set a manual halo colour, press Legend or click Set Legend, click the fixture button (or select multiple buttons) then select the Halo option. A colour picker will open to let you set the colour, or pressing System Colours will give you colour options on the softkeys. A Remove Halo softkey lets you remove the colour.

To enable automatic halo colours, hold Avo and select User Settings, then Handles, then set Fixture Halos to Auto. Fixture buttons will then be coloured to match the automatic fixture colours used in the Patch window.
Halo colours are also shown in the Intensity View and Show Library workspace. In list views such as DMX, Channel Grid, Cue View and Palette view the halo colours are shown as a bar to the left of the list - this uses the user halo colour if one is set, otherwise the automatic colour is used. The User Setting does not affect this display.
DMX View Window
When you're having problems getting fixtures to work it can be useful to see the actual DMX output values coming from the console. Double press Open/View, then select DMX from the window select buttons.
The buttons on the left let you filter by attribute and by fixture type and select the different output lines from the console. Scrolling the window to the right shows more information about each DMX channel.
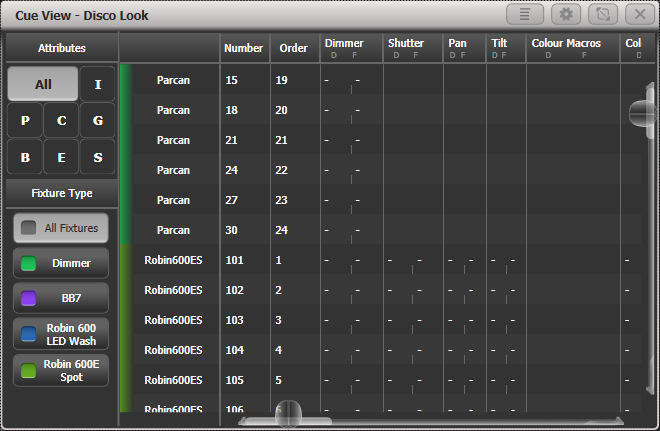
Fixture Exchange
The Fixture Exchange function enables you to repatch fixtures in your show using alternative fixtures, retaining important elements such as cue times, shapes and legends. This is very useful for touring shows and venues with a high turnover of events.
Fixture Exchange works best if you use Palettes to create your cues. This allows you to adjust for position differences and so on by reprogramming a few position palettes, rather than having to reprogram every cue. Cues recorded with absolute values will need to be re-recorded, preferably using palettes.
The pan, tilt and dimmer will always be preserved from one fixture type to the next. For other attributes, the console will attempt to match the functions between the fixtures, but you can change the details of this using the Exchange Mapping function (see next section). All programmed items including palettes will be preserved, so the programming can be easily adjusted by updating your palettes as normal.
Fixture exchange also gives you a powerful way to re-use an existing show with new lights, so you can give yourself a programming head start when faced with a new fixture.
- It's a good idea to save your show before performing major changes such as fixture exchange. Should you change your mind or have problems, you will easily be able to return your show to its previous state.
- Enter patch mode by pressing Patch.
- Select the new fixture type you wish to use.
- Touch the select button of the fixture which is to be exchanged.
- The console will warn you that the fixture is in use. Press theExchange Fixture option.
- Repeat from step 3 to exchange other fixtures with the same type of new fixture.
After exchanging fixtures you need to update the palettes which used those fixtures. If you have trouble switching values off in a palette, set new values for all the attributes in the attribute group and re-record the palette. You should then be able to switch off an attribute group as required.
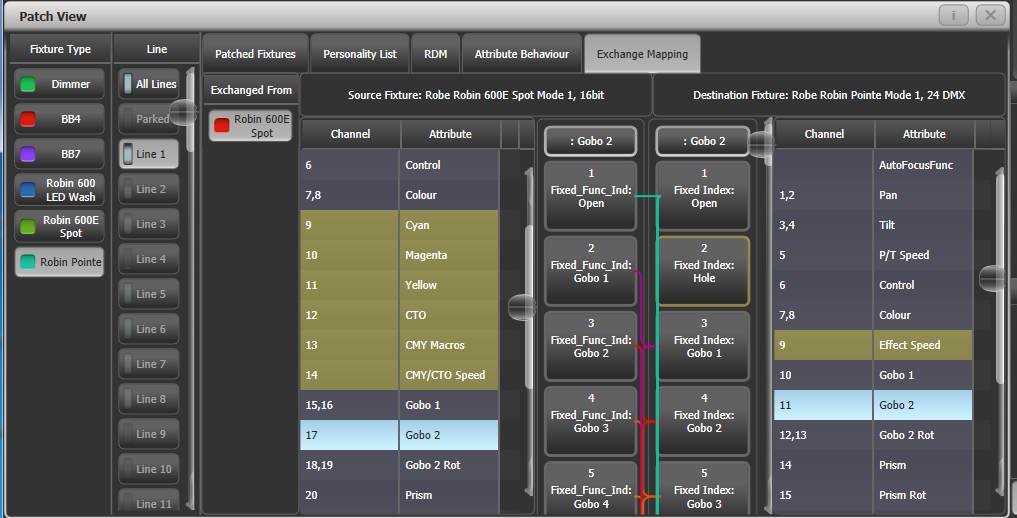
Exchange Mapping
When you exchange fixtures the console will attempt to map the functions on the new fixture to the same functions on the old fixture so that your show does not look any different with the changed fixtures.
However, this may not always work out quite right, so using Exchange Mapping you can manually map functions between the fixtures. For example this allows you to map the old gobos to similar new gobos even if they are not in the same wheel position, and to ensure that rotation speeds work the same.
Any changes made will apply immediately to the show. Mappings are remembered and will be used whenever you exchange the same fixtures in the future (though you can restore to factory mappings at any time should you need to using the Clear All Mappings softkey).

To set up mapping:
- Press Open/View then Patch to show the Patch View screen.
- Select the Exchange Mapping tab.
- In the leftmost column, click the fixture type of the new fixture which you have changed to.
- The view shows the old fixture on the left and the new fixture on the right with attributes listed for both fixture types. You can sort the list either alphabetically or in DMX channel order using the Sort context menu option.
- Select an attribute to show the mapping. The mapped attribute on both fixtures will highlight in light blue. Brown controls are not mapped. The centre of the view shows the individual functions of the selected attribute, and coloured lines show how these map between the fixtures.
- To map a function, click on a source function then a destination function. Any previous mapping will be removed. You can map multiple source functions to a single destination function.
- To unmap a function, double click the source function. If there are multiple sources mapped, double click the destination function.
- To move a mapping, click the existing destination, then click the new destination.
Where a fixture has been exchanged from more than one source fixture you can switch between them by selecting the relevant source fixture under the \'exchanged from\' column.
When you change the mapping, the \'Unsaved Changes\' options will pop up at the bottom of the screen. Here you can store the new mappings by pressing Apply, forget the changes by pressing Cancel or restore all mappings to Avolites factory default by pressing Reset. All these actions have to be confirmed by pressing the Confirm softkey.
Range Mapping
If the destination function has a range (for example 0-100%) you can adjust the range to which the source function is mapped.
Where multiple source functions are mapped to a single destination function with a range, separate destination buttons are shown allowing you to set a different destination range for each source function.
To set the range, first select a destination function, then click the Edit Ranges option at the bottom of the window. Then select the function whose range you wish to change. (Note that it is only possible to adjust the range of a mapped function. Any functions that are not mapped or are not ranges will grey out). You can then adjust the maximum and minimum values for the range either by wheel, by touching the wheel view on touch consoles or by selecting the relevant softkey and entering the value.
Once complete, click Apply then Confirm to commit the changes or Cancel then Confirm to forget.
Updating Patched Personalities
This option allows you to update the personality for a fixture used in your show. Normally a copy of each fixture personality in the show is saved in the showfile, so updating the personality library on the console does not update fixtures which are already patched.
- It's a good idea to save your show before using Update Personalities, then you will be able to undo any changes if you change your mind or have problems.
- Enter patch mode by pressing Patch.
- Press Edit Fixtures.
- Press Update Personality.
- Titan shows all fixture types which are patched in the show and which it has updates for in the installed fixture library. Select the type(s) you want to update, or click Update All to update all patched fixture types to the most recent version in the library.
- Updating a number of fixtures may take a little while.