Linking PioneerDJ System to Titan
Using the Pioneer Pro DJ Link Bridge software you can automate BPM masters on the Titan console from a network-equipped Pioneer DJ system. You can either run the bridge software on the console itself or on an intermediate laptop.
Pioneer DJ integration is compatible with the following Pioneer hardware:
CDJ-TOUR1
DJM-TOUR1
CDJ-2000NXS2
DJM-900NXS2
Connecting Titan to the Pioneer System
You need to get the console and the Pioneer equipment connected to the same network. The Pioneer equipment has some limitations with its network IP address - it either needs to be assigned an address using DHCP or it uses an automatic address in the range 169.254.*.* - which means that if you are already using networking to control the lights (Art-Net or sACN) things can get a bit complicated as many lighting products cannot use that address range.
Pioneer Bridge running on the console
If you aren’t using networking, or your console has two network interfaces, or you can adjust your lighting to a suitable address range, then you can run the Pioneer Bridge software on the console itself. If your console includes an Ethernet switch, you can connect the “Extension” Ethernet socket on the Pioneer equipment directly to the console, otherwise you need to go through an external switch.
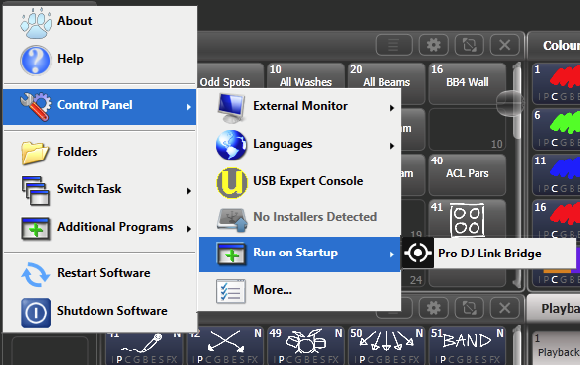
Run the Pro DJ Link Bridge software from the Tools > Additional Programs menu on the console.
- You can set the Bridge software to run automatically when the console powers up using the Tools > Control Panel > Run on Startup menu option. This is useful in club environments where the console is always linked.
Look at the Interface tab of the bridge software to see what IP address is being used by the Pioneer equipment. You need to set the network interface on the console to use an IP address in the same range – if it is using DHCP, just set the console to DHCP as well, or if using the automatic addresses set a fixed address. For example if the bridge is set to 169.254.225.212 as in the image below, set the console to 169.254.225.1 (assuming nothing else on the network is using that address).
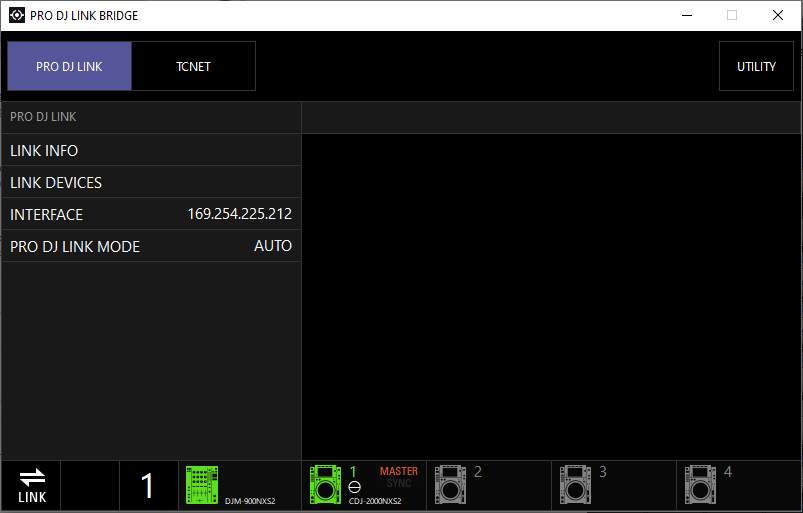
- Once you have everything connected up and have got all the IP addresses right, the bridge software should show connections for both the Titan console and the DJ mixer.
- Some Art-Net / sACN equipment can be configured to run on the 169.254.*.* address range, in which case you can run everything on the same network.
Pioneer Bridge running on separate computer
If you need to keep the Pioneer network separate to the lighting network and your console only has a single network port, or if you just prefer to have the bridge separate from the console, then you can download the bridge software from the Pioneer website and run it on a separate computer.
If you need two separate address ranges then your computer will need two network interfaces.
Once you have everything connected up and have got all the IP addresses right, the bridge software should show connections for both the Titan console and the DJ mixer.
Pioneer Workspace window
Open this window the usual way by double pressing Open/View and selecting PioneerDJ from the window select buttons.
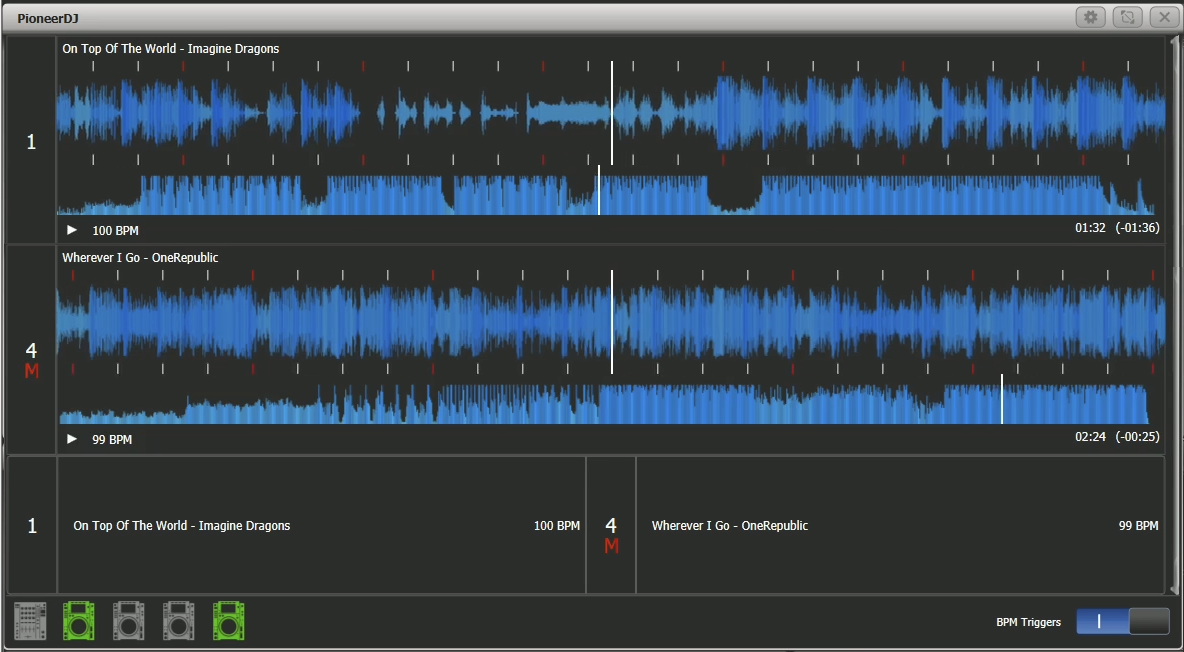
The top of the window shows a big (detail) waveform and a small (full track) waveform for the current track. Multiple tracks can be shown one above the other.
Below that, details of the current track playing on each device is shown.
At the bottom, the connection status of the Pioneer equipment is shown – green when connected.
You can select which track is currently the Master by pressing the track number on the left or in the detail area at the bottom. A red “M” shows which track is the master. If you assign your trigger as “Master” this lets you quickly change which track is controlling the BPM.
Context menu buttons allow you to show or hide the big and small waveform displays, the track details and the status bar. The other elements of the window will change to fill the space.
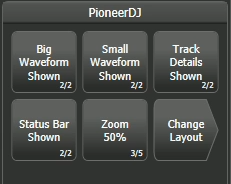
The Zoom button allows you to set the scale of the big waveform.
The Change Layout button allows you to select the view in the workspace. This is useful if you want a smaller window:
- Full – shows all the currently playing tracks
- Master – shows only the waveform of the master track
- Condensed - shows details of all the tracks at the bottom, but only shows the waveform of the master track. You can change the master track by pressing the track number in the Track Details area.
Setting up BPM triggers from Pioneer
You will need a fader on the console configured as a BPM master which will be automatically controlled by the track BPM playing on the Pioneer devices. See BPM Master section for how to set up a BPM master.
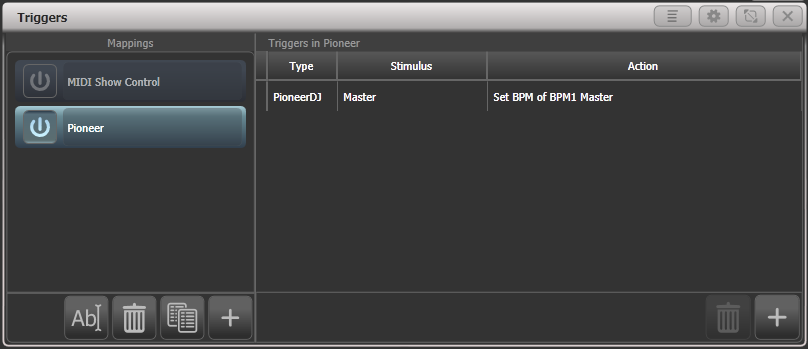
Go to the System menu (Avo + Disk) and select Triggers. The Triggers window will open.
- Add a new mapping using the + button at the bottom of the left hand column, and enter a name such as “Pioneer”.
- Add a trigger to the mapping using the + button in the right hand column or softkey Add trigger.
- Select Trigger Type as Item.
- Press the button for the BPM master you want to control.
- The Action button will show PioneerDJ as this is currently the only action for a BPM master. Press OK. You have now set up the console action which is to be triggered.
- Now you need to select which Pioneer deck will control the BPM. Select Deck= as Master, 1, 2, 3, 4. Master will use the track you have currently selected as Master (red M displayed). The 1-4 options let you fix the control to one of the decks.
- Press Add. The trigger should now appear as shown below.
Now you should see the BPM master automatically change to match the BPM of the track playing which you have selected as Master (or on the selected CDJ player if you selected a fixed player number).
- To regain local control of the BPM master, switch off the “BPM triggers” switch at the bottom of the PioneerDJ workspace window.