External triggering
You can set up the console to allow most features to be triggered by external events. This is very useful in complex shows or when using in an automated setup.
The following types of trigger are available:
- Audio (not on all console hardware)
- DMX
- GPIO (not on all console hardware)
- MIDI (except T1)
- Streaming ACN
Audio trigger (sound to light) requires special hardware which is not fitted on Sapphire Touch, Tiger Touch, Titan Mobile, T1 and Pearl Expert. You can plug a T2 into these consoles to provide audio triggering. The motherboard "line in" socket can't be used for audio trigger.
GPIO trigger is available on Diamond 9, Arena, Tiger Touch II and Sapphire Touch.
Connecting External Trigger Sources
Audio input is connected to the dedicated audio in jack (not the line in jack on the motherboard) -- see information box above for consoles which provide this.
DMX inputs are connected to one of the DMX output connectors using a DMX male to male gender changer cable. (This is a simple plug to plug cable with all pins wired straight through, i.e. 1-1, 2-2 and 3-3).
GPIO uses a contact closure for trigger which is connected using a dedicated jack socket, currently only on the Diamond 9, Arena, Tiger Touch II and Sapphire Touch consoles. The Diamond 9 additionally has a 15-pin D connector for GPIO trigger. The TNP can optionally have a GPIO input fitted, contact Avolites.
Most console hardware has a standard 5-pin MIDI connector, also USB-MIDI devices supporting the DirectX MIDI driver may be used on all consoles except T1. For the T2 this allows you to connect a MIDI fader controller to give you real playback faders.
sACN is connected using the normal Ethernet connection on the console.
- You can link a networked PioneerDJ system to Titan to automate BPM masters; this is described in the next section. This replaces the old “Pro DJ Tap” function.
Setting up External Triggering
Go to the System menu (Avo + Disk) and select Triggers. The Triggers window will open.
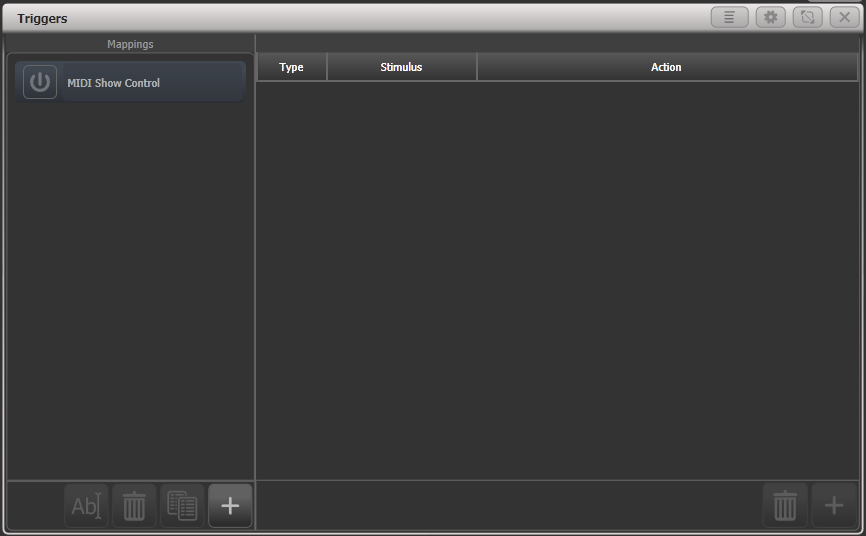
The left hand side of the window has a list of trigger Mappings, where each mapping can contain one or more trigger setups. A default set is provided for MIDI Show Control which includes standard show control messages (see next section for details).
Each trigger mapping can be enabled or disabled using the "power" button at the left hand end of the mapping name. This allows you to configure the console to react in different ways and easily swap between them.
This is how you set up a trigger:
Add a new mapping using the + button at the bottom of the left hand column, and enter a name for it.
Add a trigger to the mapping using the + button in the right hand column or softkey Add trigger.
Select Trigger Type as Hardware or Item.
- Hardware triggers a physical or touch button, or fader move, and will use the key profile set for the button/fader, just as if the user pressed the button or moved the fader.
- Item triggers a programmed item, such as a cue or chase, but you can select what action happens to it when it is triggered.
Press the button or move the fader to be triggered, or containing the item to be triggered. The status area of the screen will update to show you what has been triggered. For Item triggers you can select what action the trigger will cause, using the Action softkey:
- Set Level (sets playback level to trigger level - but see Level Match below)
- Fire At Level (like Set Level but ignores Level Match and will "kill at 0" if used with a cue list)
- Re-Fire at Level (any level change will re-fire the LTP values in the playback - see below)
- Flash (like pressing Flash button)
- Swop (like pressing Swop button)
- Preload (fires only the LTP values in playback)
- Latch (latches the playback on)
The Level Match option sets what happens if the playback has already been fired by the user when the trigger happens. If set to On then the trigger must match the current playback level before it will take effect. If Off (default) the trigger will override the playback at any level.
Press OK. You have now set up the console action which is to be triggered.
Now you need to set up the external stimulus which will cause the trigger. Select Trigger Type as Audio, DMX, GPIO, MIDI or Streaming ACN.
By default the Learn option is set to On, so you can generate the stimulus from your device (for example play the MIDI note, or turn on the DMX channel) and the console will automatically detect it and set the correct values.
Or you can enter the trigger details using the softkey options.
For Audio, set the Band (frequency band) for the trigger (see Audio Control)
For DMX, press DMX Port to select which DMX port you are using for DMX input. As soon as a DMX port is used for triggering it is switched to Rx (Receive) mode. Set the DMX address to act as trigger using the Address button.
If you want to use it as output (Tx mode) again you need to re-assign it in DMX settings.
For GPIO, you can Invert the trigger (to trigger on contact open rather than close). The Pin option allows multiple GPIO inputs but currently no consoles support this, so it should be set to 1.
For MIDI, set the MIDI channel, MIDI Command, Value, and Level (velocity) ranges
For sACN, select the Universe and Address for the trigger.
Press Add to add the trigger to the list.
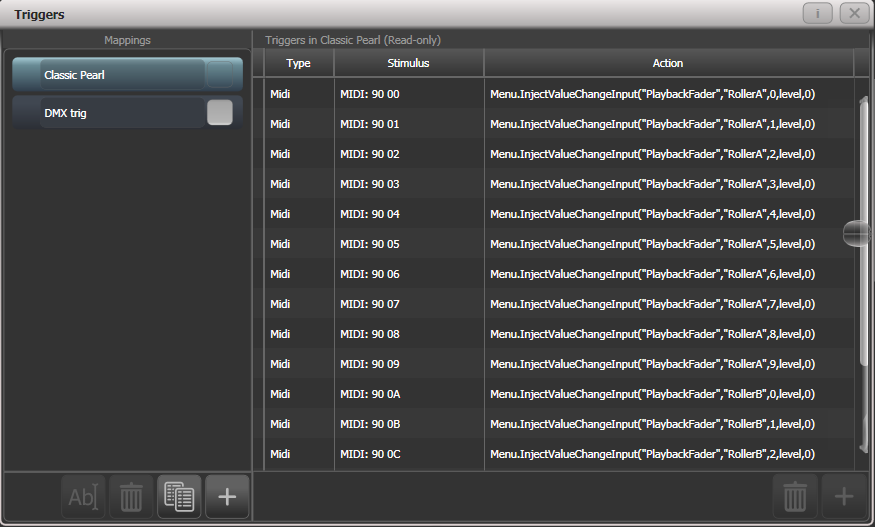
The window will show the trigger stimulus and the action to be carried out.
You can continue to add other triggers to the mapping.
To delete a trigger from the mapping, select it in the list and press the button at the bottom of the right hand column.
To delete a complete mapping, select it and press the button at the bottom of the left hand column.
The Re-Fire At Level action will cause the playback to be re-fired when the trigger level changes, so any LTP values in the playback will be set again. So for example if the playback sets fixtures to red, but then another playback changes the colour to white, the Re-Fire action would set the fixtures back to red when the trigger level changes, but the Set Level / Fire At Level actions would leave them at white and just change the intensity.
Setting up a MIDI fader controller with T2
This is how to set up a MIDI fader controller to act as playback faders on T2. Ensure your MIDI device is connected and recognised by Windows (you can use a utility such as Midi-OX to test it).
- From the System menu select Triggers.
- Add a new mapping using the + button at the bottom of the left hand column, and call it "T2 playbacks".
- Add a trigger to the mapping using the + button in the right hand column or softkey Add trigger -- by default this is set to the correct Trigger Type of Hardware.
- Move playback fader 1 on Titan Go.
- Click OK
- Move the first fader on your MIDI controller. Titan Go should recognise the MIDI commands and display the trigger in the prompt area.
- Click Add. The trigger for playback 1 is added to the list on the right.
- Repeat from step 3 to add the other 9 playback faders.
MIDI Show Control
The following MIDI Show Control messages are supported:
| Command | Action |
|---|---|
| GO | Fire the specified playback or cue |
| STOP | Pause the specified playback or cue |
| RESUME | Un-pause the specified playback or cue |
| LOAD | Set the playback level to full |
| ALL OFF | Release all playbacks |
| RESET | Same as ALL OFF |
| GO OFF | Same as resume |
Playbacks/Cues are identified by their User Number. To set the user number, press Set Legend then the select button of the cue, then User Number.
MIDI show control devices are identified by a device ID. To set Titan's device ID select User Settings from the System menu, then go to the Timecode tab. The default setting is 0.
Audio Control (Sound to Light)
On supported consoles the audio input is divided into frequency bands which can be used to provide the trigger. The Band option selects which of the bands is being used.
| Band | Sound frequency |
|---|---|
| 1 | 50Hz |
| 2 | 140Hz |
| 3 | 380Hz |
| 4 | 875Hz |
| 5 | 2400Hz |
| 6 | 6200Hz |
| 7 | 14000Hz |
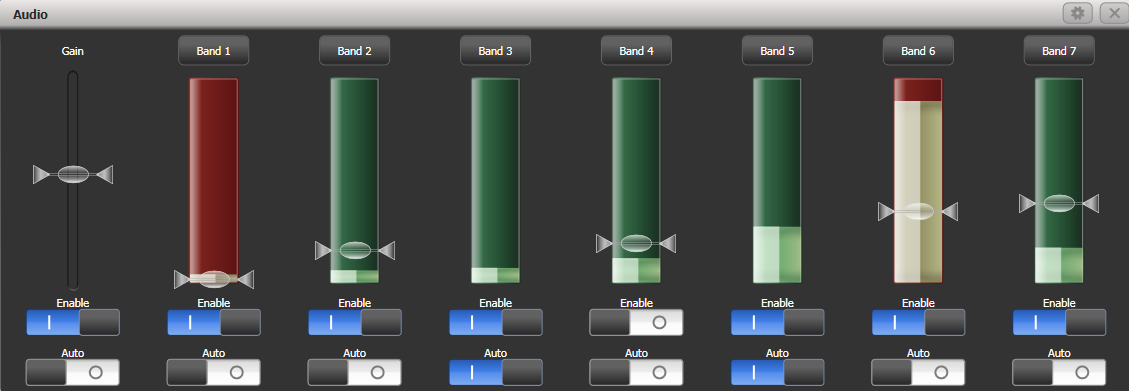
Audio triggers are adjusted in the Audio Triggers workspace which also shows the levels in the different bands of incoming audio.
If the console does not have suitable hardware a warning message is displayed (see top of page for list of audio-enabled consoles).
The Enable switch below the gain slider disables all audio triggers
The left hand gain slider sets the overall input gain, which can be used to boost weak signals
Auto gain will automatically adjust the gain, this disables the slider from manual changes
The Enable switches below each band disable triggers on that particular band
Trigger level sets the threshold for triggering on each band. The band shows red when triggered.
The Auto switches on the bands automatically adjust the trigger level on each band when no triggers are occurring.
You can quickly allocate a playback to a trigger by clicking the top Band button above the trigger, then select the playback to be triggered.
On the Arena and Quartz consoles, the Audio LED (just above the power switch) will flash when audio is received. Note that the headphone socket on these consoles is linked to the motherboard audio output and can't be used for monitoring the audio trigger input.