Layouts
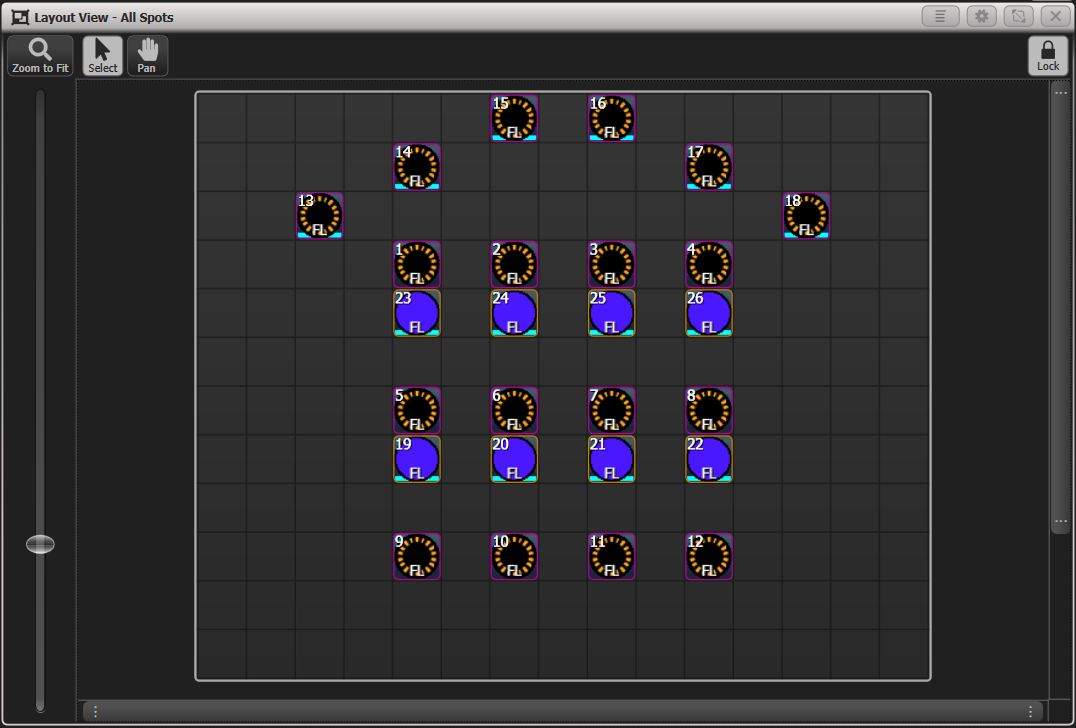
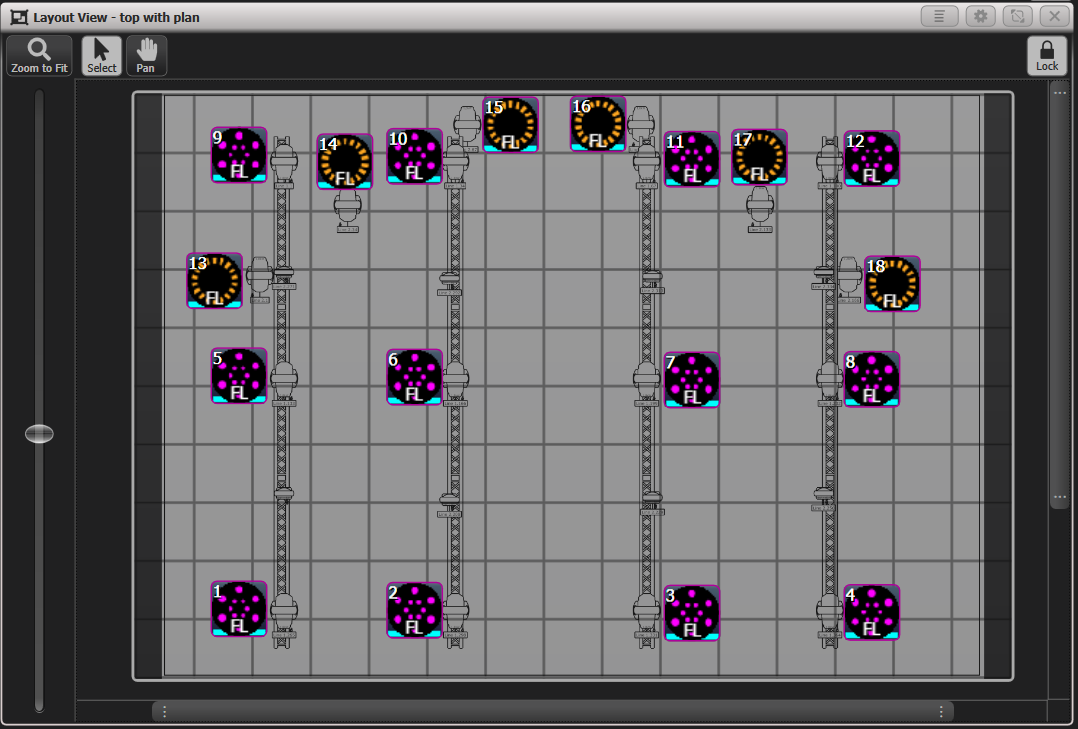
When you are selecting fixtures for control, it's often useful to refer to a plan of where the fixtures are positioned to help you identify them. The Layouts window allows you to make one or more control screens with freely-positioned fixture mimics. You can also import a lighting plan on which the fixtures can be overlaid. As well as allowing you to select fixtures, the fixture mimics also show the current intensity, colour and gobo being output by the fixture (where applicable to the type of fixture.)
You can also include playback, group and macro buttons on a layout to give you a quick way of selecting these items without having to change the workspace view.

Creating a layout
You can create any number of different layout screens and store them in handles on the Layouts window.
- Select the fixtures you want to be included in the layout (if no fixtures are selected you can add them later).
- Double tap the Open/View button and select Layouts.
- Press an empty handle button on the Layouts window.
- Enter or draw a legend for the Layout.
- Press the handle button again or Record Layout.
- Now the Layout handle has been created, press it again to open the Layout View window.
If you used Groups to select the fixtures to be included, the group layout will be used to initially position the fixtures. See [Adding fixtures from group layouts using Record] below for more details.
If you only have one screen, you may find it useful to create a workspace for the Layout Editor window so you can swap between windows while copying fixtures from the Fixtures window.
Fixture mimics
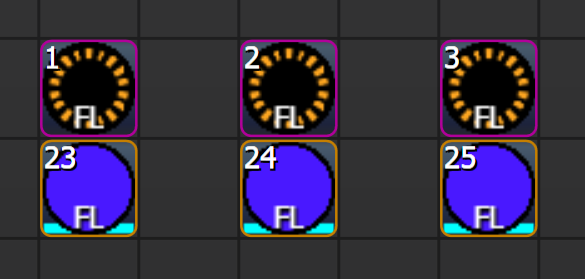
On the layout, fixtures are represented by a square "element" which uses the fixture halo colour.

- The fixture number is shown in the top left corner and the intensity at the bottom.
- The centre of the fixture shows the current colour and gobo (if it has gobos, and if the fixture personality includes the gobo patterns). This can be disabled using the Show Fixture Mimics setting in the Elements tab of the Layout View options (press the Options context button).
- If the fixture is in the programmer, a cyan highlight is shown at the bottom.
- If an effect is running on the fixture a tilde symbol is shown in the top right corner.
- If a dimmer effect is running the intensity value will be shown in yellow.
- An arrow is shown indicating the front of the fixture.
For a dimmer, the mimic will normally show as white. You can change the mimic colour to match the gel colour of the dimmed fixture by selecting the fixture(s) then set Wheels=Visualiser on the root menu, then select the Colour attribute bank and change the Red, Green, Blue colours to your desired setting.
Layout View functions
The Layout View can be locked or unlocked using the button in the top right corner.
- To position items in the layout, select unlocked - you can move items around the screen by clicking on the item then dragging it, or using the wheels but you can't select fixtures for control.
- To use the layout to select fixtures, select locked - you can select fixtures for control by clicking on them but items can't be moved. Playback/Group/Macro buttons only work in locked mode.
The Layout View can be zoomed in or out using the zoom slider on the left of the window, or you can set it to fill the screen using the Zoom to Fit button.
The and buttons set whether dragging on the screen will draw a marquee box to select fixtures or will pan the screen view.
Adding items to the layout
There are several ways to add items to the layout. Items can be deleted by pressing Delete then selecting the item(s).
Adding fixtures using Copy
Press Copy, select fixtures, then touch in the Layout View where you want the selected fixtures to be placed.
- The fixtures will be placed in a row starting at the position you touched - you can rearrange them later.
Adding fixtures from group layouts using Record
If you select fixtures using groups, and you have set up a layout for the group (see Group Layout), then the group layout will be used to position the fixtures.
Select fixtures using groups, press , then press a Layout handle. Pick one of the options from the softkeys:
- Replace will remove all items from the layout and replace them with the selected fixtures.
- Merge will add the selected fixtures to the layout.
- Update Fixture Positions from Programmer will reposition selected fixtures using the layout information stored in the group.
Fixtures will be placed starting in the top left corner of the grid. If groups don't have a stored layout or if you select fixtures individually, then the fixtures will be added in a row in the order you selected them.
Adding playbacks, groups and macros to the layout
You can include buttons for playbacks, groups and macros on a layout to give you a quick way of selecting these items without having to change the workspace view.
Press Copy, select the playback, group or macro, then touch in the Layout View where you want the button to be placed. You can select multiple items to be copied.
- When the layout is in Unlocked mode, press Delete then the button in the Layout View to remove the button. This will not affect the original handle.
Arranging elements in the layout
You can arrange the items on the layout manually, or using a variety of automatic tools. The positioning works for both fixtures and group handles.
Arranging elements manually
Select one or more elements, then drag them to the desired position on the grid. Elements will always snap to the grid.
You can also use the wheels to position selected elements and rotate them. Wheel positioning can be disabled using the context menu option Position & Angle (which toggles with No Wheel Control).
When using the wheels to position, you can move elements off the grid by toggling the context menu option Wheels Move Full Pixel / Wheels Move Sub Pixel. Once elements are offset from the grid they will keep their offset when moved in Full Pixel mode or by dragging, until you set them back on the grid using the wheels or the context menu option Snap Selected Elements to Grid.
When rotating elements, if the Wheels Move Full Pixel option is enabled then the elements will rotate in 45 degree increments, otherwise you can set any angle. If you have selected multiple elements for rotation, the context menu toggle Wheels Rotate Individual Elements / Wheels Rotate Selection sets whether each individual item will rotate on its own centre or whether the whole selection will rotate about the centre point of the selection.
Arranging elements using shapes
You can automatically arrange elements into a rectangle, circle/oval or triangle:
- Press the context menu button Arrange Elements.
- Select the context menu option Shape.
- Choose whether to arrange all elements or only selected elements by toggling the softkey option All Elements / Selected Elements.
- Select the shape you want (rectangle, oval or triangle) using the softkey Shape=.
- Set the number of rows / columns you want to have using the softkeys Width= and Height=.
- Choose whether elements should be placed across then down, or down then across by toggling the option Arrange in Rows / Arrange in Columns.
- Press OK.
Arranging fixtures using visualiser layout
If you have fixtures set up in the onboard Capture visualiser, you can use the visualiser positions to arrange fixtures in the layout.
- Press the context menu button Arrange Elements.
- Select the context menu option From Capture.
- Choose whether to arrange all elements or only selected elements by toggling the softkey option All Elements / Selected Elements.
- Choose which view/projection to use from Capture (Top, Front, Side) using the softkey Projection=.
- If necessary adjust the Scale= option for best results (to prevent having overlapping fixtures).
- Press Apply to preview the changes.
- When the layout is OK, press Apply and Exit to save the changes.
Grid options
The grid displayed on the layout screen can be extended to allow more fixtures, and can be hidden.
To extend or shrink the grid area, drag the corner handles (while in Unlocked mode). The context menu Crop Grid button can be used to shrink the grid area so that it just encloses all the fixtures with no spare space.
To show or hide the grid, from the context menu select Options then go to the Layout tab and set the Show Grid toggle.
Loading a lighting plan
You can import a lighting plan image to show behind the fixtures.

- Save your plan as an image file (png, bmp, jpg - not PDF).
- From the context menu Options, go to the Layout tab.
- Click on the Background Image to open the image browser.
- Select the image you want to use.
Click on Background Image and Use the softkey Scaling Mode to select
- None (image displayed full size, overflow will be lost)
- Letterbox (Fit the largest of height or width, fill other side with black bars )
- Fill (Fit the smallest of height or width, the other side will overflow and be lost)
- Stretch (stretch to fill height and width without preserving the aspect ratio of the image)
You can set the opacity of the image if you want to fade the plan into the background, by entering a number in the Opacity option on the Layout tab, or use Wheel A. 0% = fully transparent, 100% = fully opaque. The fixture mimics are always overlaid on top of the background.
Swapping layout views
You can change to a different layout view either by selecting another handle in the Layouts window, or by using the Open Layout context menu button - this shows a list of available layout views on the softkeys for you to select.