Upgrading the Software
The console operating software is under constant revision by the Avolites team. You can always download the latest version of the software from the Avolites website: http://www.avolites.com.
From v10 it is possible to keep the older versions of Titan installed on a console when you install a new version, which is useful for backwards compatibility if you need to load a show created in an older version. To swap between versions go to Switch Software on the Tools menu.
The Titan PC Suite software, used for T1, T2, T3, Titan Mobile and Titan Simulator, is installed simply by running the "PC Suite" installer program as with any other Windows application. Please ensure you have exited the Titan software before running the installer. The "Titan Go" application is now used with all hardware (there is no longer a separate Titan Mobile application).
If you are upgrading the software from a version earlier than v12, you will have to obtain an AvoKey USB dongle from Avolites and license the software. See the Software Licensing section for details of how to do this. Once the console is fitted with a licensed AvoKey you do not need to re-license it when upgrading to subsequent versions.
It can take some time to install new software, especially if you have to do a recovery install, so this is not a job for a show day!
Always make a backup of your show files before upgrading the console software.
Software upgrades for consoles are installed from a USB drive. Depending on the updates included in the new version, and which version you are updating from, it may be necessary to use a separate PC or laptop to create a "Recovery Installer" USB drive. The instructions on the Avolites website will tell you whether you can do an Upgrade or whether you need to make a Recovery Installer. Please contact Avolites Support if you need help with this. There is also a link to the Recovery Creator Guide at the bottom of the downloads page.
Console Update Procedure (Recovery Installer)
- Go to the Downloads page on the Avolites website and select your console. Download the Recovery Creator software to your PC.
- Insert a blank 16GB USB drive into your PC and run the Recovery Creator software to create a bootable Recovery Installer drive. (see the Recovery Creator Guide on the website for more details).
- Insert the USB drive into the console and power on the console. The console should boot into a "Recovery Environment".
- Select the "Standard Recovery" option and follow the instructions on screen.
Console Update Procedure (Upgrade File)
Go to the Downloads page on the Avolites website and select your console. Check if an Upgrade installer is available to upgrade from your current version - if not, use the Recovery Installer procedure above.
Download the Upgrade Installer file and copy to a USB drive, then insert into the console.
Click the Tools menu on the toolbar, then Control Panel, then Titan Installers. This will list all installers - software and personalities - found in the root directory of the stick (provided you haven't changed their filename).
Click the software version to install, and follow the instructions.
If for whatever reason Titan doesn't show the file in the Titan Installers submenu you can find and double-click it through Tools -> Folders.
When the installation has completed, a prompt will be shown to restart the console and it will start back up into the version installed.
Titan PC Suite (Titan Go or Titan Simulator Procedure)
- Ensure Titan software is not running on the computer.
- Locate the downloaded file Avolites Titan PC Suite Setup and double click on it to run it.
- Click OK on the Windows User Account Control warning box.
- When the installation has completed, a prompt will be shown to restart the computer.
Upgrading panel firmware with USB Expert
After upgrading the software it is sometimes necessary to upgrade the firmware in the various panels which make up the console control surfaces. You can do this using the Avolites USB Expert application which is installed on the console.
Sometimes the USB Expert application might be opened automatically after completion of a software upgrade, to prompt you to upgrade panel firmware.
Use the following steps to upgrade panel firmware:
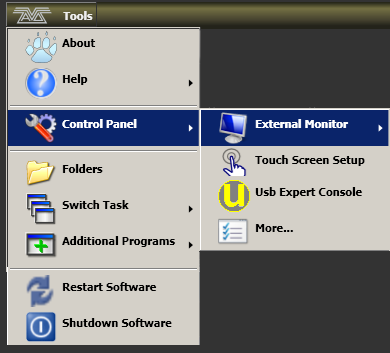
In the screen Tools menu, click on Control Panel and select the USB Expert Console option. For a PC-based device or panel such as T1, T2, T3 or Titan Mobile, run USB Expert Console from the start menu.

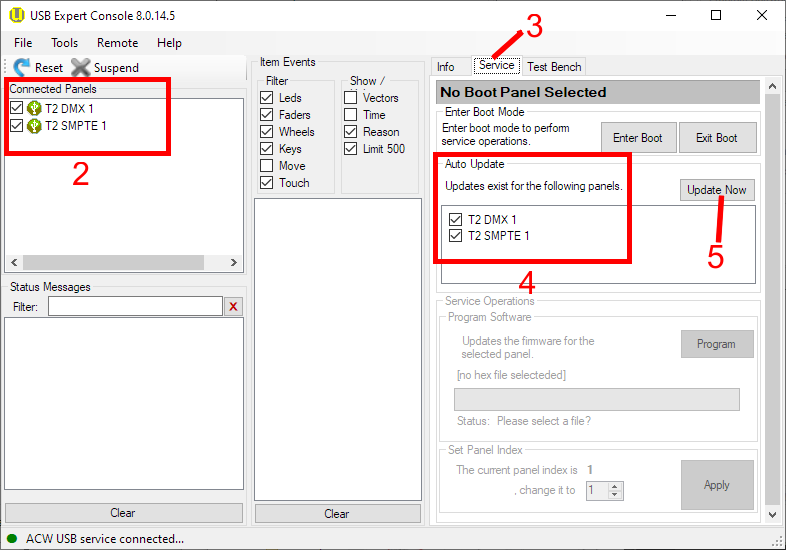
You should see a list of the panels on the console in the left hand Connected Panels window (the list will vary depending on the console type).

On the right hand side of the window select the Service tab.
In the Auto Update box on the right hand side, any required firmware updates will be listed. The list may vary depending on the console type and the updates available - sometimes no updates might be found or needed.
If updates are needed, click Update Now to start the process and the system will update the panels one by one. A green progress bar will be shown in the bottom part of the window.
When the Auto Update box is empty, close USB Expert, shut down the console using the power button, then restart it.
You can check the status of all panels using the Connected Panels window.
If you are updating a PC-based panel such as Titan Mobile, T1 or T2 and no panels are listed in the Connected Panels window, click on Tools, then Acw Service, then Start.
You can test the function of all front panel controls using the Item Events window in the middle - pressing a button or moving a fader/encoder should show event messages in the window.
If the panel update has not completed after 10 minutes, press Exit Boot regardless and wait for all panels to reappear in the Connected Panels window. Then repeat from step 3 to check whether all panels have in fact been updated.