Die Tasten der Konsole
Die den Fadern zugeordneten blauen und grauen (Auswahl und Flash) Tasten sowie die Macro/Executor-Tasten sind weitgehend frei zu konfigurieren.
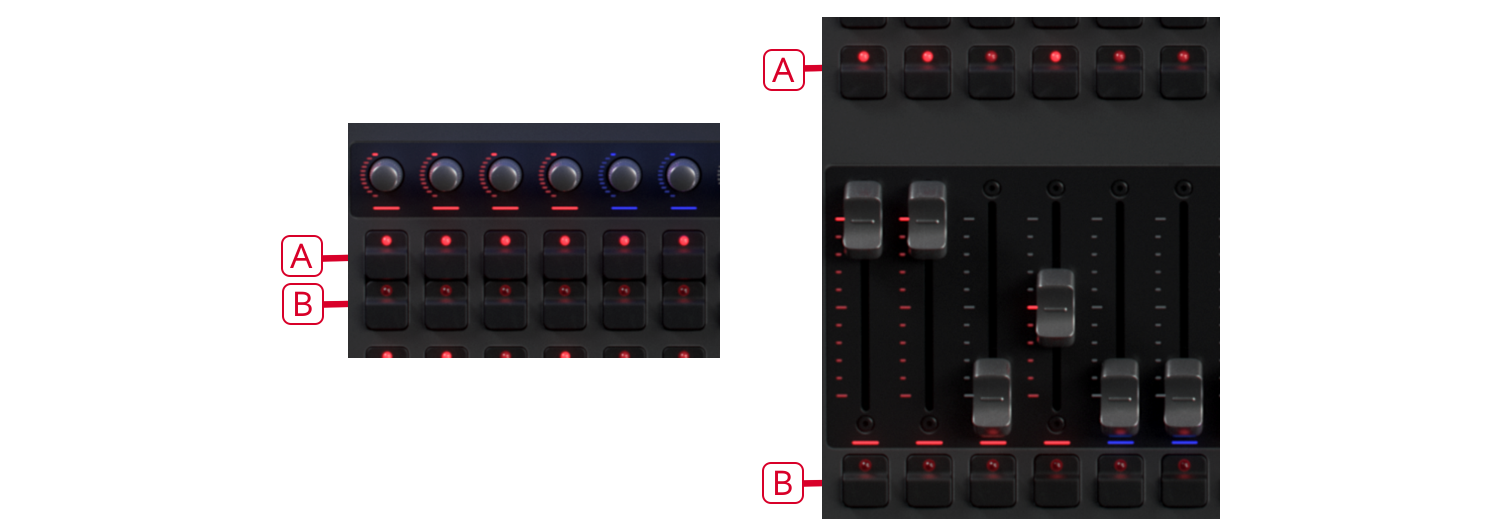
Auswahl- und Flashtaste
Zu jedem Fader auf dem Pult gibt es verschiedene Tasten.
A Auswahltaste
B Flashtaste
Auf dem Diamond 9 sind die Tasten für die Drehregler und Fader wie folgt angeordnet::

Auf dem Sapphire Touch sind die Tasten für die oberen sowie die unteren Fader wie auf den nachfolgenden Bildern angeordnet. Dabei hat das Sapphire Touch jeweils auch noch eine schwarze Taste, die per Key Profile belegt werden kann.

Bei allen anderen Pulten sind die Tasten folgendermaßen angeordnet:

Key Profiles -- Tastenprofile
Es ist möglich, die Funktionsweise der Flash- und der Auswahltasten (sowie der schwarzen Tasten beim Sapphire Touch) zu ändern. Ebenso lässt sich die Funktion einiger Schaltflächen ändern. Diese Einstellungen lassen sich als Key Profile (Tastenprofil) abspeichern. Einzelne Tastenprofile lassen sich einzelnen Benutzern zuordnen oder für die vereinfachte Bedienung des Pultes bei bestimmten Anwendungsfällen verwenden.
Macros -- Tastenfolgen
Während des Programmierens sind zuweilen bestimmte Abfolgen von Tastendrücken sehr oft auszuführen. Zur Vereinfachung lassen sich solche Tastenfolgen sehr einfach abspeichern und mit dem Betätigen einer einzigen Taste wieder abrufen; dies wird Macro genannt. Macros können die Tastendrücke mit den aufgezeichneten Pausen (Real Time) oder aber so schnell wie möglich (Full Speed) wiedergeben.
Full Speed dient dabei insbesondere für wiederkehrende Aufgaben beim Programmieren, während mit Real Time auch ganze Effekte - mit ihrem Timing - wiedergegeben werden können.
Macros können in den meisten Arbeitsfenstern sowie direkt auf den dafür vorgesehenen Tasten auf dem Pult abgelegt werden; außerdem gibt es ein Fenster "Macros". Die 10 'Macro'-Tasten (altes Tiger Touch) korrespondieren mit den ersten zehn Schaltflächen im 'Macros'-Fenster, während die Macro/Executor/Workspace-Tasten im Fenster 'Feste Playbacks' angezeigt werden.
Auf dem Diamond 9 gibt es extra 6 Macrotasten mit einem Display zur Anzeige der aktuellen Funktion zwischen den Faderbänken.
Das Arena hat noch zwei weitere Macro-Tasten vorn links auf dem Pult.
Ein Macro aufzeichnen
- Drücken Sie die blaue Taste Macro (oberhalb des Ziffernblocks)
- Drücken Sie .
- Wählen Sie Full Speed oder Real Time.
- Betätigen Sie eine freie Taste oder Schaltfläche auf dem Touchscreen, oder drücken Sie auf , um das Macro nur in die Show Library zu speichern. Damit beginnt die Aufzeichnung. Währenddessen blinkt die Taste Macro.
- Führen Sie nun die aufzuzeichnende Tastenfolge aus.
- Klicken Sie Macro zum Beenden der Aufzeichnung.
Zum Ausführen des aufgezeichneten Macros einfach die Taste betätigen, auf der das Macro gespeichert wurde. Daraufhin werden sämtliche Schritte der Tastenfolge automatisch ausgeführt (wahlweise mit den aufgezeichneten Pausen oder in schneller Folge).
Tastenkombinationen
Viele Funktionen des Pultes lassen sich durch Tastenkombinationen aufrufen; dies ist insbesondere mit dem Titan Mobile oder dem Titan Simulator sinnvoll.
Dabei 'fängt' Titan (das Pult-System) die Tastendrücke ab; soll ein anderes Programm Zugriff auf die Tastatur haben, so muss die ‚Break'(Pause)-Taste gedrückt werden, womit weder Tastenkombinationen noch Texteingabe am Pult funktionieren. Umschalten des Menüs reicht die Tastatur wieder an Titan durch.
| Taste | Aktion | Taste | Aktion | |
|---|---|---|---|---|
| F1 | Hilfe (englisch) anzeigen | Ctrl X | Ausschneiden (Text) | |
| F2 | Fenster wählen | Ctrl C | Kopieren (Text) | |
| F3 | Min/Max | Ctrl V | Einfügen (Text) | |
| Shift F3 | Nächstes Fenster | Ctrl A | Alles markieren (Text) | |
| F4 | Größe/Position | Ctrl Z | Undo | |
| Shift F4 | Bildschirm wechseln | Ctrl Y | Redo | |
| F5 | Fenster schließen | Alt C | Clear | |
| Shift F5 | Alle Fenster schließen | Alt R | Record | |
| F6 | Fenster 'Playbacks' | Alt A | Avo (shift) | |
| F7 | Fenster 'Fixtures' | Alt L | Locate | |
| F8 | Fenster 'Groups' | Alt P | Patch | |
| F9 | Fenster 'Colours' | Alt ⇑ D | Disk | |
| F10 | Fenster 'Positions' | Alt ⇑ S | System-Menü | |
| F11 | Fenster 'Gobos/Beams' | Alt V | Open/View | |
| F12 | Fenster 'Channel Grid' | Alt G | Go | |
| Esc | EXIT | Alt D | Delete | |
| Enter | ENTER | Alt ⇑ C | Copy | |
| Alt 1 | Menütaste A | Alt M | Move | |
| Alt 2 | Menütaste B | Alt U | Unfold | |
| Alt 3 | Menütaste C | Alt I | Include | |
| Alt 4 | Menütaste D | Alt ⇑ R | Release | |
| Alt 5 | Menütaste E | Alt S | Shape | |
| Alt 6 | Menütaste F | Alt ⇑ T | Fixture Tools/ML Menu | |
| Alt 7 | Menütaste G | Alt B | Blind | |
| Alt ⇑ F | Fixture | Alt O | Off | |
| Alt ⇑ P | Palette | Alt F | Fan | |
| Alt ⇑ M | Macro | Alt ⇑ O | Attribute options | |
| Alt ⇑ G | Group | Alt ⇑ L | Latch menu | |
| / (num) | Thro | Alt Q | Cue/Connect | |
| * (num) | @ | Alt W | Open Window | |
| - (num) | Not | Alt T | Times | |
| + (num) | And | Alt ⇑ U | Update | |
| Alt ← | Previous fixture | Alt ⇑ I | Select If | |
| Alt → | Next fixture | |||
| Alt ↑ | All | |||
| Alt ↓ | Highlight |
⇑ = Shift/Umschalt
(Num) = auf dem Ziffernblock