Viewing and Editing Fixture Values
The Channel Grid Window
It can sometimes be useful to display and edit exactly what each fixture is doing. The Channel Grid window allows you do to that. Display it by pressing View/Open then Open workspace window then Channel Grid.
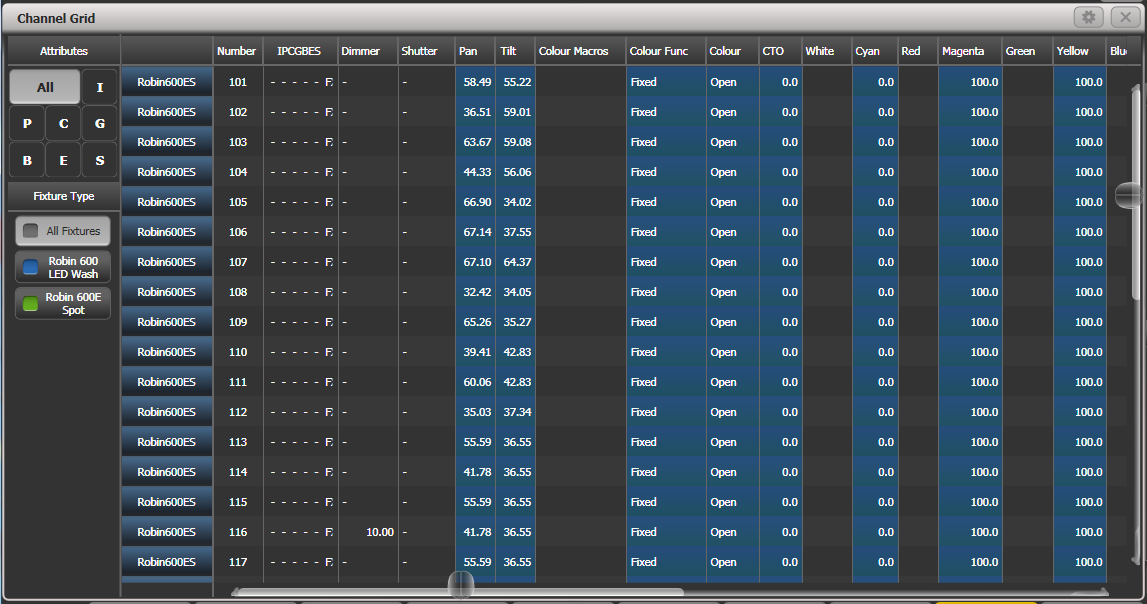
The window can be set to different modes using the context buttons to the left of the menu. The modes are:
All / Stage / Programmer / Selected: lets you filter which fixtures are shown in the list. Stage lists all fixtures with dimmer above zero.
Sort: Sets the list order as User Number, Last Selected or DMX Address
Open Intensity View: Opens the intensity view window. You can swap back to the Channel Grid by pressing the Open Channel Grid button in that window which is in the same position.
Show/Hide Palettes: lets you show which palettes are allocated to fixture attributes
Playbacks / Levels / Shapes / Effects / Times: Only one of these buttons can be selected, and sets what is displayed in the columns.
You can select fixtures by touching the fixture names on the left of the screen, or if you select any fixture values, the appropriate fixture will automatically be selected.
You can clear attributes in the channel grid by selecting them (touch or touch and drag to select multiple attributes). Then press
Clear.You can edit values by selecting one or more values in the grid, then modify the values using the wheels, or type a new value on the numeric keypad and press Enter.
You can filter what is shown in the grid either by IPCGBES attribute (using the buttons top left) or by fixture type (using the buttons below that).
Intensity Window
If you want to see at a glance the intensity setting of each fixture, the Intensity window is the place to be. To show the window, press
Open workspace window then Intensity.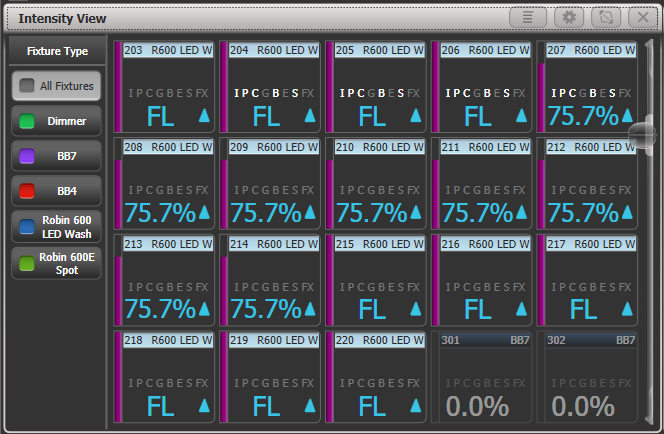
Each fixture has a block showing the intensity as a number and as a bar down the left side. The header bar shows selection/programmer state like fixture buttons -- blue for selected and cyan for in programmer.
Rising or falling intensity is shown with a blue up arrow or a green down arrow.
Tracked values from previous cues are shown with a magenta equals sign.
In a solo or block cue a red "not permitted" symbol is shown.

If intensity levels are controlled by an effect they are shown in yellow with a tilde symbol (~).
If the intensity is controlled from a cue or cue list the name of the cue will be shown.
The IPCGBESFX states of the fixture are also highlighted if any attributes have been set in the programmer.
If colour halos are set for the fixture buttons, the halo is also displayed around the fixture intensity. This option can be changed to show the automatic fixture colours, see below.
Filter the view to show only a certain type of fixture using the buttons on the left
Change the display order of the fixtures using the Sort context menu buttons - User Number, Last Selected or DMX Address.
Click on a fixture to select it, you can then edit the intensity directly.
Press View/Open followed by a fixture button to show more detailed information about the fixture.
The context menu options give you settings to change how the window is displayed.
The first option lets you only show fixtures in a particular state:
All - all fixtures (default)
Stage - fixtures with intensity above zero
Programmer - fixtures in the programmer
Selected - fixtures which are selected
Live cues - only intensities coming from active cues
Connected cue - only fixtures in the currently connected cue (for cue lists or chases)
Frozen - fixtures with frozen intensity
The second option changes sort order as described above
Search allows you to enter characters to search for in the legend or user number, matching fixtures will be shown as you type. When Search is active a search bar is shown at the top of the window, click the X to remove the search filter or click on the text to modify the search string.View If lets you click on a group and/or playback to show only the fixtures in that group or playback. For a chase or cue list, this will include all fixtures in all the cues of the chase/list. The filter settings are shown in a bar at the top of the window, click the X to remove the filter or click on the bar to change the group/playback.Open Channel Grid opens the Channel Grid.
In the Window Appearance Settings (cog button) there are further display options. Turning off some of the options will reduce the size of each fixture button which may be useful if you want to get more fixtures on the screen.
Filter Fixtures Shown/Hidden: Shows or hides the fixture selection buttons on the left
User Number Hidden/User Number Shown/DMX Address Shown: Sets what information is shown in the top left corner of the button
Legend Shown/Hidden: Sets whether the fixture legend is shown in the top bar
Cue Information Shown/Hidden: Sets whether the button shows the current cue information
Attribute Mask Shown/Hidden: Sets whether the button shows the IPCGBESFX settings
Halo Colour Custom/Auto: If set to Custom, buttons will have a halo colour if you have set one, otherwise they will not have a halo. If set to Auto, buttons will be coloured using the automatic fixture type colour used in the filter buttons on the left.
Fixture Cells Shown/Hidden: If set to Shown, separate buttons are shown for cells (sub-fixtures) of any multi-celled fixture, along with a master intensity.
Tracked Fixtures Shown/Hidden: (This option only appears when the view is filtered to Live Cue or Connected Cue). Sets whether fixtures with tracked intensity are shown or not.