Cue List Playback
Running a Cue List
Raise the fader of the cue list and press the Go button to run the first cue. The bottom section of the display shows the cue list; the current cue is highlighted in grey and the next cue has a box round it.

Also the display relating to the playback fader shows information about the cue list, including the current and next cue, fade progress of the current cue, and fade in/out times.

You can also open the Playback View window to show more details of the cue list by clicking the Cue List legend area or press View/Open then the swop button of the playback. This shows all the timings, links and tracking status and is very useful when running a theatre show on a cue list.
The option "Auto View On Connect" (in the User Settings/Wheels menu) if enabled will automatically open the relevant Playback View window when you fire a cue list.
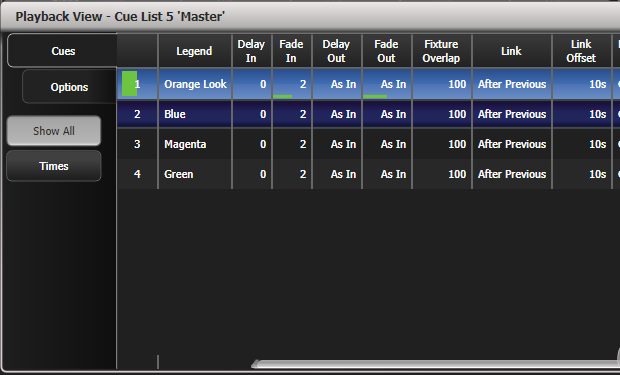
When times are in progress on a cue, green progress bars are shown in the Playback View window.
The Playback View will autoscroll to keep the active cue on-screen. You can change the way the autoscroll works using the view options (click the options/cog icon at the top of the window).
The HTP levels of cues in the cue list are mastered by the fader level.
You can pause a fade by pressing the button above Go. Press Go again to resume the fade.
You can skip to any cue in the cue list by selecting a "next" cue using Wheel A, or using the left/right arrow keys. When you press
Go, the cue list will run that cue next.You can snap back to the previous cue by pressing the Snap Back button (not on all consoles)
On consoles with a Snap button (Arena and Tiger Touch 2), when you turn on the Snap button the Prev/Next buttons will snap immediately to the cue rather than going to the previous/next cue using the programmed times. There is also a User Setting Chase Snap which enables this mode on consoles which don't have the button.
You can jump directly to a cue by pressing Connect, then typing in the desired cue number, then pressing Enter or softkey A. Alternatively at the top level menu you can type the cue number then press Connect.
You can use Key Profiles to set the blue and grey buttons of the playback to have various functions including Go, Stop, Connect, Next Cue, Prev Cue, Cut Next Cue To Live, and Snap Back, see Key Profiles.
When you lower the fader for a cue list, the HTP channels will fade out, but the cue list will remain active. The section below details how to kill the cue list.
You can use timecode to play back a cue list automatically. See section Cue List Timing.
You can change the time for the next cue by entering the time on the keypad then pressing Go. You can jump to another cue and set a different time by typing the cue number then press Connect, then type the time and press Go.
Killing a Cue List
Once a cue list is fired, it remains active until you kill it. You do this by holding down the Avo button and pressing the blue Select button of the cue list's handle.
You can change this in the Playback Options to make the cue list automatically clear when the fader reaches zero (press Playback Options at the program menu, then press the Select button of the cue list, then select Fader Fader Mode Intensity Kill At 0.
You can also use Key Profiles to configure one of the handle buttons to release the cue list.
While the cue list remains active, any shapes/effects stored in the current cue will run even if the fader is at zero. If you are working with a cue list and have unexplained shapes occurring, check all cue lists have been killed.
Tracking
Video covering Tracking in Cue List
By default, cue lists run in tracking mode. Only changes in attributes are stored, everything else just continues at the level it was previously set to. Tracking mode is usually used for theatrical performances because it makes editing much easier; if you need to adjust a dimmer level at the start of a scene, you don't have to go through and change the level on every cue for that scene, the change just tracks through the other cues until a new level is stored.
You can enable or disable Tracking mode globally for the whole cue list, or each cue can have Tracking mode set individually from the Playback View window (or Playback Options, Cue Options).
Settings are:
| Setting | Action |
|---|---|
| Global (default) | Obeys the global setting for the cue list. |
| Track | The cue will track |
| Block | The cue will not take tracking states from previous cues. All subsequent cues will track from the Block cue. |
| Solo Excluding Shapes | No states are tracked into or out of the cue, but shapes will track into the cue, except for dimmer shapes which will not track. This lets you have a cue that solos all levels but allows non-dimmer shapes to continue. |
| Cue Only | Changes in this cue will not track to subsequent cues. Unchanged states from previous cues will be restored in subsequent cues. |
| Solo | No states are tracked into or out of a solo cue. States from previous cues will track to subsequent cues but will not appear in the solo cue. |
| Block Shapes | Any tracked shapes will stop from this cue. Other attributes will continue to be tracked. This lets you create a point where you can guarantee all shapes will stop. |
Move In Dark (MID) Functions
When using moving lights in theatre, often you would like them to be positioned ready for the next cue so that you do not see them moving. The Move In Dark function does this by automatically positioning the fixture for the next cue when it is not lit.
Move In Dark options can be set either for the whole cue list or for individual cues.
Options for the whole cue list are set by pressing Playback Options then the select button for the cue list, then Playback.
| Setting | Action |
|---|---|
| Disabled | Prevents Move In Dark functions for all cues in the cue list regardless of the individual cue settings |
| Early | Will attempt to position a fixture as soon as possible unless overridden in an individual cue |
| Late | Will position the fixture as late as possible |
| Off (default) | Turns off Move In Dark unless enabled in individual cues |
For individual cues the options are set using the Playback Window.
| Setting | Action |
|---|---|
| Global (default) | Uses the cue list's global setting |
| Cue Number | Specifies a cue where you would like the move to occur |
| Cue Offset | Specifies a preferred number of cues in advance |
| Disabled | Prevents Move In Dark for this cue |
| Early | Will move as early as possible |
| Late | Will move as late as possible |
Move In Dark delay and Move In Dark fade times can be set for the whole cue list or for each cue using the Set Times menu. Each cue also has a Move In Dark Inhibit option which prevents any movements during that cue (useful if you need to prevent fixture noise at a particular point).
If the fixture has its intensity above zero or Move In Dark is inhibited when the Move In Dark is supposed to occur, the console will attempt the movement in the nearest suitable cue instead.
Key Profile Options for Cue Lists
Using Key Profiles, you can assign different functions to the blue and grey buttons of the playback handle. (The Sapphire Touch also has a black button). If the cue list is stored on a touch button you can assign a function to that. See Key Profiles for a full list of functions.