Editing Cues
Editing a Cue by Merging
You can edit any part of a cue you have already saved simply by making the changes and saving the new information on top of the cue.
Press Clear to empty the programmer
Fire the cue you want to edit, so you can see what you are doing.
Kill all other cues to avoid confusion.
Select the fixtures you want to change, and make the changes
Press
Press the Swop button for the cue you are editing
Press Merge (the cue being edited is highlighted on the screen)
The console will merge the existing cue with your changes. Unchanged information is not affected.
If you want to overwrite the cue entirely, use the option
Replace at step 6 - but remember that unless you are in **"Record by Stage"** mode, any fixtures you haven't changed won't be saved.To speed up editing, you can set the console to "Always Merge" the cue. This option is set in the Handles tab of User Settings (press
Avo and select User Settings).You can also press the Swop button for the cue a second time to select the "Merge" option (quicker than selecting the softkey Merge option).
Updating Stored Values and Palettes used in a Cue
If during a show you need to quickly update a cue, or a palette used in a cue (for example you fire a green cue and the fixtures turn out to be not quite the right colour) the Update function lets you quickly update either the cue itself or the palettes used in the cue.
For instant update of a fired cue, change the fixture settings and press
Update twice.With the cue fired, select the fixtures and change them to the settings you want to store (e.g. the right green colour)
Press Update *(on consoles without an Update button press
Record Cue, Update)*Press Enter to immediately store the new values to the cue
Alternatively, the softkeys show a list of palettes and playbacks which can be updated. Select or deselect these as required.
If you have used the softkey options, press Enter to complete the update.
You can also select which palettes will be affected by pressing the palette's button twice.
If you manually set an attribute in the cue which was set by a palette, then press Update Update, the palette will be removed from the cue. If you want to update the palette, use the softkey options or press the palette button.
If you change an attribute using a different palette, the new palette will be stored instead.
Playback and Cue View
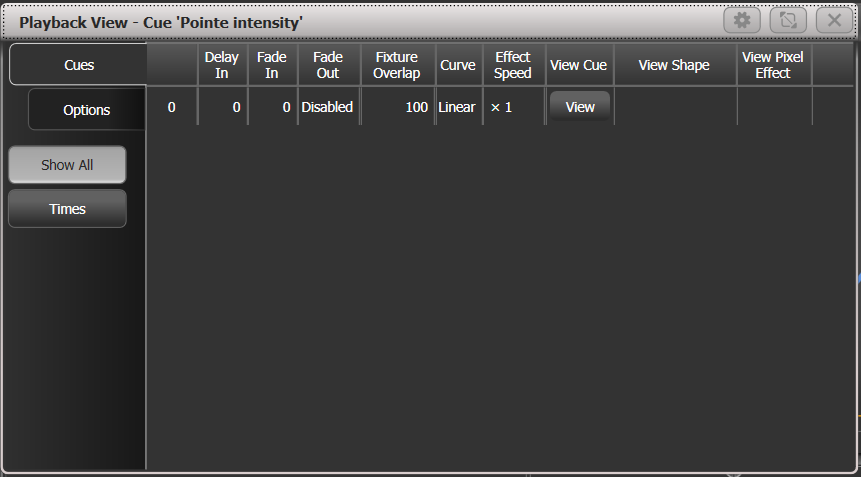
To see the current timings of the cue, touch the playbacks display for the fader, or press View/Open then the swop button of the playback you want to view. The screen will show details of the delay, fade, overlap and curve settings for the cue. You can touch each item to enable editing.
If a shape or pixel map effect is stored in the cue, you can view or edit the effect by clicking the button in the appropriate column.
The Effect Speed column allows you to set a multiplier or divider for the speed of effects in the cue.
The Times button on the left removes some of the columns, showing only timing related information.
Filter Columns
You can configure which columns are shown in the Playback View using the
Edit Columns context menu button. Once you have set a view you can save it to a filter button which appears below the Times button on the left.Press Edit Columns on the context menu.
Using the softkeys, enable or disable the columns to get the view you want.
Press . An Add button will appear at the bottom of the screen.
Press the Add button to create a filter button for this view.
You can set a legend and colour halo for the filter button using the normal Set Legend function.
You can delete filter buttons by pressing Delete then the button.
Cue View
If you touch the View button at the right hand end of the row or the
View Cue context button, the Cue View window opens, showing you details of the settings individual timings for all the fixtures in the cue.The Cue View has four different views: Levels, Palettes, Times & Shapes. Views are selected using the context buttons to the left of the menu buttons.
The Levels view shows the individual attribute values for each fixture.
The Palettes view shows which palettes have been used to record the cue. Palettes are shown by their legends. Where an absolute value was saved rather than a palette, the value is shown instead. Again you can edit or remove the values.
The Times view shows individual attribute timings for fixtures. If global timings are set, no times are shown in the cue view.
The Shapes view shows which attributes of each fixture are running shapes.
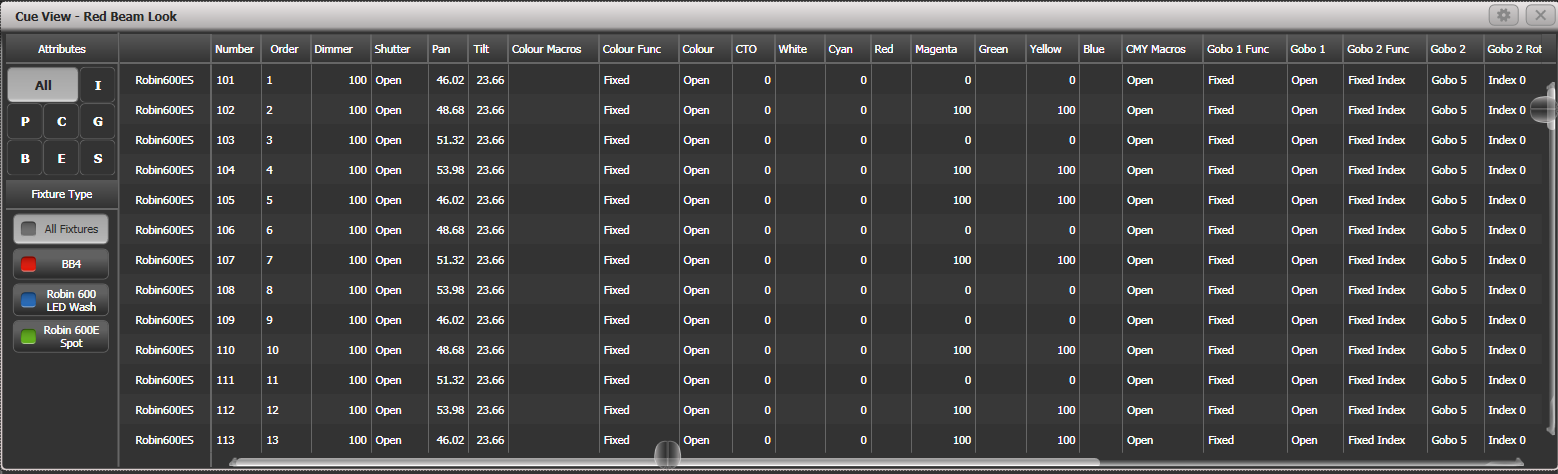
Filter which attributes you are shown using the All/IPCGBES buttons in the top left corner.
Filter which fixtures you are shown using the fixture type buttons on the left.
Edit Values in Cue View
You can edit or remove one or more individual control values in the cue:
Touch or drag over the required control values in the grid to select them - they will be highlighted in blue
The softkeys then give you available settings for that control value, or you can directly edit values by typing numeric values and pressing
EnterYou can delete the selected control(s) using the Delete softkey
You can turn attributes On and Off using the Off button and the
On softkey. Off temporarily removes a value from the cue, it can later be restored using On.You can remove a fixture completely from the cue by selecting the fixture then pressing the Remove Fixtures softkey.
Any changes take immediate effect.
Using Parts of Existing Cues - the Include Function
The Include function lets you load selected parts of a cue back into the programmer. (Normally, only manual changes to fixtures are put in the programmer). You can then use this to make a new cue. This is useful if you want to make a cue which is similar to one you already have, or to build a new cue from various parts of other cues. It's also useful when editing shapes in cues.
There are two modes, Quick Include and Advanced Include. Quick Include simply reloads the whole cue. Advanced Include allows you to specify which attributes of which fixtures you want to load into the programmer. So, for example, if you have a cue which contains position, colour and gobo information for 8 fixtures, you can use the include function to load only the colour information for 4 of the fixtures into the programmer. You could then Include position information from another cue into the programmer, and build up a new cue using information from several existing cues.
If you Include a chase or cue list, the screen shows you a list of the cues within it, and you select the one you want to Include using Wheel A or by touching the cue. You can also type in the cue number to Include.
Press Include.
Press Quick Include or Advanced mode if you want to change the mode.
Press the Swop button of the cue you want to include into the programmer. If you are in Quick Include mode, this Includes the cue and finishes.
If you are in Advanced Include, all fixtures in the cue will be selected. If you don't want them all, deselect the fixtures you don't want. The fixtures in the cue are highlighted on the screen and on the fixture buttons.
Use Set Mask or the Attribute Bank buttons to select which Attributes you want to include (all are included by default - Softkey C turns them all off and Softkey D turns them all on). Softkey E lets you include or exclude Shapes from the cue.
Press Enter. The selected attributes of the selected fixtures will be loaded into the programmer.
- Repeat steps 2 - 6 to include other attributes from the same fixtures, or repeat steps 1 - 6 to include other fixtures.
In Quick Include mode, you can set a mask for the include by pressing one or more of the attribute bank buttons before you select the cue to include.
Removing Attributes from Cues Using "Off"
Video covering the Off function
The Off button allows you to remove an attribute which has been stored in a cue, as if you'd never recorded it.
For example, suppose you recorded a cue which had fixtures at a certain position, with the colour set to green. If you later decide that you don't want a colour recorded at all in the cue, so that the playback will position the fixtures but leave the colour set by previous playbacks, you set the colour values to Off in the programmer, which when saved will remove those values from the cue. You can also use the Off function to remove complete fixtures from a cue.
Setting an attribute to Off is not the same as recording an attribute at zero, since this would change the attribute when the cue was fired. It is the same as excluding that attribute using the mask when recording, so the attribute will remain unchanged when the cue is fired.
Press Off, then Off Playback Values followed by the playback to be changed.
All fixtures in the playback will automatically select. If you only want to change some fixtures to Off, change the selection.
By default the attribute mask is set so all attributes will be changed to Off. Press Set Mask to choose which attributes will be set to Off.
Press the Off softkey
You can also use Include to set values to Off.
Use the Quick Include function (described in previous section) to load the cue you want to change into the programmer.
Press Off to display the Off menu.
All fixtures in the cue will be selected. If you don't want to change them all, deselect the fixtures you don't want.
Use the Attribute Bank buttons to toggle which attributes you want to change. Then press the Attributes Off softkey to set them to Off. The bottom softkeys also give options such as Dimmer Off.
Press , then set the record mode to Replace, and press the Swop button of the cue to update it.
To turn off all attributes of all selected fixtures, press Off then Selected Fixtures Off.
You can merge "Off" attributes into a cue without including it first.
You can also remove attributes from palettes using the Off function.
Another way to remove attributes is from the Cue View window.
Attributes set to Off can be restored to their previous value using the On function. Set the attribute to On and merge it into the cue.