Cue List Timing
Time and Fade Options for Cue Lists
Time settings are independent for each cue in the cue list. The display shows which cue you are working with. You can select which cue is active using Wheel A or by pressing Select Cue Number softkey in the Edit Times menu for the cue list.
See the diagram below for more information about overlaps and fade times.
- Press Edit Times at the root menu then the Select button of the Cue List.
- To change which cue you are editing, scroll through the list using Wheel A or press Select Cue Number then type the cue number you want to edit and press Enter.
- The Chase arrow buttons to the right of the Connect button also step through the cues.
- You can select a range of cues, enabling you to alter the timings of multiple cues all in one go, by using Wheel B, or in the Playback View window, dragging across the cues you want to select in the grid.
- Setting times
- To set the delay time between pressing Go and the cue starting, press Delay In then type a time in seconds and press Enter.
- To set the fade in time of the cue, press Fade In then type a time in seconds and press Enter. Both HTP and LTP channels are affected by the fade.
- The fade out time of the cue is set by default to be the same as the fade in time. You can change the fade out time by pressing Fade Out, then type the time in seconds and press Enter. To set equal to Fade In time, delete the time and leave the box blank. The fade out time starts when the next cue fires, so if you set the time to 1 second, the outgoing cue would start a 1 second fade out as the new cue begins its fade in.
- The Delay Out setting of the cue would normally be used if the cue links automatically to the next cue, and sets a wait time before the next cue starts its fade in. So the outgoing cue would start to fade out, and the delay out time would run before the new cue begins its fade in.
Cue Linking & Link Offset
Cues in cue lists may be linked together, allowing you to build up complex self-timed sequences. The link options are set using the softkeys and are:
| Link Option | Action |
|---|---|
| Link Wait For Go | The cue waits for the Go button to be pressed then fires immediately. Link Offset is disabled. |
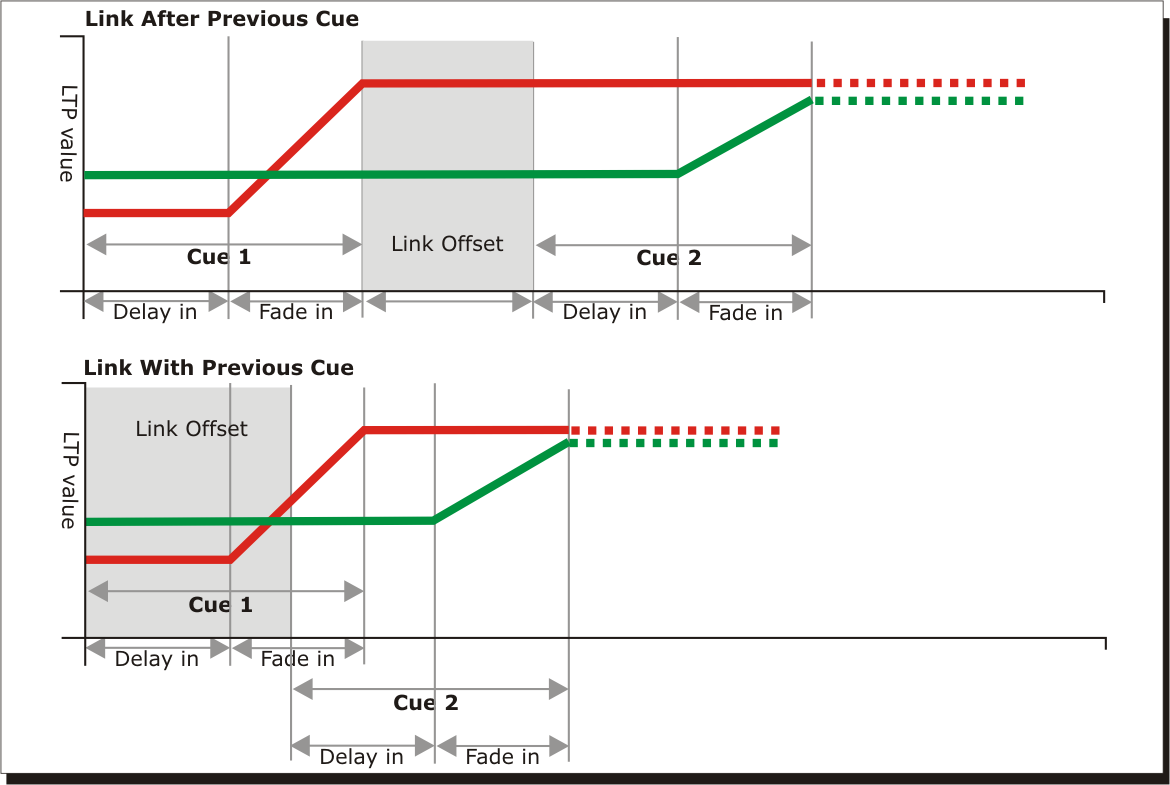
| Link After Previous Cue | The cue fires when the previous cue has finished its delay in and fade in times. A Link Offset can be set to add a delay between the previous cue finishing and this cue firing. The offset can be given as a time in seconds, or as a percentage of the fade time of the previous cue. |
| Link With Previous Cue | The cue fires at the same time as the previous cue fires. A Link Offset can be set to add a delay between the previous cue firing and this cue firing, set either in seconds or as a percentage of the fade time of the previous cue. |
These options allow you to create complex self timed sequences by building up simple steps. For example if you wanted the following effect:
- Go is pressed, fixture one starts fading up over 20s
- After 10s fixture two fades up over 15s
- Both lights stay on for 5s
- Both lights go off in 3s
You could program
- Cue 1 - Fixture 1 @ 100%, Fade In 20s, Link Wait For Go
- Cue 2 - Fixture 2 @ 100%, Fade In 15s, Link With Previous, Link Offset 10s
- Cue 3 - Fixture 1 AND 2 @ 0%, Fade Out 3s, Link After Previous, Link Offset 5s
To obtain the effect which was called "cue overlap" in previous versions of software, use Link With Previous Cue and set a percentage Link Offset time. Link Offset of 100% is equivalent to Cue Overlap of 0% and vice versa.
Individual Attribute Fade Times
You can set individual fade times for each IPCGBES attribute group. You can also select which fixtures this is applied to. For example you can make the position change take 2 seconds, but the colour change take 10 seconds.
Additionally you can set individual times for each attribute so you could make the pan fade over a different time to the tilt.
To set times for an attribute group, first select the Edit Times menu and go to the cue you want to set as described above, then press Next to go to the second page of options.
- Press Attribute times.
- All fixtures in the cue will be selected. If you don't want to change the times for any fixtures, deselect them now. You can press the ALL button (below Next Time) to select all fixtures in the cue or Avo + ALL to deselect all fixtures.
- Press the softkey for the attribute group you want to change.
- Press Delay to set the delay time, or press Fade to set the fade time. Press Use Global to remove the attribute group timing and go back to the normal delay/fade times for the cue.
You can use Individual Attributes to set times for one attribute within the group, for example just Pan from within the Position group. You can also use the Cue View window to set times for individual attributes.
Fixture Overlap
For each cue you can set a fixture overlap, which creates an effect where the fixtures in the cue are changed in sequence rather than all at the same time. This is described in more detail in Cue Timing.
Running a Cue List to Timecode
The console can run a cue list automatically to a timecode. This is very useful for complex performances which must be exactly the same time every time, or for unattended operation. Each step in the cue list is assigned a time at which it will run.
See also Timelines which offer a more streamlined way of producing a show to timecode.
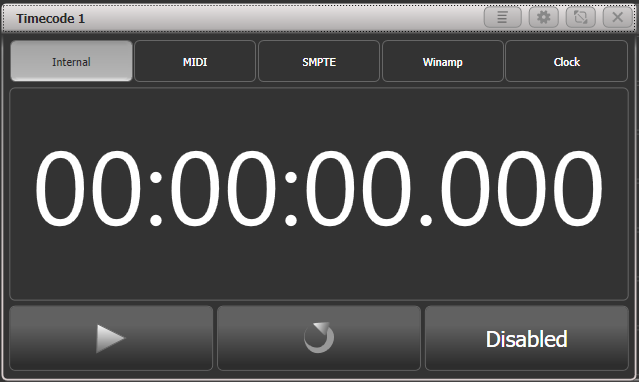
The console can have up to 4 separate timecode sources. For each, the timecode can be read from the system clock, from an internal timecode source, from MIDI, SMPTE or from Winamp. Internal timecode is useful for programming a sequence which will later be triggered by an external timecode source.
- Connect the cue list for which you want to set timecode.
- Press Timecode on the top-level menu.
- Press softkey A to select Timecode 1-4, and softkey B to select the desired timecode source.
- Press .
- Start the timecode source. If using internal timecode, press to start it.
- Press the red Go button to step each cue at the time you wish the cue to start.
- Press when you have finished.
To play back a timecoded cue list, press Connected Cue Lists on the Timecode menu and select the cue list which is to be played. Then press Timer Disabled/Enabled to enable the timecode input.
When you start the timecode source (or press if using internal timecode), each cue will fire as the timecode matches its programmed time.
In order to edit a cue's timecode, select the cue's timecode cell in Playback View and enter the correct time, or - using the menu buttons - press Edit Times, enter the cue number, toggle to the 3^rd^ page of this menu with Next, click Timecode = and enter the new timestamp.
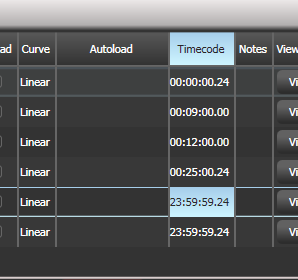
While editing a time you can also use Wheel B to select multiple cues, and use the softkey options to enter a value to change the time of all the cues: Timecode = sets the timecode directly while a value set with Offset = can be used in Add + or Subtract - , to shift all selected timestamps by this timespan.
You can open a timecode display window for each of the four possible sources to show you the incoming timecode - double press Open/View then press Timecode x (where x is 1 to 4) from the workspace select buttons.