Key Profiles
The console allows you to reconfigure how the front panel buttons work to suit your method of working. You can save your settings as a Key Profile. Different profiles can be selected for different users or to enhance the operation of the console for a particular use.
There are standard Key Profiles for Run mode, Takeover Run mode, Program mode, Theatre mode and Nightclub mode. These standard profiles cannot be edited, so you always know how they will behave. You can create your own editable profiles using one of the standard profiles as a starting point.
The current settings of the playback buttons are shown on the screen related to each playback fader.
![]()
Creating and editing key profiles
To create or edit a profile, go to the System menu (press Avo + Disk) then select Key Profiles. You can then use the Manage Profiles menu to View, Edit, Add, Delete or Rename profiles.
You can also create or edit key profiles in the Handle tab of playback Options.
Key Profiles can also be viewed from the Show Library window as described in Show Library section.
When Adding a new profile, you can select an existing profile to copy settings from.
You can also edit Key Profiles from Program mode by holding Avo, then selecting Edit Current Key Profile. If the current key profile is one of the non-editable system ones, you are prompted to add a new profile or select an existing editable profile.
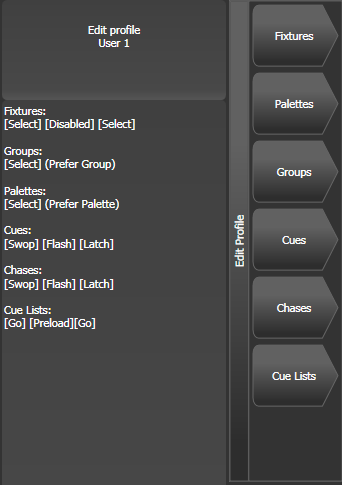
The current actions for the Black, Blue, Grey and Touch/Executor buttons are shown on the left side of the screen. (On Diamond 9, the Blue buttons are the Select buttons and the Grey buttons are the Flash buttons). Once you select a key type from the menu, the screen shows actions available for that type of button. Only the Sapphire Touch has Black buttons, but Virtual Black buttons can be used with the faders in the Virtual Fader window.
Actions for Buttons
The groups of keys you can set are as follows. The blue or grey fixture/palette buttons only exist on the Pearl Expert, on other consoles these settings will not do anything.
Fixtures
The blue, grey or touch key can be allocated to Disabled, Select, Flash, Swop, Latch.
The "Latch" function is equivalent to putting the fader to full for that fixture and touching again returns the fader to 0.
Groups
The blue, grey or touch key can be allocated to Disabled, Select Group, Flash Fixtures, Timed Flash, Flash Master, Timed Flash Master, Swop Fixtures - see Fixture Groups for more details.
The option Group/Flash takes precedence only applies to the Pearl Expert where it is possible to program a playback on a fader handle and use its flash button as group selector.
Palettes
The palette key or touch button can be allocated to Disabled or Select Palette.
With Palette is fired ignoring/with its times you select whether to take palette times into account when selecting a palette, see Timed Palettes. This setting is particularly useful when Busking with palettes.
The option Palette/Flash takes precedence only applies to the Pearl Expert where it is possible to program a playback on a fader handle and use its flash button as palette selector.
Cues
Keys and buttons can be allocated to Disabled, Flash, Timed Flash, Swop, Latch, Preload, Go, Tap Tempo, Release, Select If.
Chases
Keys and buttons can be allocated to Disabled, Flash, Timed Flash, Swop, Latch, Go, Stop, Preload, Connect, Tap Tempo, Release, Select If.
Cue Lists
These affect playback of cue lists and can be assigned to the handle's buttons:
| Setting | Action |
|---|---|
| Disabled | The button will do nothing |
| Flash | All dimmer levels in the cue will flash to programmed level, when released the levels will return to previous level |
| Flash and Go | As Flash, but when button released the cue list will advance to the next cue |
| Timed Flash | As Flash, but fade in and out times will follow the cue times set |
| Timed Flash and Go | As Flash and Go, but cue list will advance on release |
| Swop | As Flash, but all other fixtures will black out |
| Latch | As Flash, but dimmers will remain active until button pressed again |
| Go | Cue list will advance to next cue using times |
| Stop | Stops all fades in the cue list at their current point |
| Preload | LTP channels of non-illuminated fixtures will move to positions in next cue |
| Connect | Connects this cue list to controls (same as pressing Connect/Cue then select button of cue list) |
| Tap Tempo | Set speed parameter by tapping the button |
| Next Cue - | Press repeatedly to select the next cue to be output, going backwards |
| Next Cue + | Press repeatedly to select next cue to output, going forwards |
| Review Live Cue | Replays the current cue using fade times |
| Cut Next Cue to Live | Fire the next cue ignoring its times |
| Snap Back | Cue list will snap back to previous cue without times |
| Go Back | Cue list will go back to previous cue using fade times |
| Release | Release the playback using programmed release time |
| Select If | Press to select all fixtures used in the current cue |
Macros
Can be set to Select or Disabled.
The option Macro/Flash takes precedence only applies to the Pearl Expert where it is possible to program a playback on a fader handle and use its flash button as macro selector.
Options
Allows you to disable the quick record function (double tap on empty handles).
Masters
You can set different button options for Standard Masters and Scene Master.
For Standard Masters the options are Disabled, Selection, Flash, Latch, Connect, Tap Tempo, Nudge Up, Nudge Down, Release, Reset Multiplier, Multiplier x2, Freeze.
Some of these options only operate with particular types of master - the Multiplier options are only for BPM masters, see the BPM Master Options. Freeze can be useful to temporarily pause shapes or chases, or does a blackout if used with an intensity master.
For Scene Master the options are Disabled, Preload Scene Mode, Exit Scene Mode, Enter Scene Mode, Commit Changes, Commit Changes and Exit Scene Mode, Enter or Exit Scene Mode, Enter or Commit Scene Mode,Reset Scene Mode. See Scene Master.
Changing the Key Profile
To quickly change the Key Profile, hold the Avo button and press
Select Key Profile. This changes the global Key Profile used for all handles, unless they have an individual Key Profile set as described below.Individual Key Profiles for playbacks
Each playback can have an individual Key Profile allocated to it. This allows you to customise the panel button functions differently for each playback. The Key Profile for the playback is selected using the Handles option on playback Options. If the playback Key Profile is set to Global, the default global profile for Cue / Chase / Cue List is used.
You can quickly set the Key Profile for a playback by selecting the handle while holding the Options button down.