Setting up Synergy
Connecting up an Ai server
The Ai server(s) need to be connected by Ethernet to the Titan console. Media previews use NDI streams which along with copying of large media files can place a heavy demand on the network, so you should follow these tips for setting up a suitable network:
Use at least gigabit network equipment
Have a dedicated network for Synergy if possible
If you are using Titan Mobile, make sure Windows Firewall is turned off
The Ai server(s) must have the correct version of Synergy installed to match your Titan version. To upgrade Synergy on the Ai server, download the Synergy Upgrade Installer from the Avolites Download page and run it on the Ai server. You don't need to do anything extra on the console as the Titan installer will automatically install the latest version of Synergy on the console.
If you have problems getting Titan and Ai to recognise each other, make
sure they are on matching software versions, and both in the same IP
address subnet range such as 2.0.0.1 and 2.0.0.2 - read more about Networking the Console.
Setting up the Ai Show
A simple Ai system involving a single screen or projector can be set up by following the Synergy setup instructions in the next section. You just need to open a blank show in Ai and you can add Screens and Layers from the Titan console.
For more complicated requirements, create suitable screen fixtures in the Ai show - see the Ai manual for more details on how to do this. You can create and rename Layers from the Titan console. The screen fixtures you have created in Ai will then become available as Surfaces in Titan.
Connecting up Prism Zero
You can connect to Prism Zero software running on any device connected to the same network as the console.
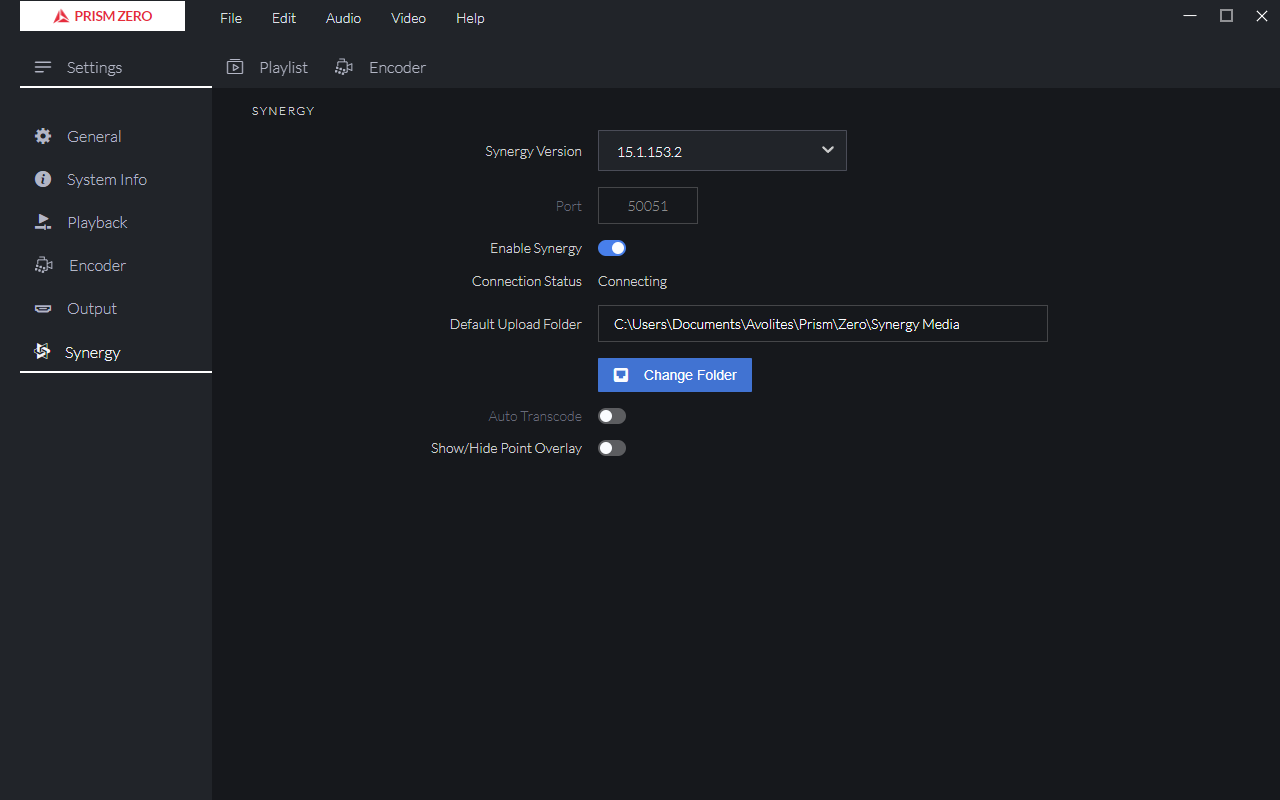
In the Prism Zero settings screen (File - Settings or click the menu icon in the top left corner), go to the Synergy option and turn on the Enable Synergy switch. Ensure the Synergy Version drop down box is set to match the version of Titan you have installed. Prism Zero will start the Titan Media node which is a Titan node designed to interface with Prism. When the Titan Media node is running, the Connection Status will change to "Connected". These settings are remembered next time you start Prism Zero.
Once connected, the Titan Media node will be discoverable by TitanNet and you can use the Prism Zero output as a media surface in Titan by following the next section.
- If the version box does not show a matching version, you need to install the correct version of Titan Media node from the Avolites website.
Synergy Setup
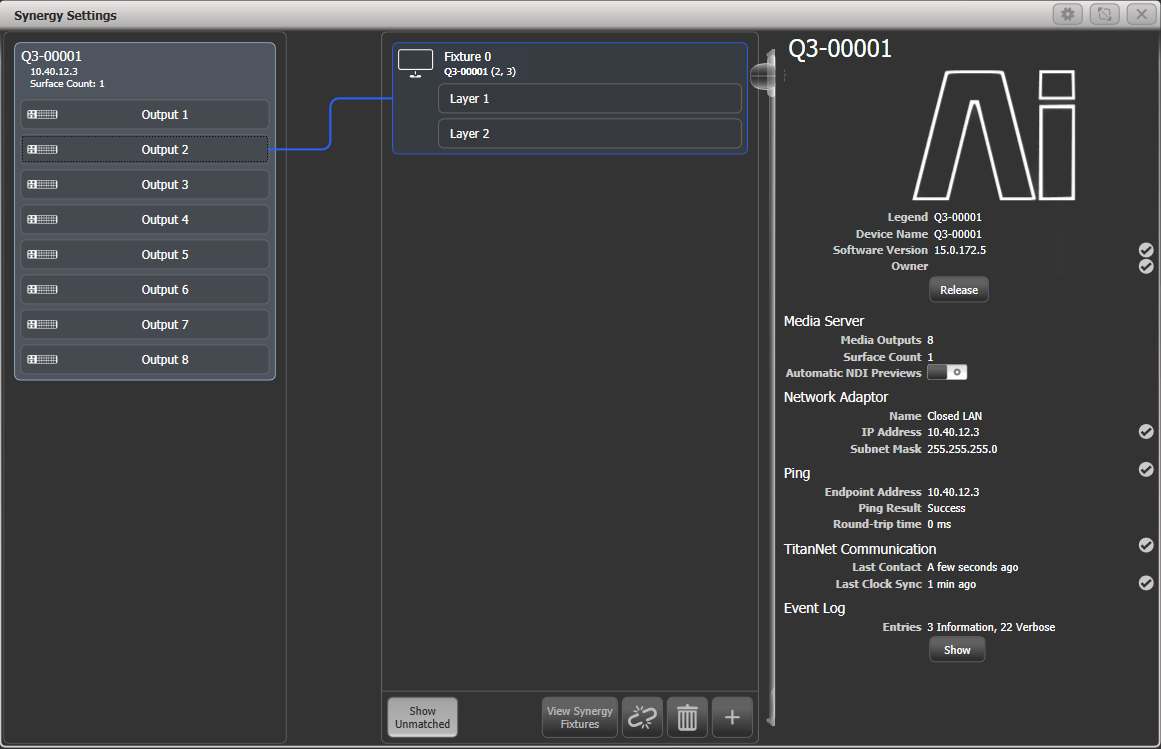
In Titan, open the Synergy Settings window using the Workspace button provided on new shows, or use the option in the Open Workspace Window menu.
This window is a little like the DMX settings screen: it lets you set up how the Titan console is linked to the various outputs on the Ai server(s) or to Prism Zero. Also, for Ai servers it lets you add or remove layers from each Ai surface and add complete new surfaces to the server (though you may need to configure these further on the Ai server itself).
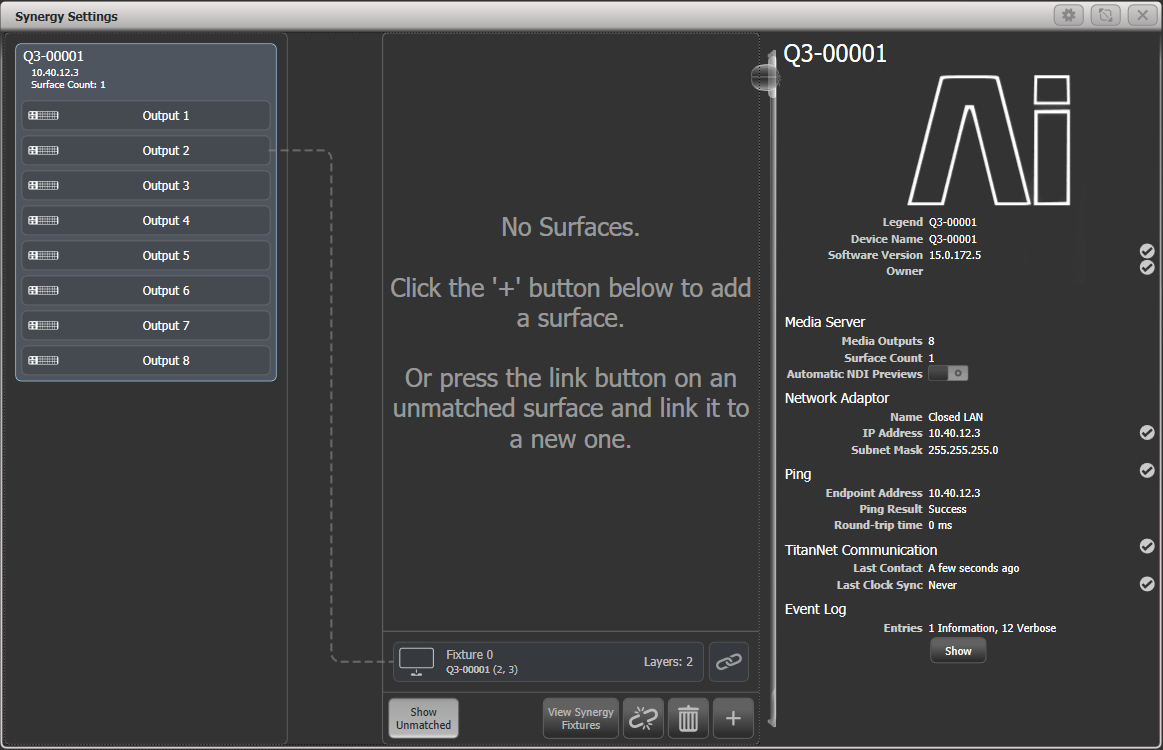
On the left of the window the available Ai servers or Prism Zero instances are shown. In the centre of the window, the Surfaces and Layers configured in Titan are shown. Connection lines show how the Titan Surfaces will control the different outputs of the media servers. At the bottom are Surfaces which are already configured on the connected media servers but are not yet linked to Titan, these are called unmatched surfaces.
Click on the + at the bottom and select a Screen or Prism surface from the pop up to add a new surface. This will appear at the top; an Ai surface by default has two layers but you can change this later. A Prism Zero surface only has a single layer.
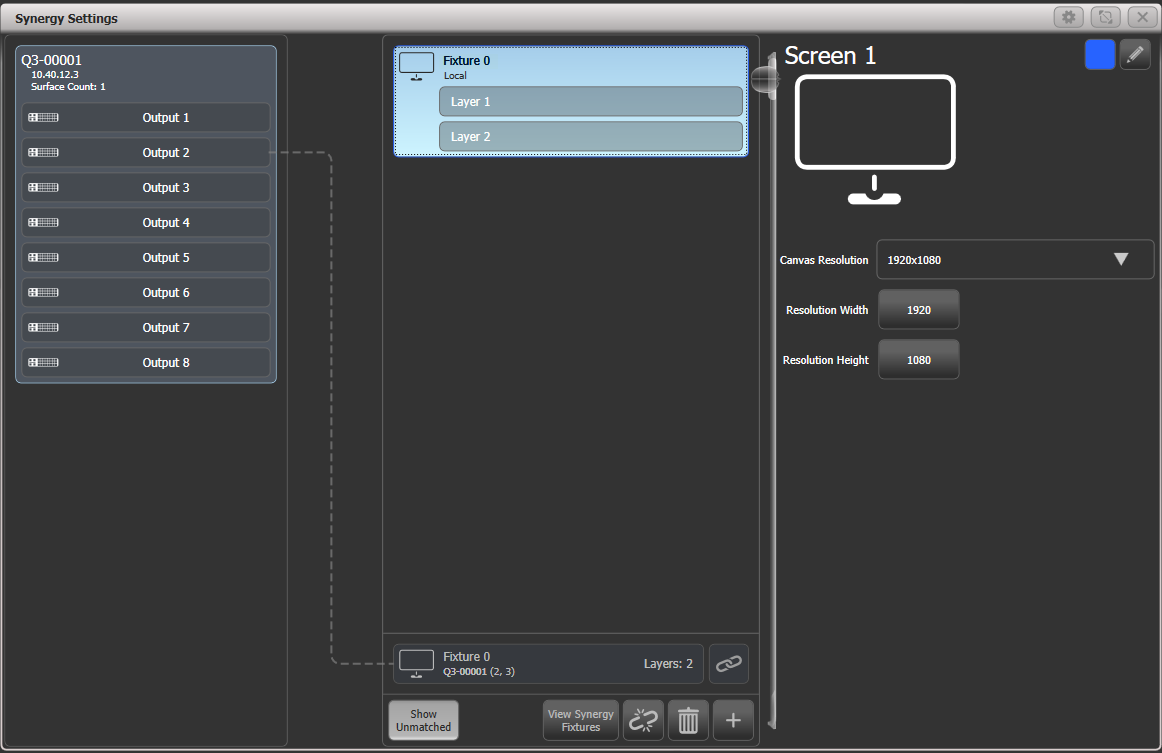
Clicking on the top part of a Surface will show options on the right for the surface. These options allow you to set the canvas resolution which can either be picked from a list of common resolutions, or entered numerically; at the top right the display halo colour of the surface can be set, and the button allows you to change the name (you can also do this with the Set Legend button).
Clicking on a Layer within a Surface shows layer options on the right. This allows you to allocate a Rate or BPM master to the layer for speed control.
When no Surfaces or Layers are selected, the right side of the window shows general information about the system. There is a switchable option "Automatic NDI Previews" to enable or disable NDI streams - if you are using the media preview window, you will need to turn this on. If not leave it turned off, as it causes a lot of network traffic.
Once you have created a surface in Titan, you need to match it to the desired Ai surface or Prism Zero. Click on the button on the unmatched surface at the bottom, then click on the Screen 1 surface at the top (or you can click "Link to new Surface" to automatically create a new surface and link to it).
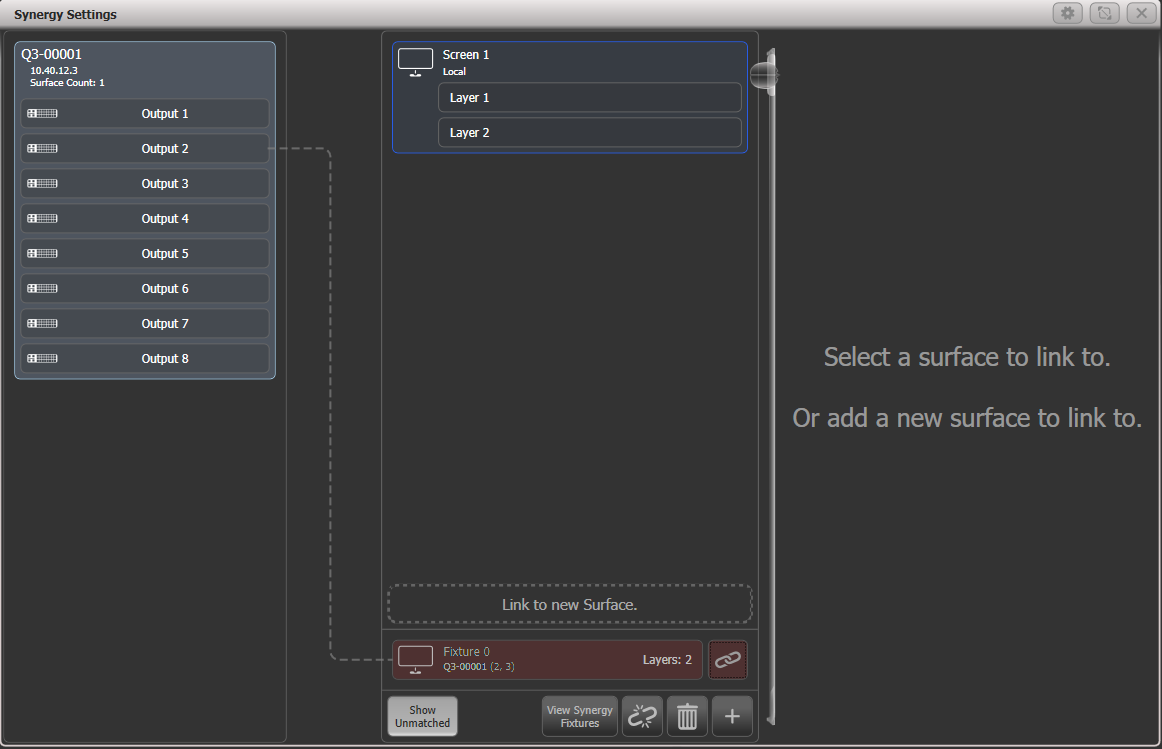
The Screen 1 Surface will now show that it is linked to the Ai server or Prism Zero and the unmatched server at the bottom disappears.
On an Ai server you can link the Screen 1 Surface to one or more different physical outputs by clicking the screen, then clicking the output to connect on the left, for example if you want to show the same media on several screens.
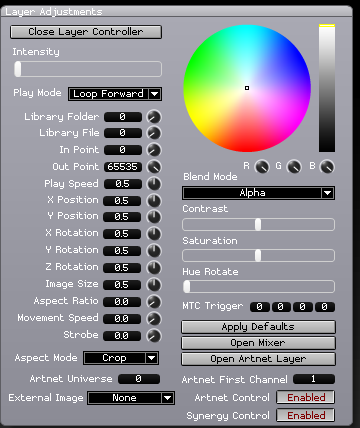
Once an Ai layer is linked, if you open the layer properties in Ai the "Synergy Control" box will show "Enabled". Now you cannot control the screen using Ai, only from the Titan console.
To add a layer on Ai, click on the surface, then the + button at the bottom and select Layer from the popup.
To delete a layer or surface, select the item then click the button at the bottom, or press Delete then click the layer/surface. If linked to Ai, this will also delete the layer/surface in Ai.
Synergy Fixtures Window
Every Prism Zero layer or Ai server layer appears as a button in the Synergy Fixtures window. You can display this using the button at the bottom of the Synergy Settings window or by double tapping Open/View and then selecting it from the window select buttons.
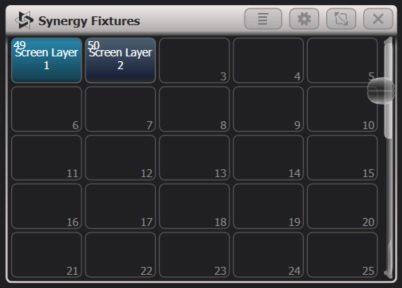
You use these buttons to select one or more layers for control, just as you would select lighting fixtures to control. Once selected, use the Attribute Editor or wheels to control the media playback and effects. You can then store palettes and playbacks as with any other lighting fixture. This is described in the next section, Operating Synergy.
The Synergy layers are shown in their own window to keep them together and help you find them quickly. However if you prefer you can move the layer buttons into the normal Fixtures window.