Einrichtung
Verbinden mit einem Ai-Server
Der/die Ai-Server und das Pult müssen per Ethernet miteinander verbunden sein. Vor allem für die NDI-Vorschauen und beim Hochladen von Clips kommt es zu einem erheblichen Datenaufkommen. Daher sollten möglichst folgende Hinweise beachtet werden, um ein zuverlässiges Arbeiten zu ermöglichen:
- Es sollte sich um ein Gigabit-Netzwerk handeln (1 Gbit/s).
- Nach Möglichkeit ein getrenntes Netzwerk für Synergy.
- Bei der Verwendung der PC-Suite sollte die Windows Firewall deaktiviert sein.
Beim Installieren und Upgraden ist darauf zu achten, dass Ai/Synergy die gleiche Version haben muss wie die Titan-Software des Pultes. Die Software steht auf der Avolites Download-Seite zum Download bereit. Für Synergy werden ggf. kleinere Update-Pakete zur Verfügung gestellt, um Ai auf die gleiche Version wie Titan zu bringen.
Sollte es zu Problemen kommen, Titan und die Ai-Software miteinander zu verbinden, so ist insbesondere die Softwareversion (müssen identisch sein) sowie die Netzwerkkonfiguration (unterschiedliche IP-Adressen, aber im gleichen Bereich; gleiche Subnetz-Masken) zu überprüfen. Mehr dazu in Einrichten des Netzwerkbetriebs.
Einrichten der Show in Ai
Einfache Setups mit nur einem einzelnen Display oder Projektor können ganz einfach direkt vom Pult aus eingerichtet werden. Starten Sie in Ai ein leeres Projekt und folgen Sie den Anweisungen im nächsten Abschnitt, um mittels Synergy Screens und Layer anzulegen.
Für kompliziertere Setups ist dagegen die Einrichtung der Screens in Ai vorzunehmen (siehe Ai-Handbuch). Diese werden dann in Synergy in Titan angezeigt, und man kann wie beschrieben Layer hinzufügen oder umbenennen.
Verbinden mit Prism Zero
Prism Zero muss auf einem Computer im gleichen Netzwerk laufen.
In den Einstellungen von Prism (File, Settings - oder per Klick auf das Menü oben links), navigiert man in den Bereich Synergy und aktiviert den Schalter Enable Synergy. Bei Synergy Version muss die gleiche Version ausgewählt werden wie Titan (Pult ode PC-Suite). Prism Zero startet den Titan Media Node, welcher die Verbindung zwischen Titan und Prism herstellt. Sobald der Titan Media Node läuft, wechselt der 'Connection Status' auf "Connected". Diese Einstellungen werden beim nächsten Programmstart automatisch geladen.
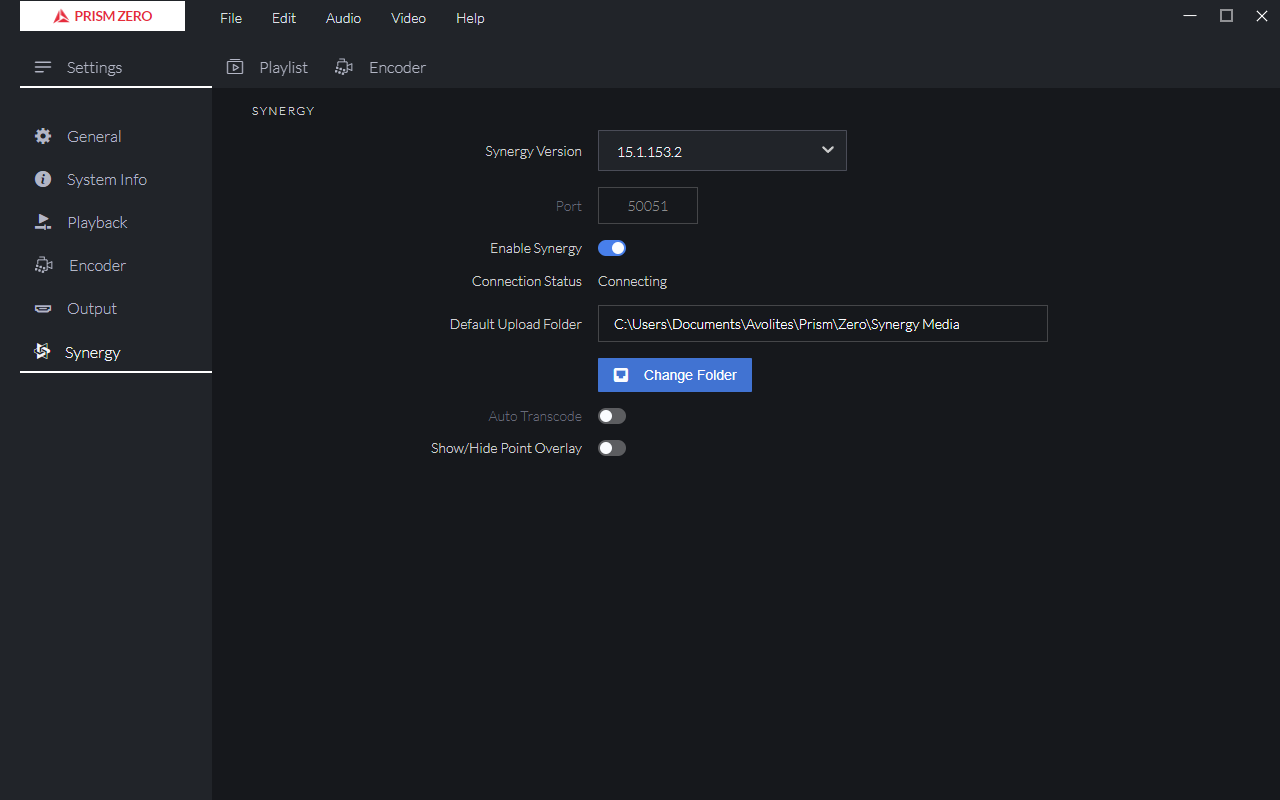
Sobald die Verbindung zwischen Prism und dem Titan Media Node hergestellt ist, kann der Node per TitanNet von Pulten im Netzwerk gefunden, verwendet und gesteuert werden, siehe nächster Abschnitt.
- Wenn die Auswahlliste bei "Synergy Version" leer ist oder die richtige Version fehlt, so muss die richtige Version des Titan Media Nodes von www.avolites.com heruntergeladen und installiert werden.
Einrichten von Synergy
In Titan öffnen Sie das Fenster Synergy Settings, entweder mit dem entsprechenden Workspace bei neuen Shows, oder über das Menü 'Open Workspace Window'.
Dieses Fenster ähnelt entfernt dem der DMX-Einstellungen: hier stellt man ein, wie Titan Prism Zero bzw. die einzelnen Outputs von Ai ansteuert. Ebenso kann man hier für Ai Layer hinzufügen oder löschen sowie komplett neue Surfaces anlegen (müssen ggf. in Ai noch genauer eingestellt werden).
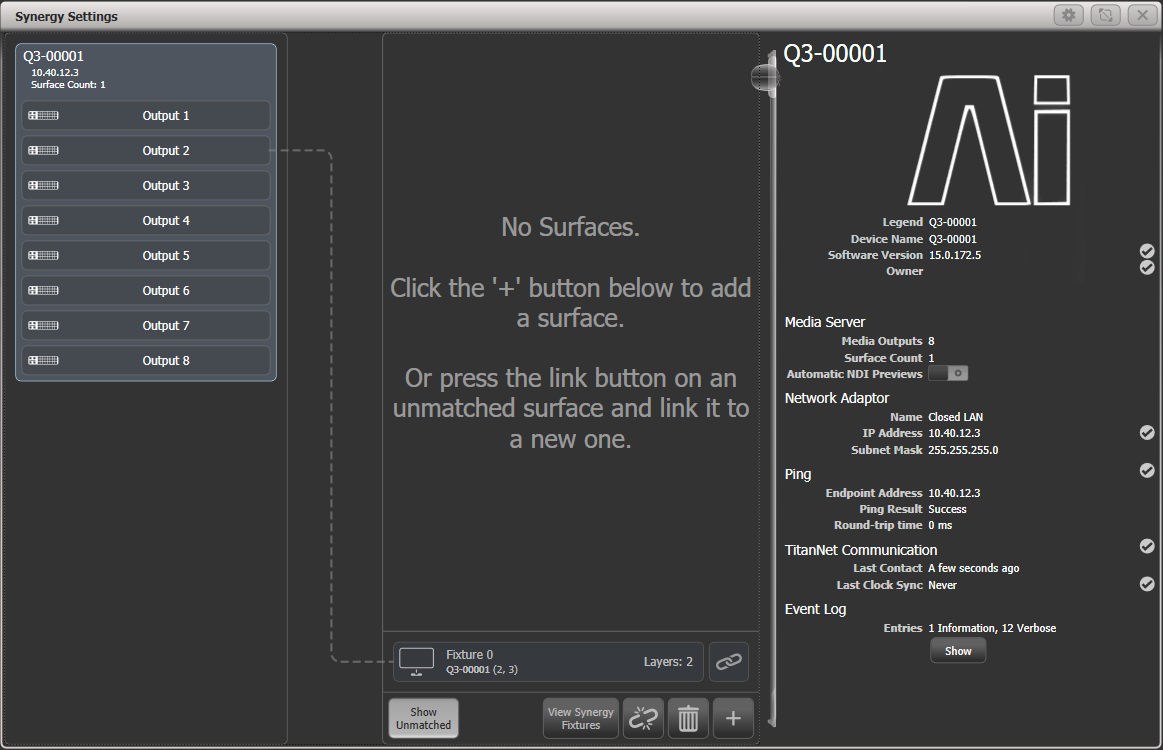
Links sind die verfügbaren Ai-Server und Prism-Instanzen mit ihren Outputs aufgeführt. In der Mitte sind die in Titan angelegten Surfaces und Layer aufgeführt. Linien zwischen den Outputs und Surfaces zeigen die Zuordnung an. Unten tauchen die Surfaces auf, die zwar in Ai oder Prism Zero schon angelegt sind, aber noch nicht in Titan. Dieses sind die ‚unmatched' (nicht zugewiesenen) Surfaces.
Klickt man auf das + unten und wählt aus der aufklappenden Liste 'Surface', so wird ein neues Surface hinzugefügt. Dieses erscheint in der mittleren Spalte oben. Neue Ai-Surfaces haben zunächst immer zwei Layer, Prism Zero hat nur einen Layer.
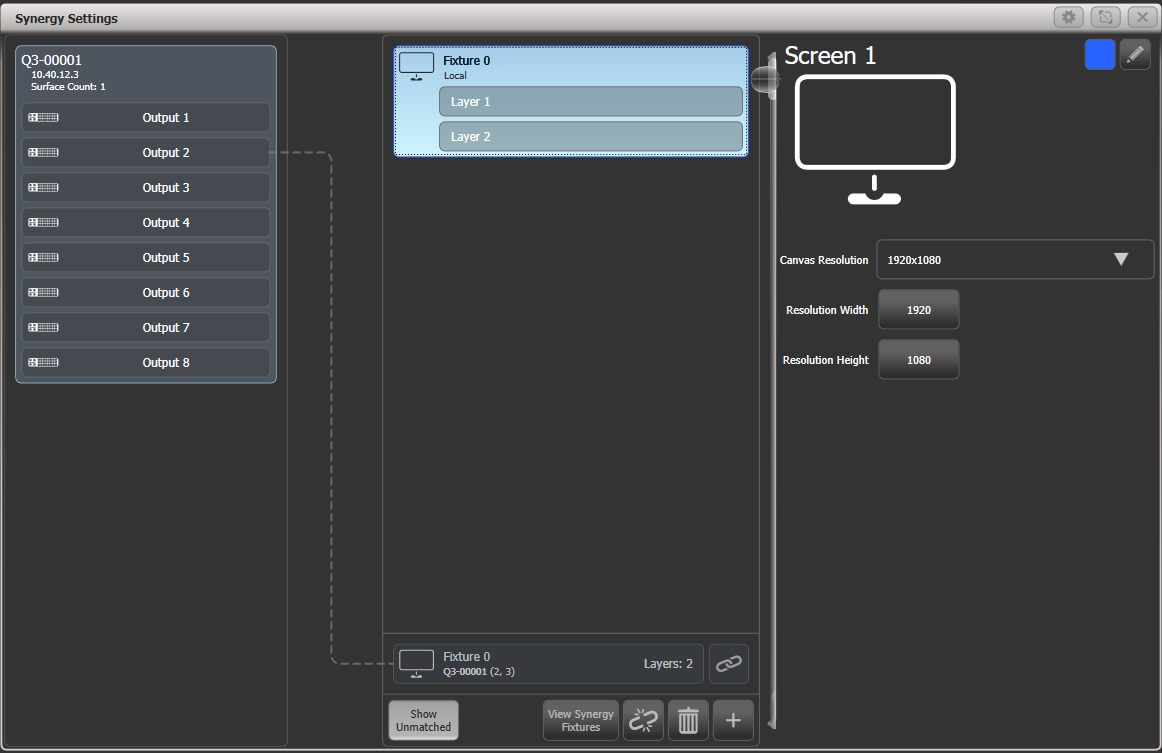
Klickt man in der mittleren Spalte oben auf die Titelleiste eines Surfaces, so werden rechts die entsprechenden Optionen angezeigt. Damit lässt sich die Auflösung einstellen, wahlweise per Auswahl aus einer Liste oder per numerischer Eingabe. Ganz rechts oben kann man mit dem farbigen Button das Halo des Surfaces ändern sowie mit dem -Button die Legende (Bezeichnung) bearbeiten (beides ist auch wie gewohnt per Set Legend möglich).
Klickt man innerhalb eines Surfaces auf einen Layer, so werden rechts die Optionen des Layers angezeigt. Damit kann man einen Speed- oder BPM-Master für den Layer zuweisen.
Sind weder Surfaces noch Layer angewählt, so werden rechts allgemeine Informationen über das System angezeigt. Es gibt die Option 'Automatic NDI Previews', mit der NDI-Streams ein- bzw. ausgeschaltet werden. Verwendet man das Vorschaufenster (Media Preview), so müssen NDI Previews aktiviert sein - verwendet man das nicht, so empfiehlt es sich, die Option zu deaktivieren, um das Netzwerk zu entlasten.
Ist in Titan ein Surface angelegt, so muss dies einem Ai-Surface (Ai Screen Fixture, oder Prism Zero) zugewiesen werden. Dazu klickt man auf den Button des nicht zugewiesenen Ai-Surfaces unten und danach auf das Titan-Surface oben. Wählt man dagegen Link to new Surface, so wird ein neues Titan-Surface angelegt und verknüpft.
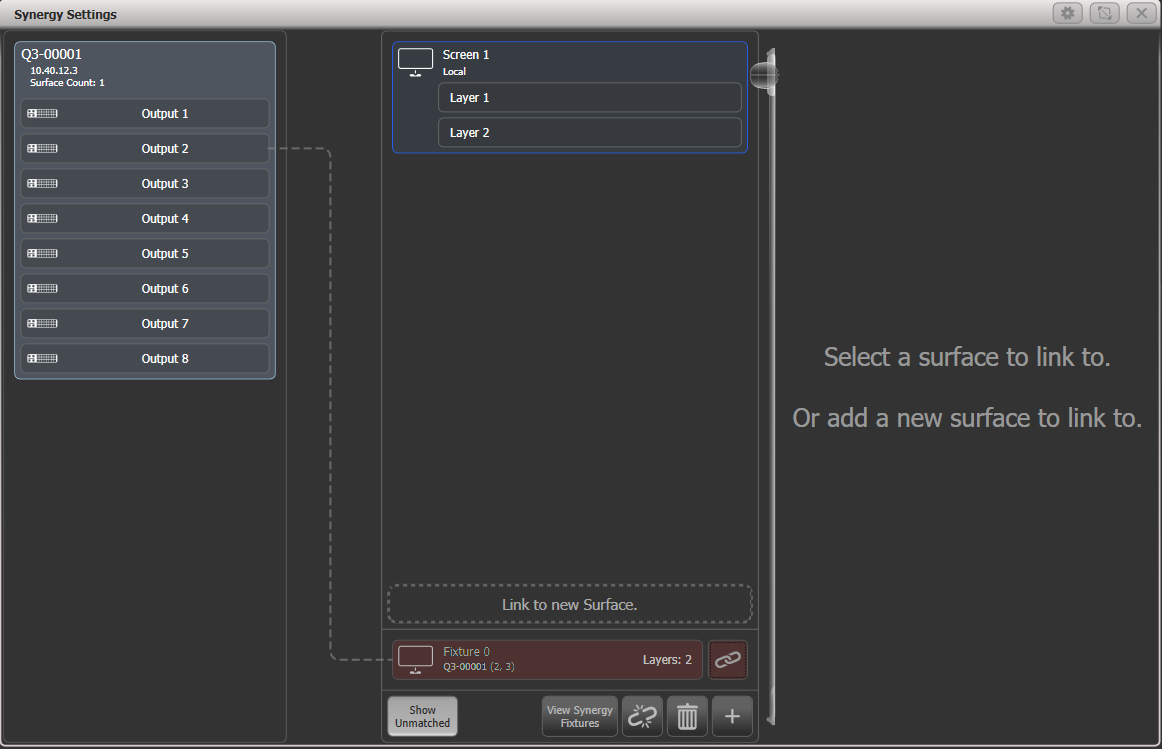
Sind die Surfaces verknüpft, so wird dies über eine farbige Linie zum Server angezeigt, und das nicht verknüpfte Surface unten verschwindet.
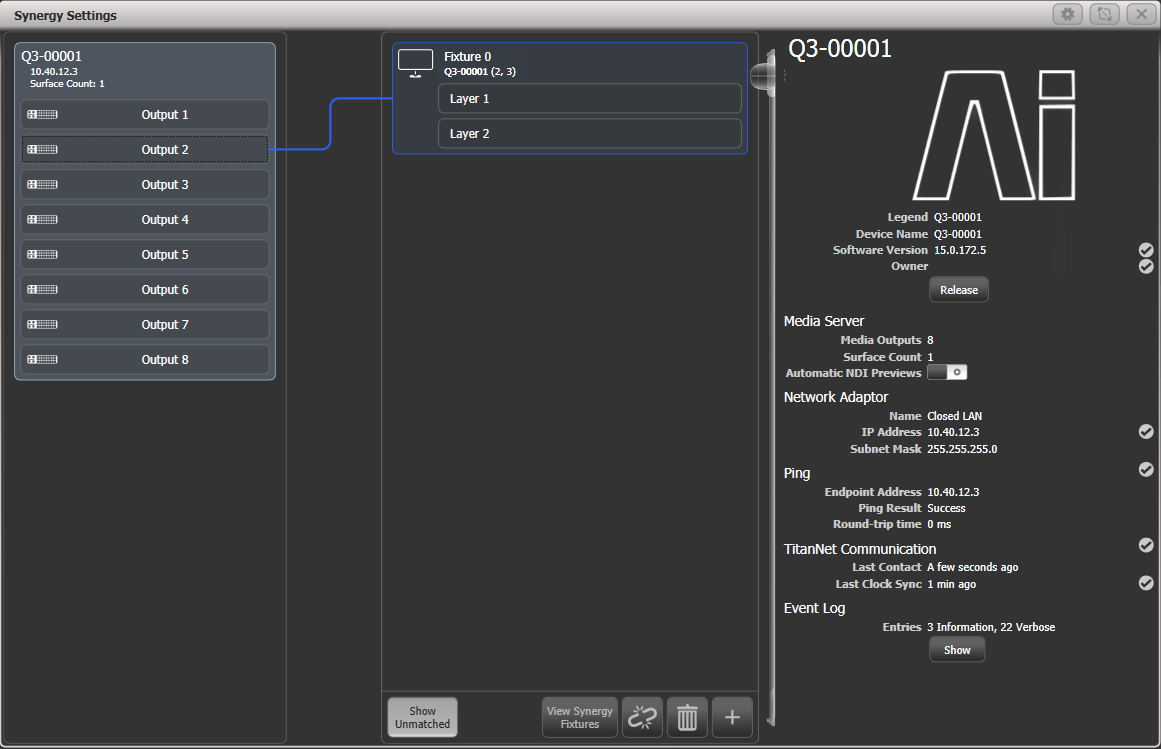
Das Surface lässt sich auch mit mehreren Ai-Outputs verknüpfen, wenn man z.B. den gleichen Content auf mehreren Outputs verwenden will. Dazu klickt man auf das Surface in der Mitte und danach links auf den zusätzlichen Output.
Ist ein Layer verknüpft, so wird das in Ai in den Layer Properties mit Synergy Control: Enabled angezeigt. Dieser Layer kann nun nicht von Ai direkt, sondern nur über Titan/Synergy gesteuert werden.
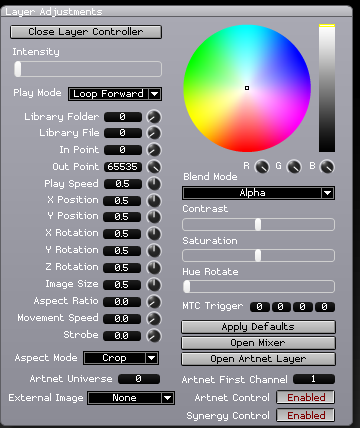
Um auf einem Ai-Server einen weiteren Layer hinzuzufügen, klickt man auf das Surface, dann auf den + - Button unten, und wählt Layer.
Um einen Layer oder ein Surface zu löschen, wählt man dieses aus und klickt unten auf den , oder man drückt Delete und klickt dann auf das zu löschende Element. Ist dabei Ai verbunden, so wird der Layer bzw. das Surface (Screen Fixture) auch in Ai gelöscht.
Das Fenster Synergy Fixtures
Jeder Layer erscheint als Button im Fenster 'Synergy Fixtures'. Dies kann man entweder mit dem Button View Synergy Fixtures im Synergy Settings-Fenster öffnen, oder Sie drücken zweimal Open/View und wählen es mit den Buttons zur Fensterauswahl.
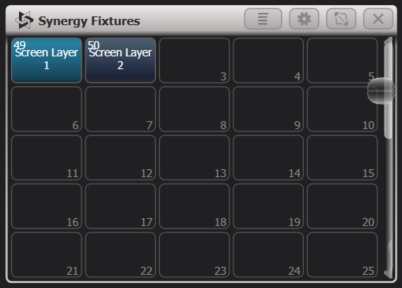
Durch Anklicken lassen sich einzelne oder mehrere Layer auswählen, wie man auch sonst Dimmer oder Movinglights zum Steuern auswählt. Sind Layer ausgewählt, so kann man im Attribut-Editor oder einfach mit den Attributtasten und Encodern Medien und Effekte steuern, die darauf angezeigt werden. Genauso lassen sich auch Paletten oder Playbacks speichern, wie das mit anderen Fixtures gewohnt ist. Es wird im folgenden Abschnitt näher erläutert.
Die Synergy-Layer werden in einem eigenen Fenster angelegt, damit man eine bessere Übersicht hat. Wenn gewünscht, kann man diese aber in das normale Fixture (Geräte)-Fenster verschieben, um alles an einem Platz zu haben.