Upgrading firmware and testing hardware (USB Expert Console)
From time to time Avolites will issue updated firmware for the various modules inside the console. These may be included as part of a software version update, or can be applied separately.
Avolites also provides a software utility called USB Expert Console which is used to update firmware. It is also useful for fault finding if you have problems with the console hardware.
Opening USB Expert Console
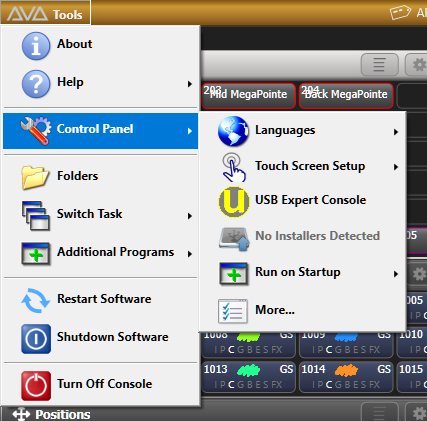
Open the Tools menu from the system toolbar, click on Control Panel and select the USB Expert Console option. For a PC-based device or panel such as T1, T2, T3 or Titan Mobile, run USB Expert Console from the start menu.
In the top left hand window Connected Panels you should see a list of the hardware panels in the system. If no panels are listed, go to the Tools menu, click ACW Service, click Start.
The USB Expert Console might be opened automatically after completion of a software upgrade, to prompt you to upgrade panel firmware.
Panel indications in USB Expert
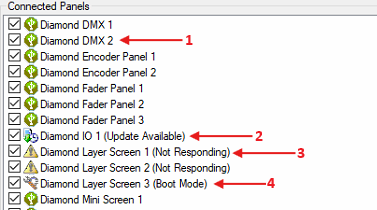
In the top left hand window Connected Panels, an icon to the left of each panel shows its status.
- Panels in normal operation show a green USB icon (1).
- Panels with an update available or which are in Boot Mode awaiting update show a download/clock icon (2). Carry out the update procedure in the next section.
- Panels which are not responding show a yellow exclamation icon (3). Try performing a panel reset, if this does not help then contact Avolites support.
- Panels which have been manually put into Boot Mode show a spanner icon (4). If this is not intentional you can select the panel and click Exit Boot on the right.
Automatic firmware update
Use the following steps to upgrade panel firmware:
Open USB Expert Console as described above.
You should see a list of the panels on the console in the left hand Connected Panels window (the list will vary depending on the console). Select the panels which have an update available (see image above).
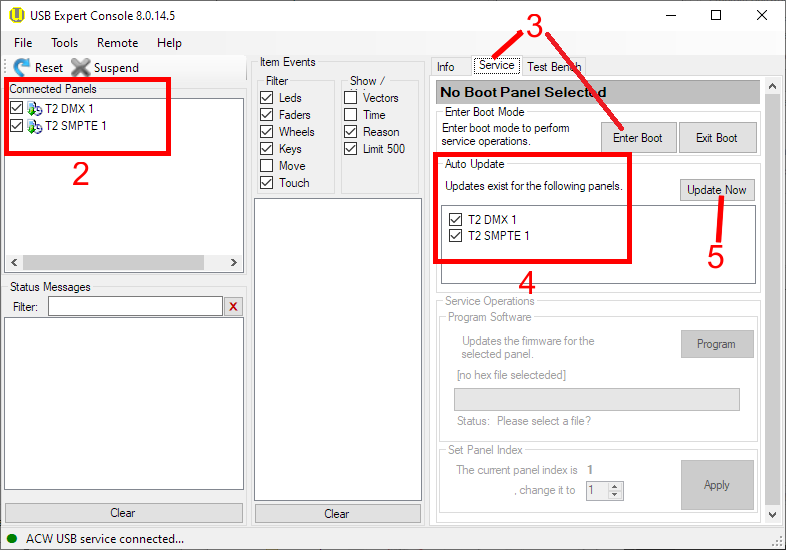
On the right hand side of the window select the Service tab and click Enter Boot.
In the Auto Update box on the right hand side, the firmware updates will be listed. The list may vary depending on the console type and the updates available. If updates are not shown, see next section.
Click Update Now to start the process and the system will update the panels one by one. A green progress bar will be shown in the bottom part of the window.
When the Auto Update box is empty, close USB Expert, shut down the console using the power button, then restart it.
If the panel update has not completed after 10 minutes, press Exit Boot regardless and wait for all panels to reappear in the Connected Panels window. Then repeat from step 3 to check whether all panels have in fact been updated.
If Update Now remains greyed out, or the process fails, try and carry out a panel reset. If this does not work, you may need to manually update the panel.
Manual firmware update
If firmware updates are not listed in the Auto Update window, but you have .bin or .hex files to update from, you can manually update individual panels.
Open USB Expert Console as described above.
In the left hand Connected Panels window select the panel that you want to update.
Click on the Service tab and click Enter Boot.
Make sure the panel has gone into Boot Mode in the Connected Panels window.
Click on Program in the Service Operations window.
A file selection dialog will open. Navigate to
C:\Program Files (x86)\Avolites\USB Expert\Panel SoftwareSelect the firmware file appropriate for the panel (see Firmware file reference at the end of this section).
On completion, press Exit Boot.
Testing panel operation
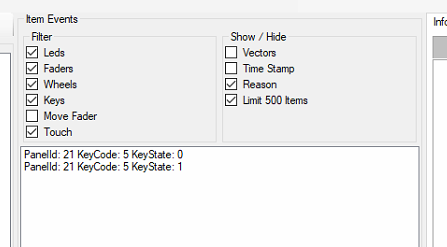
The central part of the USB Expert window shows a log of hardware events. You can use this to test whether the panel controls are working correctly.
Testing Buttons / switches
Pressing any button on the panel should show up in the central window as KeyState:0 followed by KeyState:1 when the button is released. If you can see double entries, missed responses or no response at all then the switch may be faulty and should be replaced.
Testing Faders
In the Connected Panels window on the left, select the fader panel you want to test. On the right hand side click on the Faders tab.
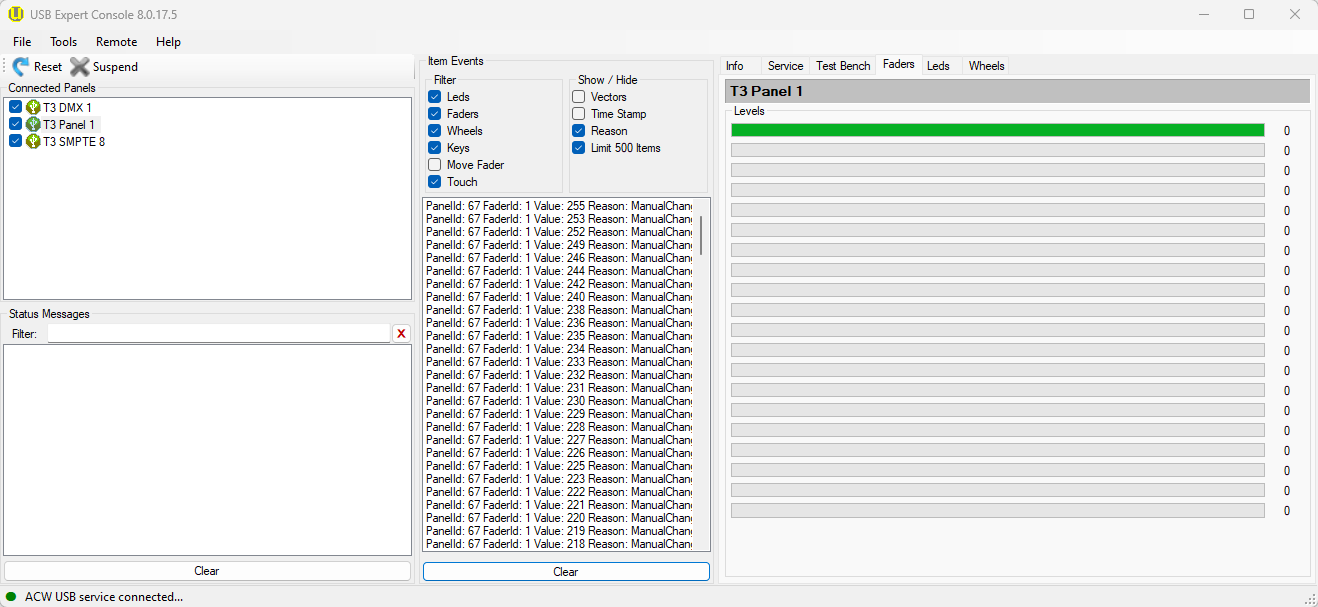
- Slowly raise the fader at a steady, moderate pace. In the central window you should see a value increasing gradually from 0 to 255.
- The green progress bar on the right should move smoothly upward as the fader is raised. There should be no flickering or erratic movement.
- The value should not jump back and forth — consistent movement is expected.
- Once the fader reaches the top, the value should remain stable at 255 without any drops of flickering.
- Finally, slowly bring the fader back down and check for smooth, consistent behaviour.
If flickering or unstable values are seen, try cleaning the problematic fader with Deoxit F5 Fader Cleaner (alternatives: Servisol Super 10; Kontakt Chemie Cleaner 601). If cleaning the fader does not resolve the problem it may need to be replaced.
Testing Motorised Faders
In the Connected Panels window on the left, select the motor fader panel you want to test. On the right hand side click on the Motors tab.
Tick the checkbox for Link Faders and reduce Speed to 30 for testing.
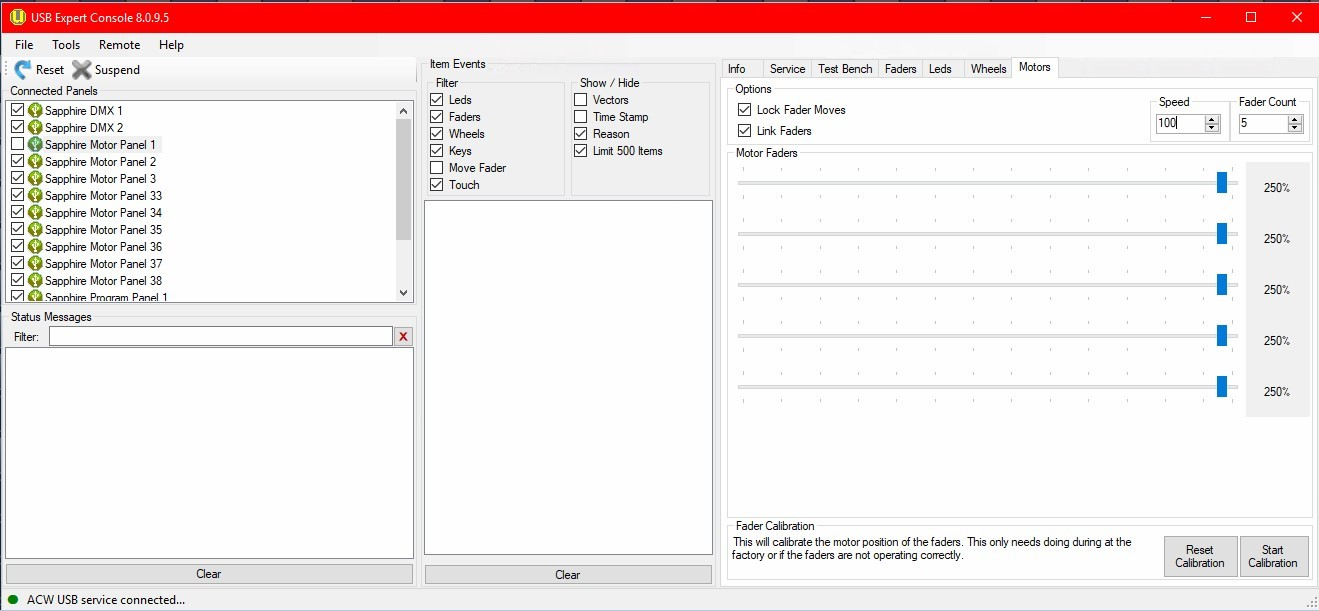
- Move one of the onscreen slider bars to the right.
- All faders should move smoothly and in unison without any stuttering. If you see any jerky or inconsistent movement it may indicate a fault with the fader's motor - please contact your local Avolites support team.
Calibrating Motorised Faders
If the faders recall to an incorrect position then they may need calibration. In the Connected Panels window on the left, select the motor fader panel you want to test. On the right hand side click on the Motors tab, then press the Start Calibration button on the bottom right of the screen and follow the on-screen prompts.
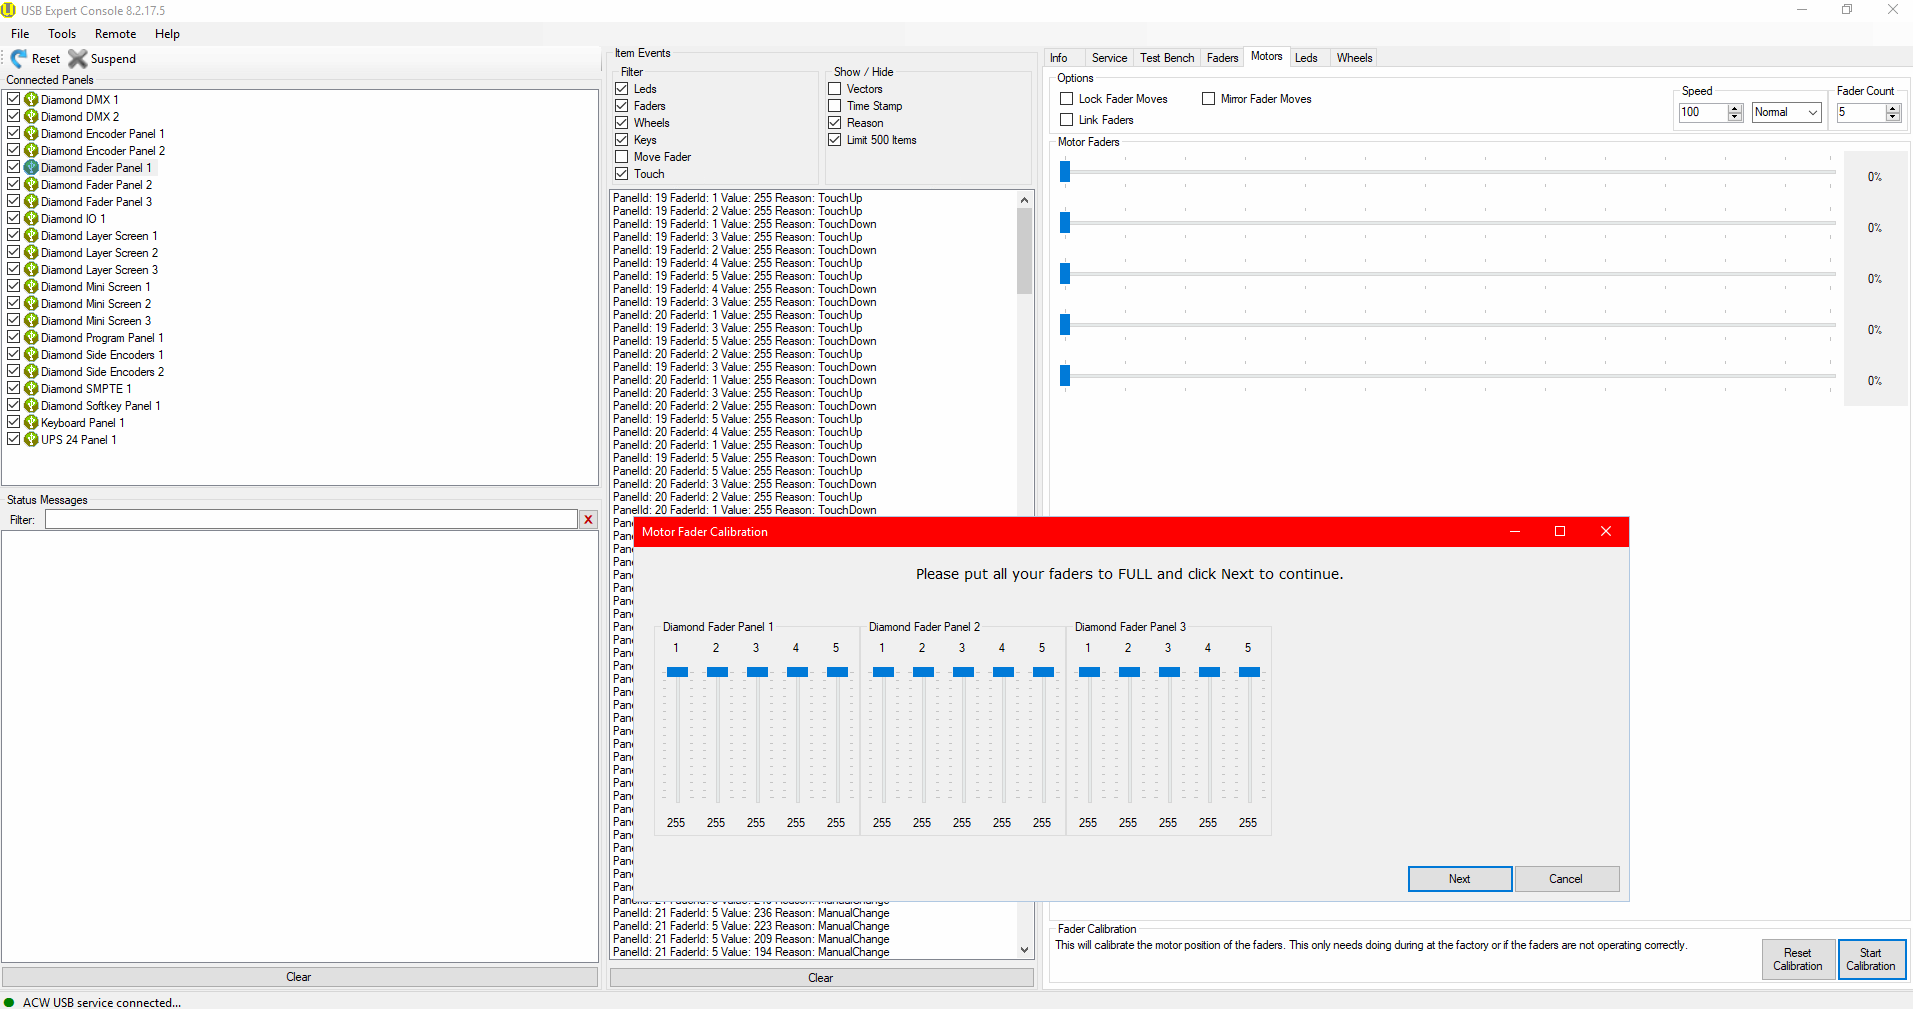
- Put all faders on the console to full
- Put all faders on the console to zero
- Store the calibration values
Testing DMX panels
This test will require a DMX tester. You will need to shut down the Titan software using the shutdown option in the Tools menu.
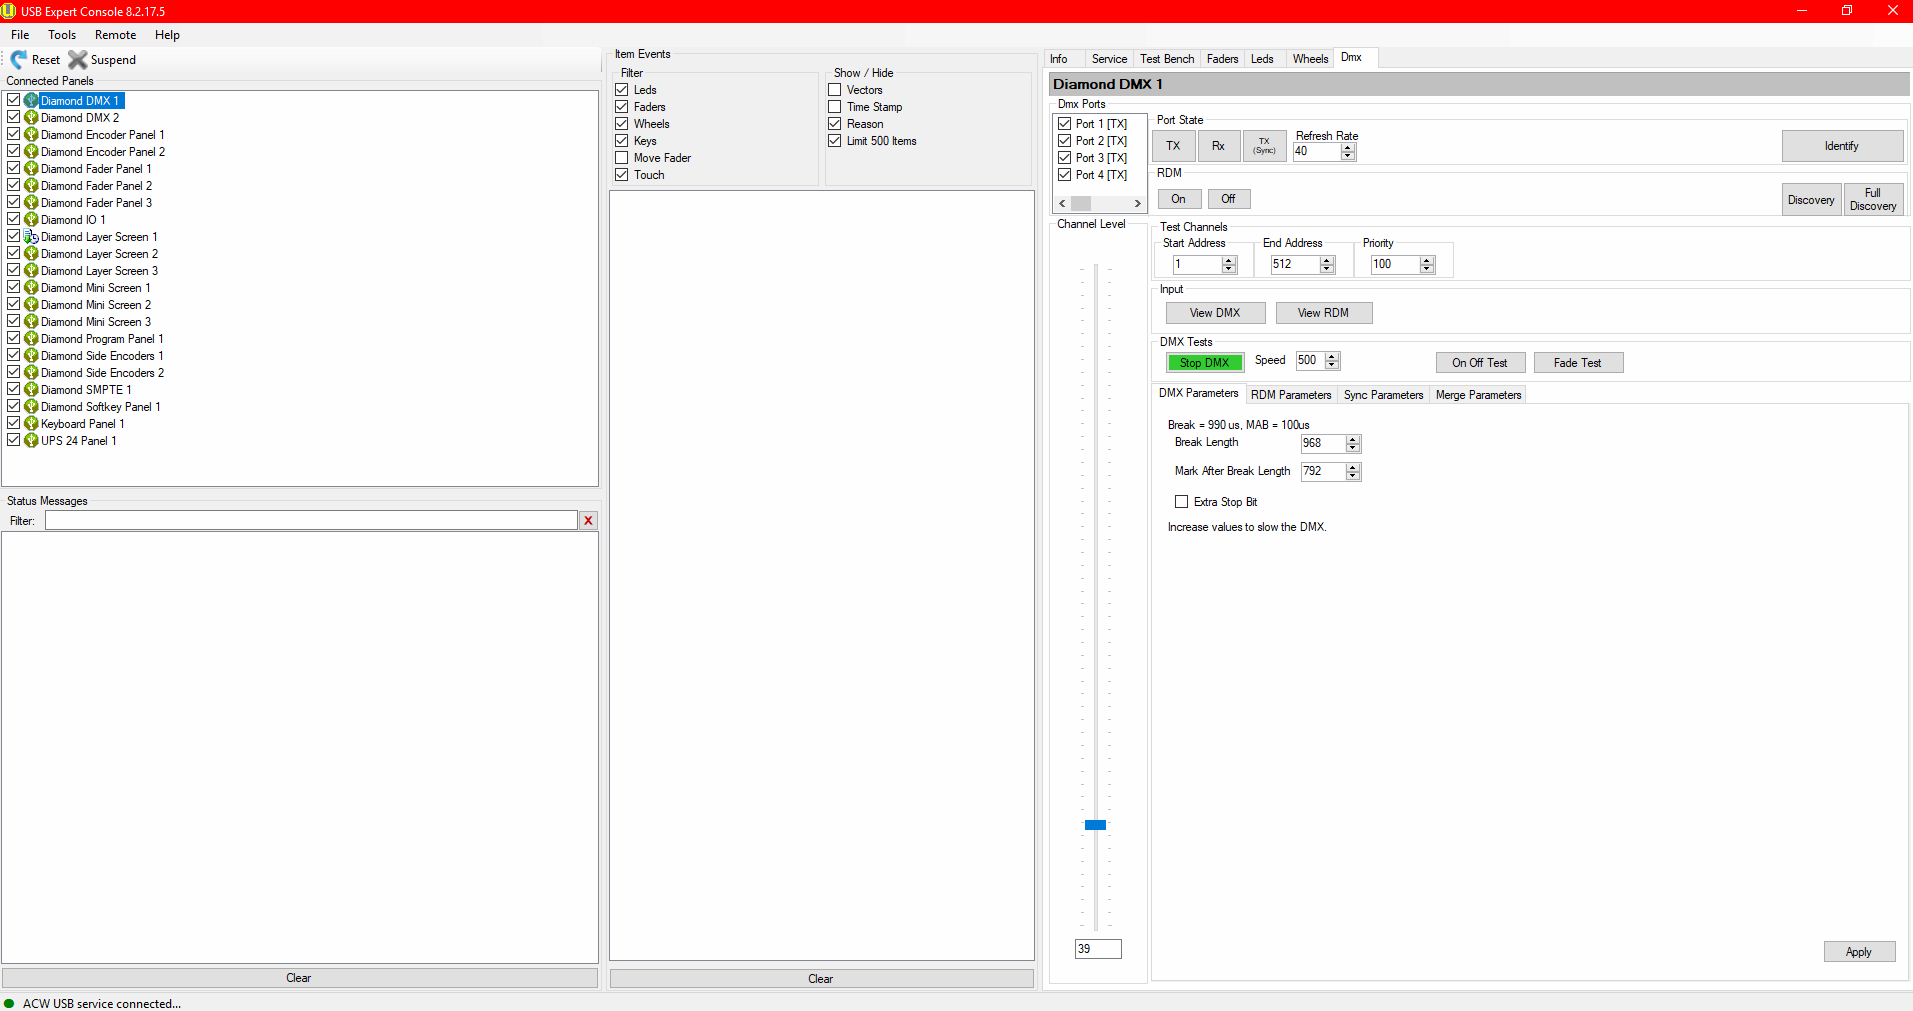
In the Connected Panels window on the left, select the DMX panel you want to test. On the right hand side click on the DMX tab, then move the Channel Level slider up and down to change the DMX output level. Check with the DMX tester that the correct levels are being output.
- For consoles with 8 DMX outputs, select DMX 1 to test outputs 1-4 and DMX 2 to test outputs 5-8.
Testing panel LEDs
The process for testing the panel LEDs varies slightly depending on the console type.
T3 and D3
- Under Connected Panels select T3/D3 Main Board.
- On the right select Leds tab.
- Change End LED value to 64.
- Under Binary State press On.
- Press LED echo.
- Raise all faders on console
- All LEDs should be illuminated on the front panel.
Quartz and Titan Mobile
- Under Connected Panels select Mobile Main Board.
- On the right select Leds tab.
- Change End LED value to 56.
- Under Binary State press On.
- Press LED echo.
- Raise all faders on console
- All LEDs should be illuminated on the front panel.
Quartz
- Under Connected Panels select Mobile Main Board.
- On the right select Leds tab.
- Change End LED value to 56.
- Under Binary State press On.
- Press LED echo.
- Raise all faders on console
- All LEDs should be illuminated on the front panel.
Tiger Touch II
- Under Connected Panels select Touch Playback Panel 1.
- On the right select Leds tab.
- Change End LED value to 20.
- Raise level bar to the top.
- Change End LED value to 56.
- Under Binary State press On.
- All LEDs should be illuminated on the front panel.
Arena
- Under Connected Panels select Touch Playback Panel 1.
- On the right select Leds tab.
- Change End LED value to 20.
- Raise level bar to the top.
- Under Connected Panels select Fader Wing Panel 5.
- Change End LED value to 18.
- Raise level bar to the top (you may need to lower it slightly first then raise it again).
- Under Connected Panels select Arena Auxiliary Panel 1.
- Change End LED value to 4.
- Raise level bar to the top (you may need to lower it slightly first then raise it again).
- Under Connected Panels check Arena Auxiliary Panel 1 is still selected.
- Change End LED value to 30.
- Under Binary State press On.
- Under Connected Panels select Touch II Program Panel 1.
- Change End LED value to 56.
- Under Binary State press On.
- All LEDs should be illuminated on the front panel.
Sapphire Touch
- Under Connected Panels select Sapphire Program Panel 1.
- On the right select Leds tab.
- Change End LED value to 56.
- Under Binary State press On.
- Under Connected Panels check Sapphire Program Panel 1 is still selected.
- Change End LED value to 4.
- Press Led Colour, set the colour to red and press OK.
- Raise level bar to the top.
- Under Connected Panels select Sapphire Motor Panel 1.
- Change End LED value to 5.
- Raise level bar to the top.
- All LEDs should be illuminated on the front panel.
D9
- Under Connected Panels select Diamond Encoder Panel 2.
- On the right select Leds tab.
- Press Led Colour, set the colour to red and press OK.
- Under Binary State press Off then On.
- All LEDs should be illuminated on the console.
- Use the horizontal bar to adjust the encoder LEDs (step up/down).
- Use the vertical bar to adjust the intensity of the LEDs.
- Repeat the above steps for colours Green, Blue and White.
Testing UPS battery
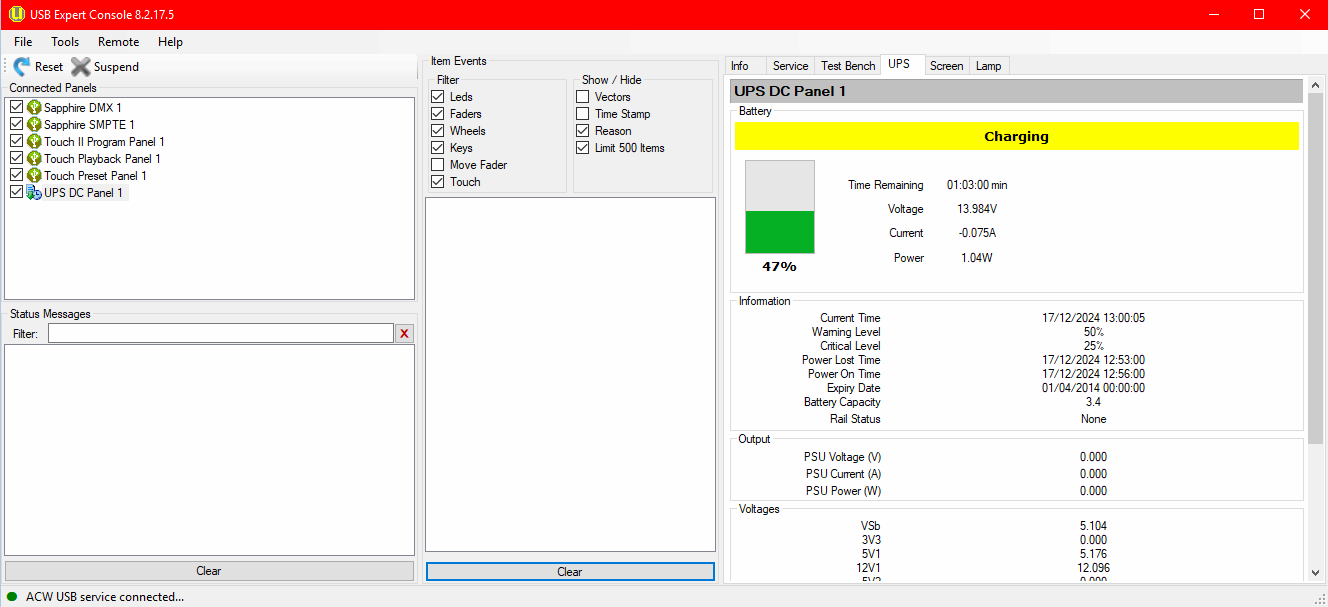
In the Connected Panels window on the left, select the UPS panel. On the right hand side click on the UPS tab.
- Make sure that the battery status is set to charging. A fully charged battery will show a current between 0.02A – 0.05A. A charging battery may show a current of 2A-3A.
- When power is removed the Charging status should switch to a green bar with NoLoad, indicating that the console is on UPS battery.
Testing timecode
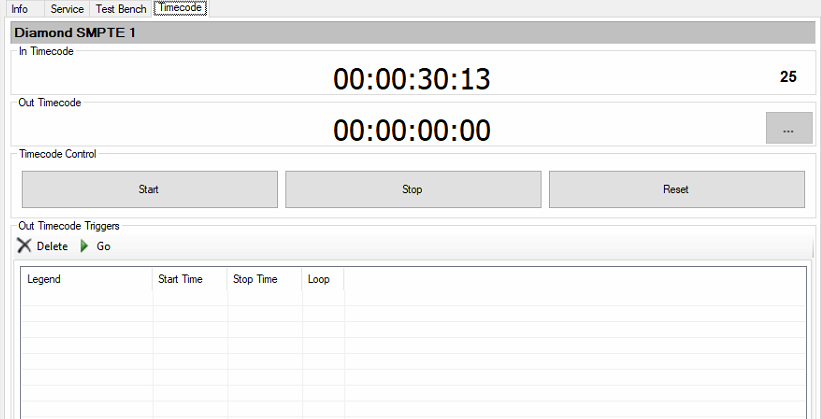
In the Connected Panels window on the left, select the SMPTE panel. On the right hand side click on the Timecode tab. Connect a timecode source to the console and you should see the timecode updating in the In Timecode panel.
Testing MIDI
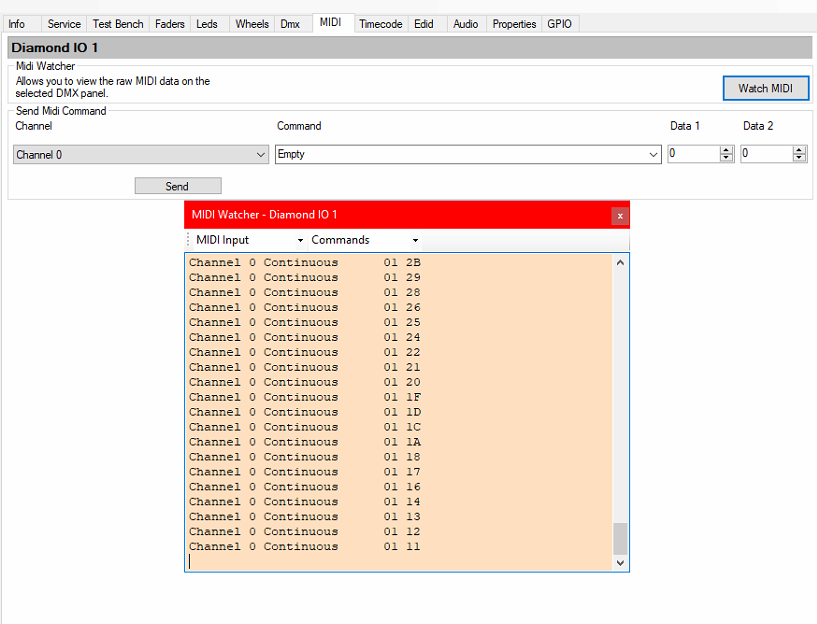
In the Connected Panels window on the left, select the IO panel (or DMX panel on some consoles). On the right hand side click on the MIDI tab and click Watch MIDI. Connect a MIDI device to the console and send some MIDI commands, you should see the commands appear in the MIDI Watcher window.
Firmware file reference
| Panel | Filename |
|---|---|
| T1 / TitanOne | |
| Titan One DMX Panel 1 | titan_one.bin |
| T2 | |
| T2 DMX 1 | titan_two.bin |
| T2 SMPTE Panel 1 | N/A |
| T3 | |
| T3 Panel 1 | T3_MB.bin |
| T3 DMX 1 | N/A |
| T3 SMPTE 8 | N/A |
| Titan Mobile | |
| Titan Mobile DMX Panel 1 | N/A |
| Titan Mobile Panel 1 | m_mb.bin |
| TitanNet Processor | |
| Sapphire SMPTE Panel 1 | N/A |
| Sapphire SMPTE Panel 2 | N/A |
| Sapphire DMX Panel 1 | st_dmx.bin |
| Sapphire DMX Panel 2 | st_dmx.bin |
| DC UPS Panel 2 | dc_ups.bin |
| Quartz | |
| Quartz Main Board 1 | qz_mb.bin |
| Quartz DMX Panel 1 | N/A |
| Quartz Auxiliary Panel 1 | qz_qab.bin |
| Tiger Touch | |
| Touch Preset Panel 1 | pt_fas.hex |
| Touch Playback Panel 1 | pt_mf.hex |
| Touch Program Panel 1 | pt_pp.hex |
| DMX Panel 1 | xp_dmx.hex |
| DMX Panel 2 | xp_dmx.hex |
| Tiger Touch Pro | |
| Touch Preset Panel 1 | pt_fas.hex |
| Touch Playback Panel 1 | pt_mf.hex |
| Touch Program Panel 1 | pt_pp.hex |
| DMX Panel 1 | xp_dmx.hex |
| DMX Panel 2 | xp_dmx.hex |
| UPS Panel 1 | ups.bin |
| Tiger Touch II | |
| Touch Preset Panel 1 | pt_fas.hex |
| Touch Playback Panel 1 | pt_mf.hex |
| Touch Program Panel 1 | tt_pp.bin |
| Sapphire SMPTE Panel 1 | N/A |
| Sapphire DMX Panel 1 | st_dmx.bin |
| DC UPS Panel 1 | dc_ups.bin |
| Pearl Expert | |
| Preset Fader Panel 1 | xp_fas.hex |
| Preset Fader Panel 2 | xp_fas.hex |
| Preset Fader Panel 3 | xp_fas.hex |
| Playback Panel 1 | xp_mf.hex |
| Program Panel 1 | xp_pp.hex |
| Screen Panel 1 | xp_scb.hex |
| Master Panel 1 | xp_mas.hex |
| Touch Wing Panel 1 | ew_sb.hex |
| DMX Panel 1 | xp_dmx.hex |
| DMX Panel 2 | xp_dmx.hex |
| Pearl Expert Pro | |
| Preset Fader Panel 1 | xp_fas.hex |
| Preset Fader Panel 2 | xp_fas.hex |
| Preset Fader Panel 3 | xp_fas.hex |
| Playback Panel 1 | xp_mf.hex |
| Program Panel 1 | xp_pp.hex |
| Screen Panel 1 | xp_scb.hex |
| Master Panel 1 | xp_mas.hex |
| Touch Wing Panel 1 | ew_sb.hex |
| DMX Panel 1 | xp_dmx.hex |
| DMX Panel 2 | xp_dmx.hex |
| UPS Panel 1 | ups.bin |
| Arena | |
| Sapphire SMPTE Panel 1 | N/A |
| Sapphire SMPTE Panel 2 | N/A |
| Sapphire DMX Panel 1 | st_dmx.bin |
| Sapphire DMX Panel 2 | st_dmx.bin |
| Arena Auxiliary Panel 1 | ar_asb.bin |
| Touch Playback Panel 1 | pt_mf.hex |
| TitanNet Switch Panel 1 | tns_mb.bin |
| Touch II Program Panel 1 | tt_pp.bin |
| Tiger Touch Wing 5 | tt_fw.bin |
| Tiger Touch Wing 6 | tt_fw.bin |
| Sapphire Touch | |
| Sapphire Motor Panel 1 | st_mb.bin |
| Sapphire Motor Panel 2 | st_mb.bin |
| Sapphire Motor Panel 3 | st_mb.bin |
| Sapphire Motor Panel 33 | st_mb.bin |
| Sapphire Motor Panel 34 | st_mb.bin |
| Sapphire Motor Panel 35 | st_mb.bin |
| Sapphire Motor Panel 36 | st_mb.bin |
| Sapphire Motor Panel 37 | st_mb.bin |
| Sapphire Motor Panel 38 | st_mb.bin |
| Sapphire Program Panel 1 | st_pp.bin |
| DC UPS Panel 1 | dc_ups.bin |
| Sapphire SMPTE Panel 1 | N/A |
| Sapphire SMPTE Panel 2 | N/A |
| Sapphire DMX Panel 1 | st_dmx.bin |
| Sapphire DMX Panel 2 | st_dmx.bin |
| Diamond 7 (D7-215) | |
| D7 SMPTE Panel 1 | N/A |
| D7 UPS & Network Switch | N/A |
| D7 Fader Panel 1 | D7_MOT.bin |
| D7 Fader Panel 2 | D7_MOT.bin |
| D7 Fader Panel 3 | D7_MOT.bin |
| Diamond DMX 1 | D7_DMX.bin |
| D7 IO 1 | D7_SIO.bin |
| D7 Display Hub 1 | D7_UDH.bin |
| D7 Program Panel 1 | D7_PPC.bin |
| D7 Encoder Panel 1 | D7_ECB.bin |
| Diamond 7 (D7-330) | |
| D7 SMPTE Panel 1 | N/A |
| D7 UPS & Network Switch | N/A |
| D7 Fader Panel 1 | D7_MOT.bin |
| D7 Fader Panel 2 | D7_MOT.bin |
| D7 Fader Panel 3 | D7_MOT.bin |
| D7 Fader Panel 4 | D7_MOT.bin |
| D7 Fader Panel 5 | D7_MOT.bin |
| D7 Fader Panel 6 | D7_MOT.bin |
| Diamond DMX 1 | D7_DMX.bin |
| Diamond DMX 2 | D7_DMX.bin |
| D7 IO 1 | D7_SIO.bin |
| D7 Display Hub 1 | D7_UDH.bin |
| D7 Program Panel 1 | D7_PPC.bin |
| D7 Encoder Panel 1 | D7_ECB.bin |
| D7 Encoder Panel 2 | D7_ECB.bin |
| Diamond 9 (D9-215) | |
| Diamond Fader Panel 1 | BB_MOT.bin |
| Diamond Fader Panel 2 | BB_MOT.bin |
| Diamond Fader Panel 3 | BB_MOT.bin |
| Diamond Program Panel 1 | BB_PP.bin |
| Diamond Softkey Panel 1 | BB_SKB.bin |
| Diamond Mini Screen 1 | BB_RGB2P2.bin |
| Diamond Mini Screen 2 | BB_RGB2P2.bin |
| Diamond Mini Screen 3 | BB_RGB2P2.bin |
| UPS 24 Panel 1 | BB_UPS.bin |
| Diamond IO 1 | BB_IO.bin |
| Diamond SMPTE 1 | N/A |
| Diamond Encoder Panel 1 | BB_MEB.bin |
| Diamond Encoder Panel 2 | BB_MEB.bin |
| Diamond Side Encoders 1 | BB_SKBLR.bin |
| Diamond Side Encoders 2 | BB_SKBLR.bin |
| Diamond DMX 1 | BB_DMX.bin |
| Diamond DMX 2 | BB_DMX.bin |
| Keyboard Panel 1 | BB_KBD.bin |
| Diamond Layer Screen 1 | BB_MST4P3.bin |
| Diamond Layer Screen 2 | BB_MST4P3.bin |
| Diamond Layer Screen 3 | BB_MST4P3.bin |
| Diamond 9 (D9-330) | |
| Diamond Fader Panel 1 | BB_MOT.bin |
| Diamond Fader Panel 2 | BB_MOT.bin |
| Diamond Fader Panel 3 | BB_MOT.bin |
| Diamond Fader Panel 4 | BB_MOT.bin |
| Diamond Fader Panel 5 | BB_MOT.bin |
| Diamond Fader Panel 6 | BB_MOT.bin |
| Diamond Program Panel 1 | BB_PP.bin |
| Diamond Softkey Panel 1 | BB_SKB.bin |
| Diamond Mini Screen 1 | BB_RGB2P2.bin |
| Diamond Mini Screen 2 | BB_RGB2P2.bin |
| Diamond Mini Screen 3 | BB_RGB2P2.bin |
| UPS 24 Panel 1 | BB_UPS.bin |
| Diamond IO 1 | BB_IO.bin |
| Diamond SMPTE 1 | N/A |
| Diamond Encoder Panel 1 | BB_MEB.bin |
| Diamond Encoder Panel 2 | BB_MEB.bin |
| Diamond Encoder Panel 3 | BB_MEB.bin |
| Diamond Encoder Panel 4 | BB_MEB.bin |
| Diamond Side Encoders 1 | BB_SKBLR.bin |
| Diamond Side Encoders 2 | BB_SKBLR.bin |
| Diamond DMX 1 | BB_DMX.bin |
| Diamond DMX 2 | BB_DMX.bin |
| Keyboard Panel 1 | BB_KBD.bin |
| Diamond Layer Screen 1 | BB_MST4P3.bin |
| Diamond Layer Screen 2 | BB_MST4P3.bin |
| Diamond Layer Screen 3 | BB_MST4P3.bin |
| T3-Wing | |
| T3 Wing 1 | T3_WING.bin |
| TM-Wing | |
| ~ | ~ |
| TT2-Wing | |
| Tiger Touch Wing 5 | tt_fw.bin |
| Tiger Touch Wing 6 | tt_fw.bin |