Editing Cue Lists
This section describes how to edit cues within a cue list. To copy, move or delete an entire cue list see the section Copying, Moving, Linking and Deleting.
- To edit cues using keypad syntax commands, see Theatre Programming.
Playback View Window
The easiest way to edit a cue list is using the Playback View window (press Open/View then the Select button for the cue list to open it). This shows a grid with each cue and allows you to change most features of the cue. Select the item you want to change in the grid, and the softkeys will offer you options for what you can change.
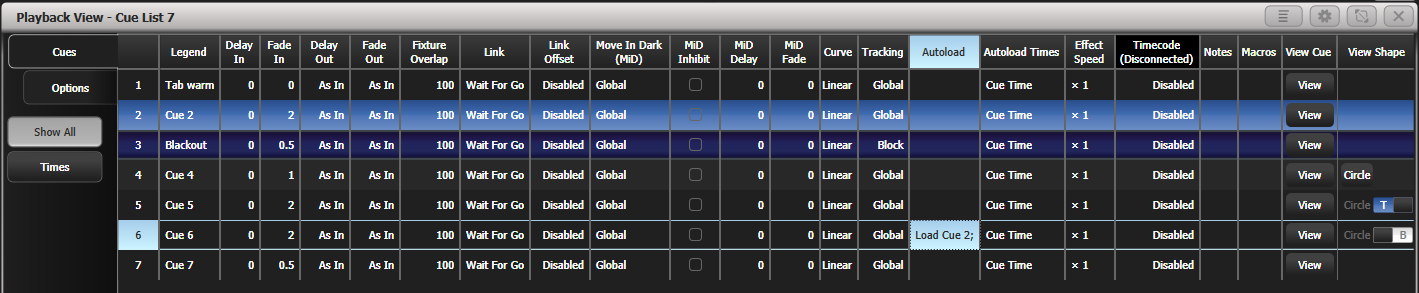
To change multiple cues at once, draw a box across the items you want to change.
Also, the Intensity View window is useful for seeing the state of all fixtures.
Editing Values in Cue View Window
You can edit the value of every fixture in each cue using the Cue View window. Press the View button in the column View Cue at the right hand end of the Playback View window.
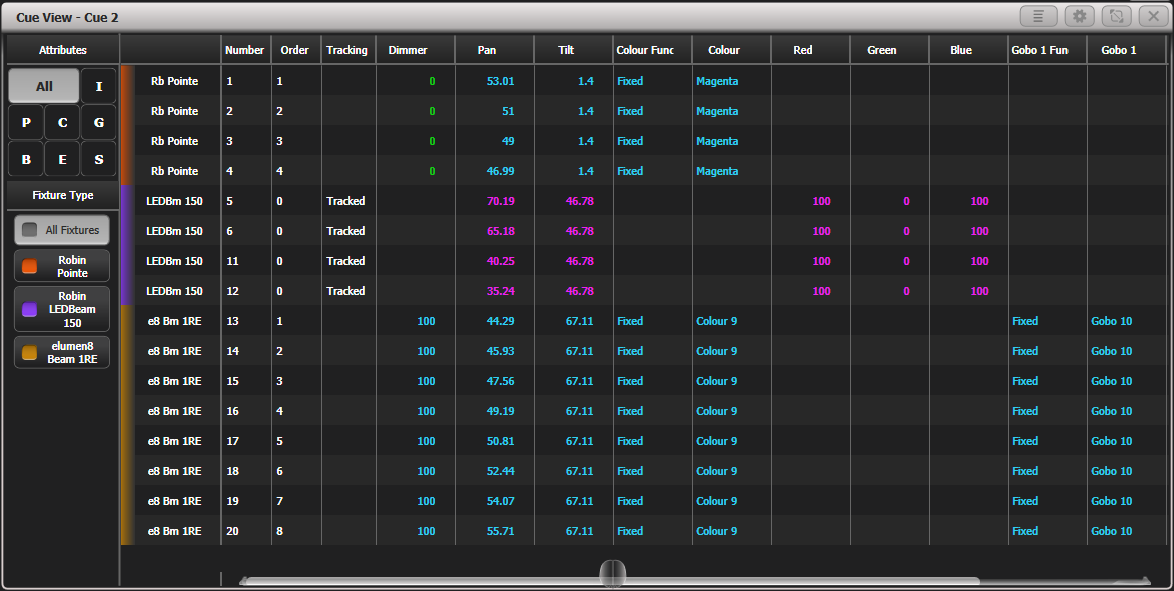
You can then click on the values you want to change and edit them using the softkeys.
The context menu buttons allow you to view levels, shapes, effects and times for each attribute of each fixture in each cue.
You can remove values from fixtures by selecting the value(s) in the grid and pressing the Off softkey. Values set to Off can be restored later by pressing On.
You can remove fixtures from the cue by selecting the fixture(s) in the left hand column and pressing Remove Fixtures.
If levels are set from a palette, the View Palettes context menu button either shows you the palette used, or the underlying value.
Values have different colours to show their tracking status. Use the Tracking View window to edit how values are tracking between cues.
- White means an unchanged hard (untracked) value.
- Green means a hard value where the level has reduced.
- Cyan means an initial value or a hard value where the level has increased.
- Magenta means a tracked value (The Tracking column will also show Tracked).
- Red means a block.
You can hide tracked values using the Show/Hide Tracked Values context menu button.
Moving, Copying and Deleting Individual Cues
There are several ways to copy or move cues within a cue list. You can also move cues to other cue lists.
You can use Unfold (as described in the next section).
To move a cue (renumber it), click on the cue number in the Playback View window and use the Change To softkey to enter the new cue number - once you have changed the number the cue will move to its correct position in the list. You can renumber multiple cues by selecting a block of cues on the screen.
You can copy or move cues by pressing Copy or Move then clicking on the screen to select a cue or a block of cues.
To delete a cue press Delete, select the cue in the window, and tap the cue again, or press Enter or Confirm to confirm.
You can also use a command-line style series of keypresses:
- fader select is a playback fader select button, n is the cue number and sections in square brackets are optional. The @ button is the one by the numeric keypad.
| Keypresses | Action |
|---|---|
| Copy fader select n @ m Enter | Copy cue n as new cue m in the same cue list |
| Move fader select n @ m Enter | Move cue n to cue m in the same cue list |
| Copy fader select n @ @ | Copy cue n as new cue at end of same cue list |
| Delete fader select n Enter Enter | Delete cue n |
| Copy fader select n fader select m Enter | Copy cue n as new cue m in a different cue list |
| Copy fader select n fader select Enter | Copy cue n as new cue at the end of a different cue list |
For the copy commands, you can use Move in place of Copyto move cues. For consoles which don't have a Move button you can press (Avo and Copy) together to get Move.
You can change multiple cues using Thru, And and Not. For example to copy cues 3, 4 ,5 ,7, 10 into a new block of cues starting at cue 20 you could do
Copy fader select 3 Thru 7 Not 6 And 10 @ 20 EnterYou can press Enter instead of @ if you are more familiar with that key sequence, for example to copy a cue onto the end of a cue list you can do Copy fader select n Enter Enter
Editing a Cue List using Unfold
As an alternative way of editing a cue list, the Unfold button places each cue of the cue list on one of the playback faders. This allows you to fire and edit each step individually as if it was a stand-alone cue.
- Press Unfold, then the Select button of the cue list to be edited.
- Cues are loaded into the playback faders. The display shows the cue numbers and legends (go to the next or previous set of cues using softkeys F and G).
- Raise a playback fader to output the contents of that cue (fade times will operate as programmed).
- Various Unfold options are available, detailed below.
- Press Unfold again to exit unfold mode.
To edit the contents of a cue: Press Clear to empty the programmer, raise the fader to output the cue, make the changes, press Record Step, then the Select button for the cue number.
To merge the programmer into the live step, double tap Record Step.
To change the times or cue linking for the cue, press Edit Times, then the Select button for the cue, then set the times (see Cue List Timing)
To insert a new cue, set up the look for the new cue, press B Insert Step, then press the playback button where you want the new cue to go. All following cues will be shifted on by one and the new cue will be given a number in between the two existing cues (for example, if you press playback 3, your new cue will be 2.5).
To move or copy a cue, press the Move or Copy button, press the select button for the cue you want to move or copy, then press the select button where you want it to go.
To delete a cue, press the Delete button then the select button for the cue you want to delete. Press the select button again to confirm.
To change the cue legend, press Set Step Legend then the playback select for the step you want to change.
If the cue list has more cues than there are playback faders, you can swop to the next page using softkeys F and G.
Editing tracked cues using Tracking View
The Tracking View window allows you to see and edit how dimmer levels and other attributes are tracked between cues in a cue list. This is really useful to tidy up a show after a frantic programming session if you've saved hard values accidentally instead of using tracking, or to work out where an incorrectly tracked value is coming from.
To show the Tracking View, use the context menu in the Playback View to select View Tracking.
- You can also double-press Open/View and select Tracking View from the workspaces menu, but then you need to select which Cue List you want to view, from the list on the softkeys.
- You can select a different cue list to view using the context menu Select Cue List option.
![]()
The cues are listed in the grid showing the attribute values stored in each cue. The tracking state is shown by colour:
- White means an unchanged hard (untracked) value.
- Green means a hard value where the level has reduced.
- Cyan means an initial value or a hard value where the level has increased.
- Magenta means a tracked value.
- Red means a block.
On the left side of the window, you can filter the fixtures and attributes shown in the grid to show only:
- one of the IPCGBES attribute banks, or All
- the current attribute bank as selected on the console buttons
- the currently selected fixtures
- a particular type of fixture patched in the show.
By selecting one or more values in the grid, you can do the following from the softkey options. Press Exit to deselect all values in the grid.
- Select Function gives a submenu with various levels or fixture functions.
- Tracking gives a submenu where you can change the tracking mode.
- Set Hard Value will record the values in the selected cells as hard values.
- Delete will remove all hard (untracked) values in selected cells. Has no effect on tracked values.
- Delete Redundant will remove hard values if the same value would have tracked into the cue. You can use this to delete hard values and return cues to being tracked in multiple columns / rows by selecting the column / row headers.
- Off Set selected attributes to Off.
- On Set selected attributes to On (for more information about On/Off see [Off](/de/docs/next/cues/editing-cues#deactivate-attributes-from-cues-using-off)).
If any fixture or attribute has been set to non-global, then a letter after the value shows T (Track), B (Block), C (Cue Only) or S (Solo).
Tracking View display options
Using the window appearance menu button you can change the following display options for the Tracking View:
- Column Size can be set to Small, Normal, Large, Super Size.
- Window Scroll can be set to automatically scroll on the Next Cue, or require Manual scrolling.
- Scroll offset from top sets how many past cues are visible above the current cue.
- Palettes sets how attributes display when a palette has been stored. You can choose Hidden (displays value only), Legend Only (shows the palette legend), or Legend and Value (shows legend, and also value if the column is wide enough).
You can also show or hide various parts of the display to make more space in the window:
- Attribute Filters
- Selection Filters
- Fixture Filters
- Tracking Column
- Legend Column
- Fixture Legends
- Scroll Bars
In the Context menu for the Tracking View screen there are Sort and Filter options:
- Attributes can be sorted in IPCGBES Bank Order or by Current Bank First where the selected attribute bank shows first, followed by the others.
- Fixtures can be sorted by User Number, Last Selected and DMX Address.
- The sort order can be set as Fixtures then Attributes (each fixture listed with all its attributes) or Attributes then Fixtures (same attributes listed together).
For the Filter options
- Bank Selection links the Attribute filters to the currently selected attribute bank (also changing the attribute bank filter in the Tracking View window will change the attribute bank for the wheels when this option is enabled).
- Fixture Selection links the window to currently selected fixtures when enabled.
Using Update to Change Tracked Cues
Because fixture settings in a cue list are tracked through from previous cues, if you want to edit a setting you need to find the cue where it was originally stored as a hard value.
The Update function will go back through the cue list from the currently fired cue and automatically update the correct cue.
- With the cue list fired, select the fixtures and change them to the settings you want to store.
- Press Update (Record Cue, Update if the console doesn't have an Update button).
- Press Enter to immediately store the new values to the cue list.
Alternatively, the softkeys show a list of palettes and playbacks which can be updated. Select or deselect these as required.
If you have used the softkey options, press Enter to complete the update.
If the attributes you have changed were tracked through from a previous cue, Update will update that cue rather than the current one.
Editing a Cue List Which is Running
You can also edit cues in a cue list while you are running it without using Unfold.
- Fire the cue list by raising its fader.
- Use Wheel A to select the cue number you want to change then the Go button to jump to it. (On Pearl Expert/Tiger Touch 1 press the white ↔ button above the Snap Back button instead of Go)
- Press Clear to make sure the programmer is empty.
- Make the changes that you want to the current step.
- Press then Connect/Cue, then select Replace, Merge or Insert After to save the changes. (On Pearl Expert and Tiger Touch 1 use the Rec Step button)
- Press the Go button (on Pearl Expert and Tiger Touch 1 the white ↔ button) to jump on to the next step.
- You can merge your changes into the current live cue by pressing Connect/Cue Connect/Cue.
Edit Times of a Running Cue List
You can edit the times for a cue using the Live Time and Next Time buttons (not on all consoles) as follows:
- Fire the cue list by raising its fader.
- Use Wheel A to select the cue number you want to change then the Go button to jump to it (on Pearl Expert and Tiger Touch 1 the white ↔ button)
- Press Live Time to set the times for the current step, or Next Time for the next step. The Live and Next step numbers are shown on the display above the controller wheel.
- Use the softkeys to set the times, linking and overlap settings you want (see Cue List Timing for a description of the times). If you set the link option to Link With Previous Cue or Link after Previous Cue then this cue will not wait for the Go button but will start automatically.
- Press the Go button (on Pearl Expert and Tiger Touch 1 the white ↔ button) to jump on to the next step.
- The Review button lets you test the live step with the new timings.
You can also use Unfold to set the times as described in the Unfold section above.
Editing a Cue List While Recording
You can edit cues while you are in the Record Cue List menu.
- Press Cue Number=x and type the cue number to be edited.
- The console will jump to the cue and show the output.
- Make the changes that you want to the programming of the current step, or to the timings using Edit Cue x Times.
- Press Update Cue x or the Rec Step button to save the changes.
Update Mode
The Update Mode softkey allows you to set how changes in the cue will be tracked.
| Update Mode | Action |
|---|---|
Forwards | Updates the channels in the current cue and tracks following cues until the channels are next changed. The values in cues before this one will not be changed. |
Backwards | Updates the current cue and tracks backwards through cues until the channels were last changed. |
Both | Updates the current cue, tracking backwards through previous cues from the previous change and forwards through following cues to the next change. |
Cue Only | Just sets the current cue. |
You can't change the cue number using this menu - if you press Cue Number this will change the cue you are editing. Use Advanced Options to change cue numbers.
Updating Values in a Range of Cues
You can merge or replace values in a range of cues in a cue list (or a chase). This can be done either from the keypad or from the Playback View.
From Playback View, press then select a cue or range of cues by touching and dragging over the required cues. Select Merge or Replace (or press Enter to merge). The current programmer will be merged into all of the selected cues.
From the keypad, connect the cue list (or chase) and press Rec Step. Then use the syntax n THRU m to select a range or n And m to select cues which aren't together. The selected cues will highlight in red in the Playback View if you have it open. When you have selected all desired cues press Enter, then select Merge or Replace (or just press Enter again to merge).
Disabling a Cue
You can temporarily disable a cue using the Disable option at the right hand end of the Playback View window. Tick the Disabled checkbox and the softkeys let you set Cue Disabled Yes. When a cue is set to Disabled it will be skipped. This can be a useful way to remove a cue, but still be able to put it back in later.
Extracting a Cue from a Cue List with Include
You can reload a single cue out of a cue list into the programmer using the Include function. Press Include, select the cue list, enter the cue number to be included, then press Include Cue.
If you want to do this from the currently connected cue list, Press Include, Connect/Cue, type the cue number, Include Cue.
This is useful if you want to reuse a state from a cue list in another playback. It is also useful if you want to edit shapes/effects in a cue, although you can also do this from the Playback View window.
How Merged values are stored into cues
When merging into a cue containing the same fixtures, that information will always be recorded "by channel" regardless of what the record mode is set to. Otherwise merging into a cue would overwrite all the values you have for a fixture so instead it just merges the attributes that are tagged in the programmer. You can keep the console in "Record by Fixture" mode when editing cues and let the console handle it with Tracking Record.
Fixtures that do not exist in the cue already will be recorded "by fixture", this is usually best for theatre programming as it ensures that fixtures have all their attributes set to defaults (even if they are changed later or by another playback).