Chase Playback
Playing Back a Chase
To fire a chase, raise the fader of the playback. (You can also use the Flash / Swop buttons). The chase will start to run. The bottom line of the screen relating to the playback fader shows the current cue number and speed of the chase.

The HTP (intensity) channels in the chase will be controlled by the fader; if fade times are programmed, the fade will stop at the fader level. The other channels (LTP) will be set as soon as the fader moves above zero according to the fade times programmed in the chase. You can set the point at which the LTP channels activate from the User settings menu.
While the chase is running, the area of the screen above the wheels shows details of the chase steps:

You can temporarily pause the chase by pressing the button near the wheels. Press Go to resume playback.
There are many options you can set to determine the way the chase runs and these are described in the rest of this chapter.
Connecting a Chase for Control
When you fire a chase, the wheels and /Go buttons are automatically allocated to control the speed and crossfade of the chase - this is called connecting the chase. If you have more than one chase running, you can choose which chase is connected to the controls using the
Connect button.Connect a different chase to the controls by pressing Connect then the Swop button of the chase you want to control.
Disconnect a chase from the controls by double pressing Connect.
You can turn off the "Auto Connect" option in the User Settings > Wheels menu if you don't want to connect to a chase when you fire it. You will have to use the Connect button to control the chase if you do this.
There is a further option "Auto View on Connect" in the User Settings > Wheels menu which will automatically open the view window for a chase when you fire the playback. This is useful to keep the correct chase view open as you swap between chases.
Normally if you change the speed or crossfade of a chase, the new setting is saved. However you can set this change to be temporary, so that when the show is reloaded the speed and fade will go back to the previously saved settings. Go to User Settings (Avo + User Settings, in the Times tab set the option Connected View Sets to
<strong>Temporary Speed</strong>. You can still save a temporary speed by pressing
<Keys.SoftKey>Save Temporary Speed</Keys.SoftKey> in the Set Times menu.
Setting Speed and Crossfade for a Chase
The left wheel is assigned to control the speed of the chase it is connected to. The speed is shown in Beats Per Minute (BPM) on the display. You can also enter a speed from the keypad as described below. The last speed you set on the wheel is always remembered, you do not have to tell Titan to save it.
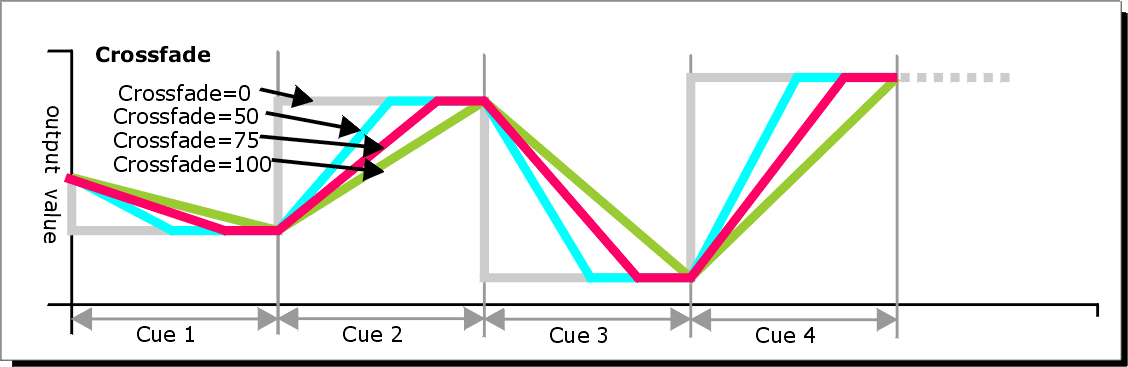
Crossfade is the "slope" between cues; with a crossfade of 0, the fixtures snap instantly to the next cue, but with a crossfade of 100, the fixtures spend the whole cue time fading to the next cue. With a crossfade of 50, the fixtures delay for half the cue time and fade for the other half of the time.
You set the crossfade and speed as follows:
Press Edit Times from the top level menu then the Swop button of the chase.
To set the crossfade, press XFade and type the fade from 0 - 100.
0 = no fade (the chase will "snap"), 100 = max fade (the chase will move continuously from step to step).
- To set the speed, press Speed, type the new speed, then pressEnter.
The speed can be set in Beats Per Minute (BPM) or seconds depending in the User Settings.
There are other options you can set for the chase from this menu including Fixture Overlap, which are described in the Chase Timing.
You can set individual times for each cue in a chase and unlink cues from each other so they wait for you to press the Go button. This is done using the Playback View, or the Unfold function which is described in Editing a Chase.
You can select whether the chase speed is displayed in seconds or in Beats Per Minute (BPM). Press Avo and User Settings, then press
Tempo Units to set the option to Tempo Units Seconds or Tempo Units Beats Per Minute (BPM).You can also allocate a Speed Master to the chase which will allow you to modify the chase speed during playback, see Speed and Size Masters.
Manually Controlling the Steps of a Chase
You can pause a chase, if the chase is connected to the wheels, by pressing the button next to the wheels. Press the red Go button to resume playback of the chase.
While the chase is stopped you can use the Prev Step/Next Step buttons (← and → on some consoles) next to the Connect button to move to the next or previous step. The programmed fade time will be used when moving between steps, unless you enable the user setting Chase Snap, or press Snap button if the console has one.
You can also configure the blue and grey buttons of the playback handle to be Stop and Go. This uses the Key Profiles function.
Hold Avo and press Edit Current Key Profile.
If you are using the default [Key Profile] which is not editable, you will be prompted to add a new profile.
Press Chases then choose either the Blue key or the Grey key.
Select Go or from the list of functions. Then press Exit and set the function for the other key if required.
Press Exit to continue using the console.
Changing Chase Direction
The Prev Step/Next Step (← and → on some consoles) buttons next to Connect set the direction of the connected chase. If fitted, the ↔ double-ended arrow button sets bounce mode where the chase will run to the end then reverse. The Review key sets the chase to random.
Jumping to a Step
You can jump directly to a step in a chase by pressing Connect, then typing in the desired step number, then pressing Enter or softkey A. Alternatively at the top level menu you can type the step number then press Connect.