Pixel Mapper Examples
Randomising Effects
This example shows you how to use the pixel mapper to create an effect where random dimmer cells turn on. This effect will overlay any existing intensities.
The fixtures you want to use need to be recorded into a group, do this first if they are not already
Adjust the layout of the fixtures in the group using Shapes And Effects, Pixel Mapper, Edit Group Layout, (select group)
Start creating an effect by selecting the group then Shapes And Effects, Pixel Mapper, Create Effect
In the Pixel Mapper Effect Editor window toggle the context menu option Fixture Overlay until it reads Fixture Overlay 50/50
This will allow you to see the relationship of your fixtures to the
effect as you create it
![]()
- Select Effect and drag Background Opacity slider to 0%
This will allow the whole effect to overlay any related intensities
![]()
Select Layer 1, click + at the bottom of the screen and then choose Circle from the elements that appear
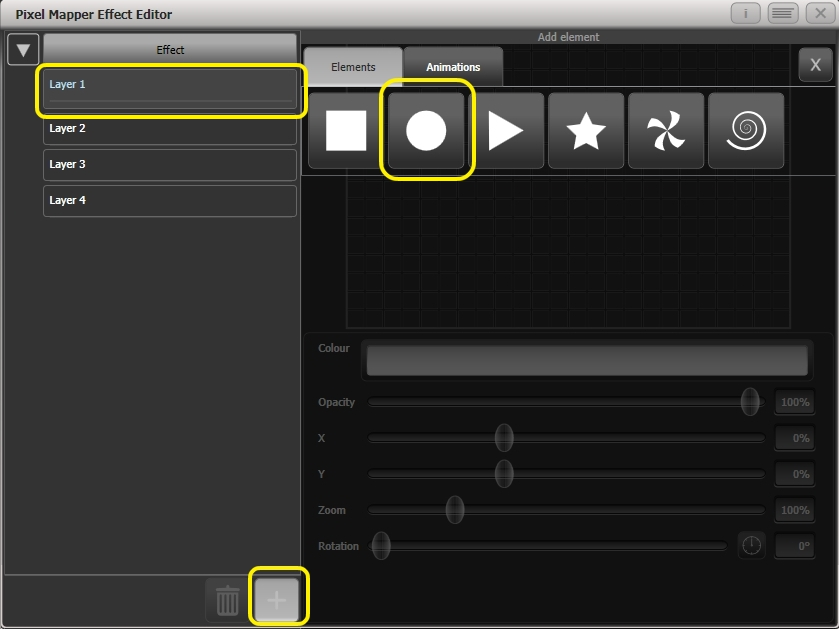
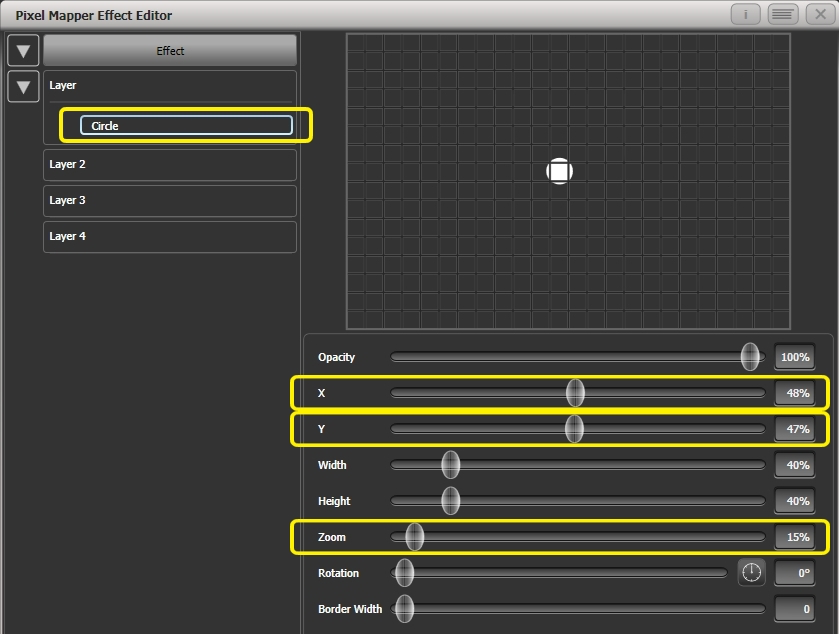
Drag the Zoom slider until the circle covers approximately one cell. You can also use the Width and Height sliders to turn the circle into an oval if that helps.
Then drag the <strong>X</strong> and <strong>Y</strong> sliders to position the circle roughly in
the centre of your fixtures if it is not already.
Select + again and choose Displacement from the animations that appear (this is represented as a few static blocks)
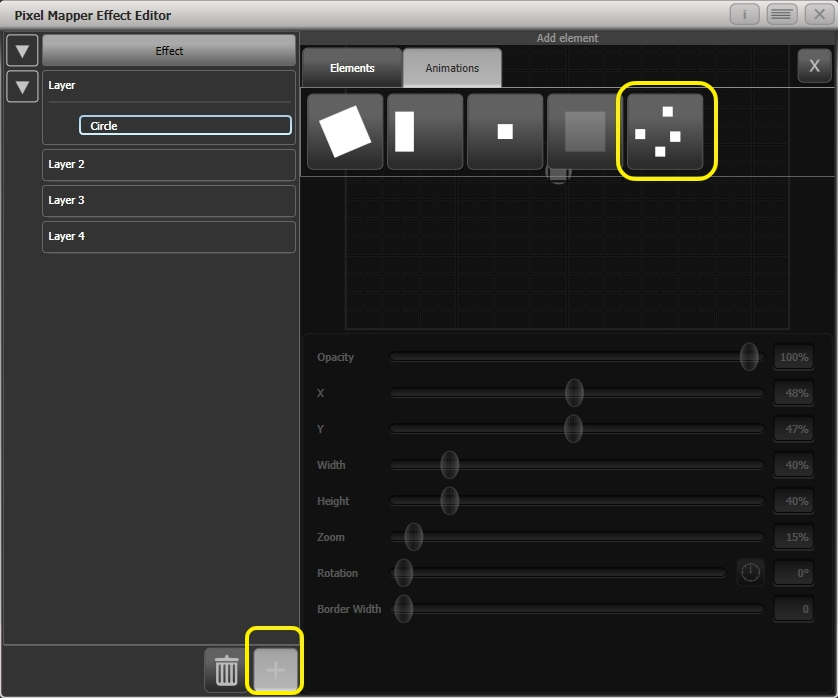
Note that nothing changes yet
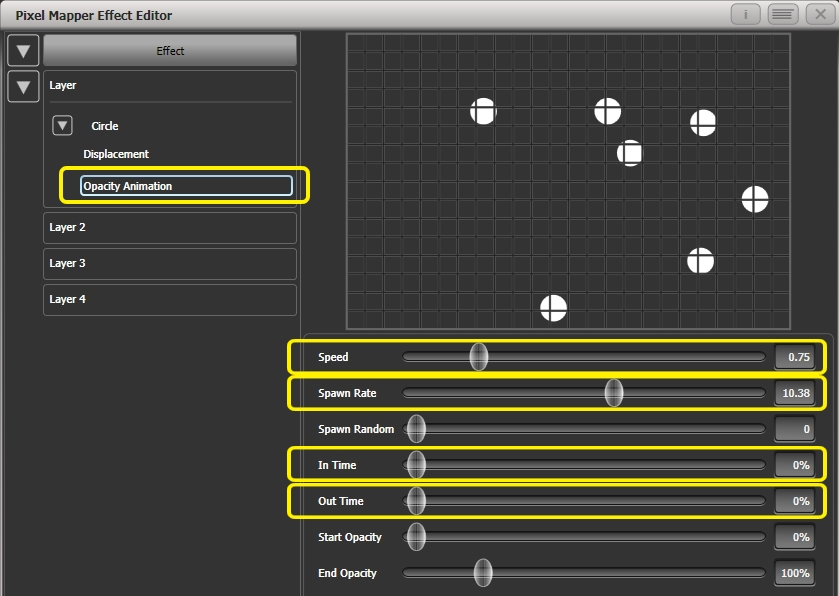
Select + and this time choose Opacity animation (represented as a block fading in).
Modify the effect:
The displacement acts on the opacity animation causing it to appear at random locations each time it is drawn.
Drag the In Time and Out Time sliders to 0%. (This will cause the effect to snap on/off instead of fade.)
Increase the Speed and Spawn Rate settings to make the effect run quicker and with more circles respectively. (High spawn rates are particularly useful for small randomised elements like this.)
- to a playback
Overlaying Effects
This example shows you how to create a diagonal white wipe with a rotating red fan on top.
Select a group containing a fixture layout as described in previous example
Start creating an effect by selecting the group then Shapes And Effects, Pixel Mapper, Create Effect
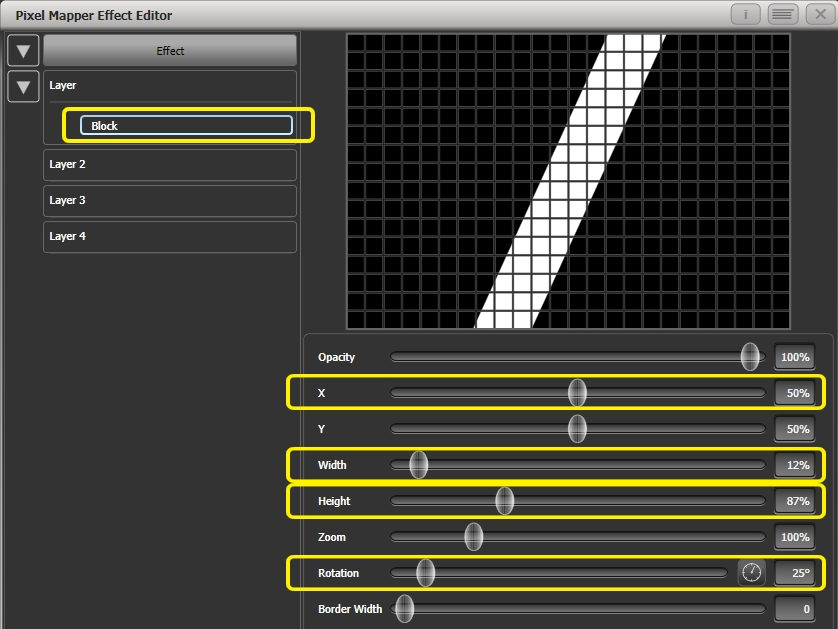
Select Layer 1, click + at the bottom of the screen and then choose Block from the elements that appear.
Drag the <strong>Rotation</strong> slider to the right to angle the element at
approximately 25 degrees.
Drag the <strong>Width</strong> slider to the left to make a thinner block.
Drag the <strong>Height</strong> slider to the right until the block fills the height
of the entire window.
Drag the <strong>X</strong> slider to the right until the block is just off the
screen.
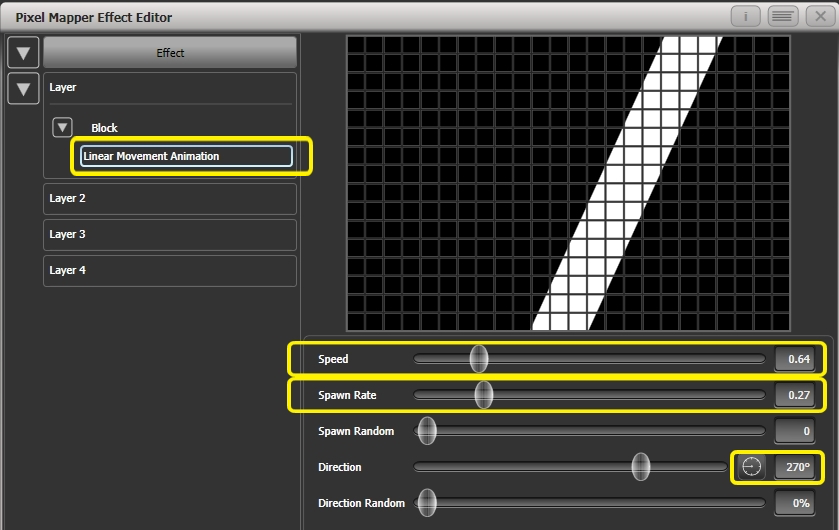
Click + again and choose Linear Movement Animation (represented as a block moving left to right).
On the right side of the <strong>Direction</strong> slider there is a compass button.
Click on this four times until the direction reads 270 degrees. (By
default the animation is set to 90 degrees or left to right. Because we
placed the block on the far right of the screen we want it to move the
other way. The compass gives shortcuts to the more common directions in
45 degree increments.)
Reduce <strong>Spawn Rate</strong> until only one stripe is on screen the same time.
For this type of effect the value will usually need to be quite low -
approximately 0.2.
You might want to reduce <strong>Speed</strong> slightly at this point. (Note that a
higher speed was initially useful for getting the correct spawn rate
above.)
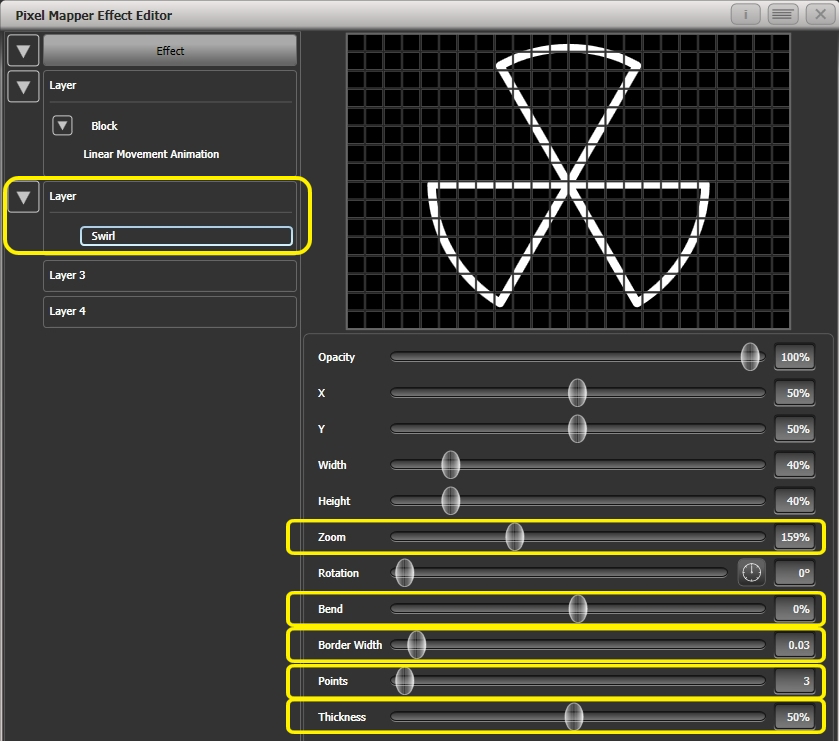
Click on Layer 2, select + and select the Swirl element (represented by a fan shape with four arms).
Increase <strong>Zoom</strong> until it is as large as will fit in the screen.
Set <strong>Bend</strong> to 0% for nice straight fan blade edges.
Set <strong>Points</strong> to 3 (minimum) for a three bladed fan.
Set <strong>Thickness</strong> to 50% for evenly sized segments.
Increase <strong>Border Width</strong> to a low value so that we just have an
outline.
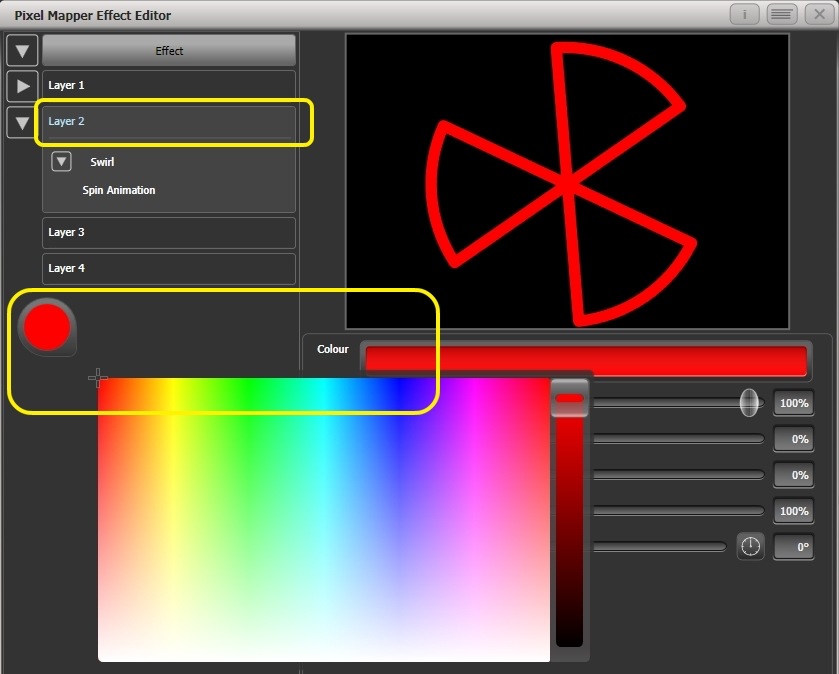
Click on + and add a spin animation.
Reduce the speed until it just causes a light breeze.
Click in the top of this layer to get the layer controls.
Click on the colour bar to open the colour picker.
Click and drag to the top left of the picker window to get a strong red.
Click on Effect at the top left to access the global controls.
Drag Pre Spool to the left until it reads 0s. (This is to ensure the wipe begins off screen where we placed it when it is fired.)
- to a playback
Note how the red fan sits on top of the white bar when they interact. This is because the white is on a lower layer. A higher layer number has priority over a lower number.
Creative Use of Fixture Layouts
Because each fixture group can contain a different layout it is possible to create more than one arrangement of the same fixtures for pixel mapping.
By arranging fixtures in certain layouts you can easily achieve complex effects.
Example 1: Odd/Even
Select your fixtures
Open the Selection Pattern menu by pressing the All key
Choose Odd from the softkey options
This will select all the odd numbered fixtures according to fixture order.
Record a group.
Press +1 (or Next) key
This will select all the even numbered fixtures.
Merge this into the first group
Open the Layout Editor Shapes And Effects,
Pixel Mapper, Edit Group Layout, (select group)
By doing the above you should be able to see how we have quickly created a layout where the all the odd fixtures are arranged together on the left followed by all the even fixtures on the right.
This arrangement could be used as it is. A block element animated to run horizontally left to right will run across all your odd fixtures followed by all the even fixtures.
An alternative goal might be a vertical cascading effect:
- Click on the vertical resize tool and drag down until the grid is at least twice the original height
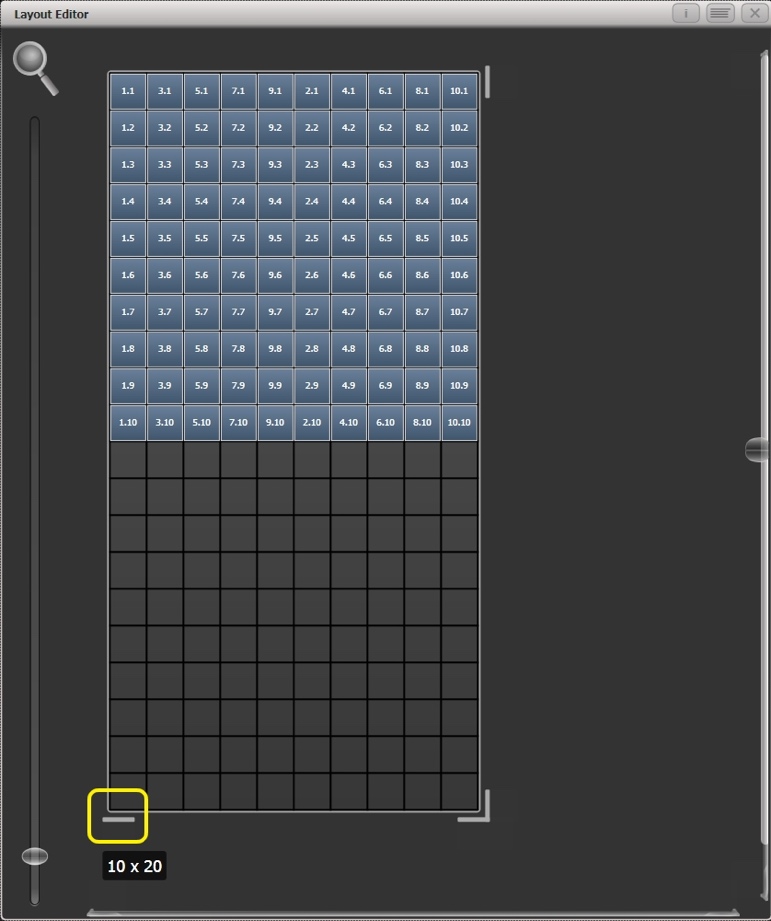
- Drag a marquee select across the even fixtures
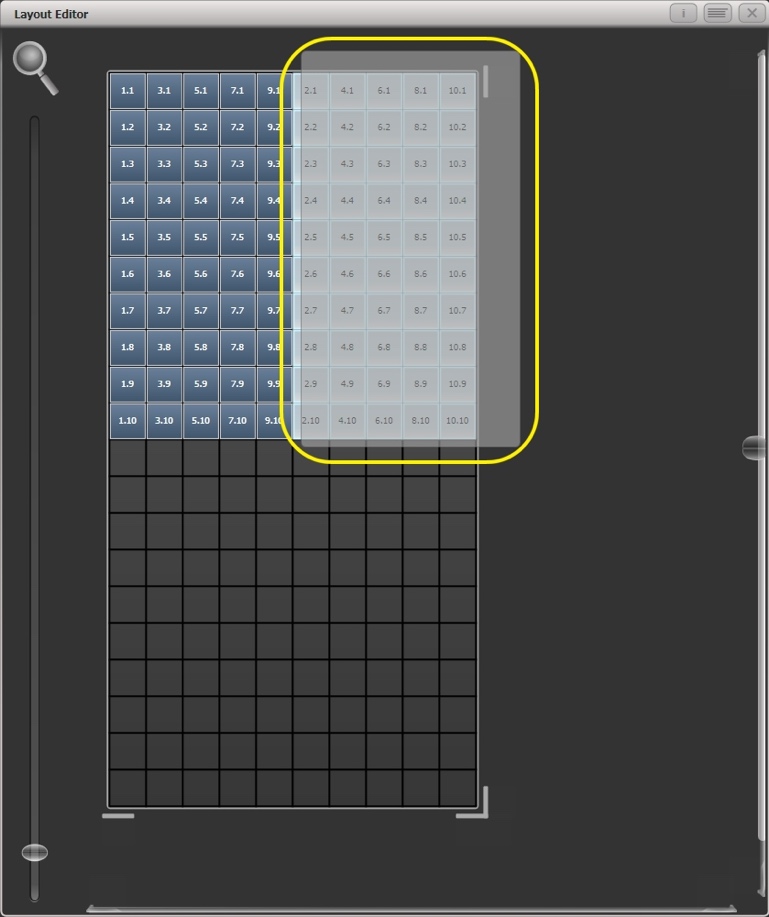
- Drag the selected fixtures so they sit directly under the odd fixtures
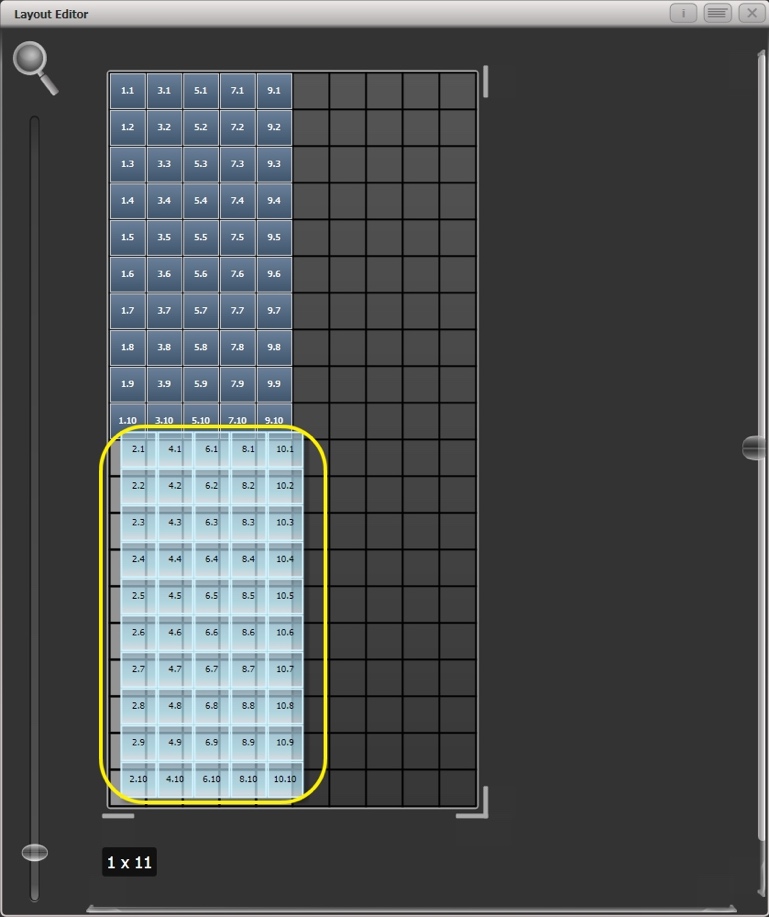
- Select Crop Grid from the Layout Editor context menu. (This will get rid of the unused pixels.)
Now a block element animated to run vertically from top to bottom will run down the odd fixtures followed by the even fixtures.
Example 2 - Pseudo Random
Select your fixtures and create a group.
Open the Layout Editor.
Click on the vertical resize tool and drag down until the grid is at least twice the original height.
Note that to help with creation and manipulation of larger grids you can use the zoom control on the left-side of the window. Clicking on the magnifying glass gives a quick shortcut to zoom in/out.
Select the group again. (This will quickly select everything in the layout.)
Press +1 key
<strong>This will select the first fixture</strong>
Use the wheel to adjust Position Y
- Repeat steps 4 and 5 until all the fixtures are at different heights in relation to one another
If you create an effect using this group it will appear to be random. Adjustments can be made to the layout at any time to fine-tune the end result.
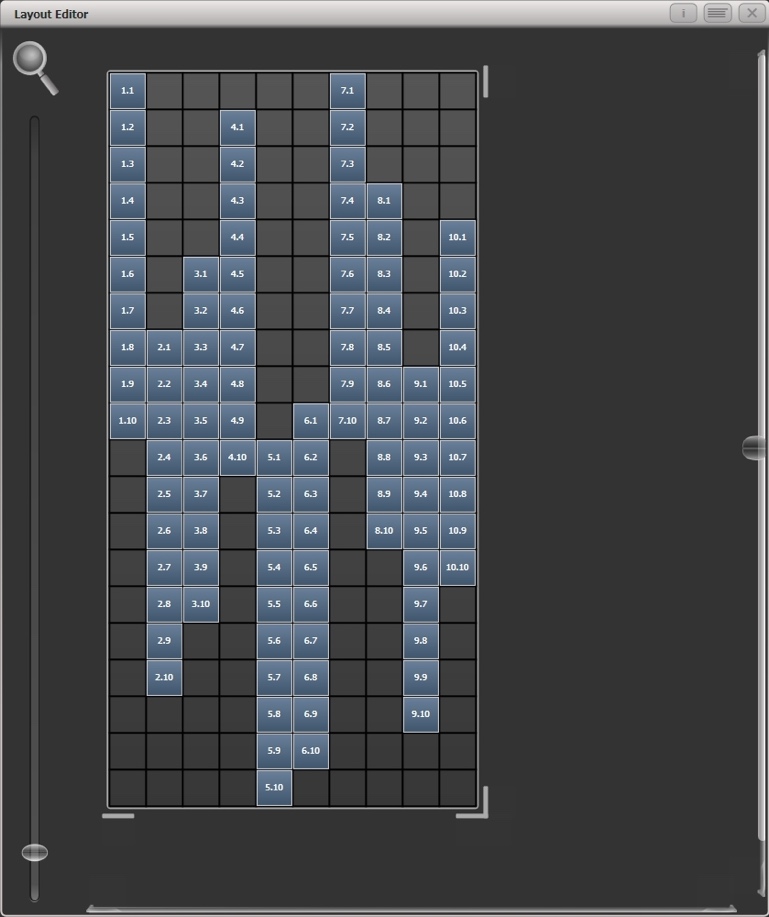
Example 3 - Angles (or "when straight just isn't good enough...")
Sometimes we like to hang fixtures at artistic angles to look pretty. By default the software assumes you have hung them vertically but fear not - Titan has a solution:
Select your fixtures and create a group
Open the Layout Editor
Select the fixture(s) that you want to angle and use the appropriate wheel to control.
If wheels are not assigned to control the cell layout you can toggle this on/off using the context menu item Wheel Control. Also, on the Pearl Expert you may need to select Adjust Angle and to return wheels to controlling position select Adjust X,Y.
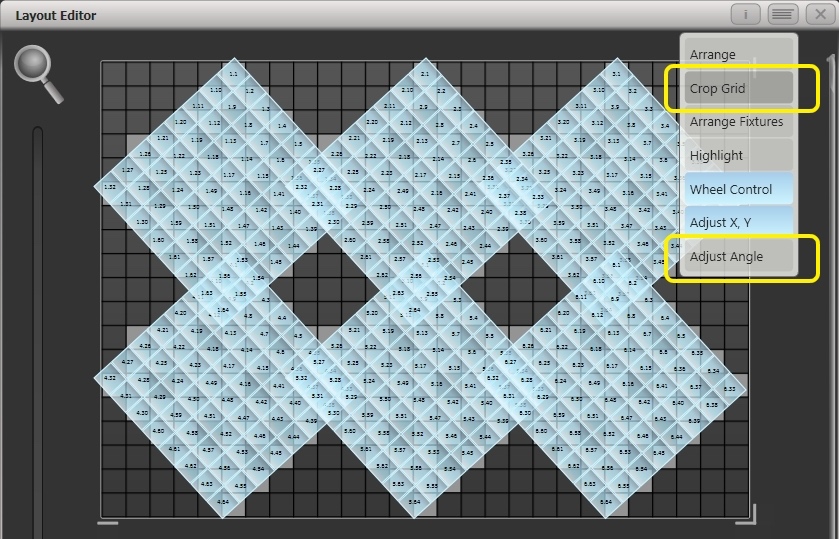
Note that underneath the visual representation of the fixtures the actual cells used are shown in light grey.
If any of your fixtures have been naughty and ended up beyond the bounds of the grid after rotating you can use context menu item Crop Grid to make them behave.
When using the wheels to move fixtures, you can click on the "up" and "down" areas in the wheel display to nudge the values up and down: 1 pixel for position and 45 degrees for rotate. If you press the @ button for the wheel, a window opens allowing you to type in the values numerically.
Other Layout Editor Tools
The Layout Editor's context menu has some useful tools for laying out fixtures quickly.
Arrange Fixtures: This is a very useful tool to quickly layout fixtures in a grid. For example you might have 20x colour blocks across four towers, each with five blocks.
Select the fixtures and create a group
Open the Layout Editor
Select Arrange Fixtures from the context menu
Select the Height softkey and type 5
Width will automatically be calculated
- Toggle Crop Grid to fixtures so that it is highlighted
This will make the grid adjust to fit
- Toggle Arrange in... to Columns or Rows
Rows will arrange fixtures left to right and Columns will arrange top to bottom.
The Shape option allows you to arrange in Rectangle, Oval or Triangle
Select OK to complete
Highlight: When enabled this will highlight selected fixtures live on stage. This can be useful to see which fixture you are positioning in the layout.
Position & Angle/Cell Scale: When set to 'Position & Angle' the wheels move and rotate the fixtures. When set to 'Cell Scale' the wheels change the size of the fixture by spreading out its cells. This is useful to get the correct layout if you have some large fixtures with widely spaced cells and others with cells close together.
Arrange/Select Only: When set to Arrange you can move fixtures by clicking and dragging on the screen. When set to Select Only fixtures are locked in position on the grid and cannot be dragged around. This provides an alternative way of selecting fixtures to edit while preventing accidental movement.
If you find you suddenly cannot move anything around this is probably the reason!
For either setting you can still use the wheels to move and rotate the fixtures.
Wheels Move Full Pixel/Sub Pixel: Allows you to position fixtures across pixel boundaries when using the wheels. The Snap option centres the fixture on the nearest cell.
Wheels Rotate Individual Fixtures/Selection: Sets whether individual fixtures rotate, or whether the whole selection rotates.
Media options: Shows a sub menu with useful options when you're using Synergy/Ai to play back media on the fixture. These options are described in Layout Editor with Ai Server.
Playback Order and Priorities
Suppose you wished to create a white pulsating oval on one playback and a blue spiral on a second playback. Normally these effects would layer differently depending on the order you fire the playbacks, but you can use playback priorities to make them always layer the same way
To create first effect:
Select a group containing a fixture layout as described in previous example and go to Create Effect
Select Effect to access the global effect controls and change Background Opacity to zero
This will allow it to overlay the other playback
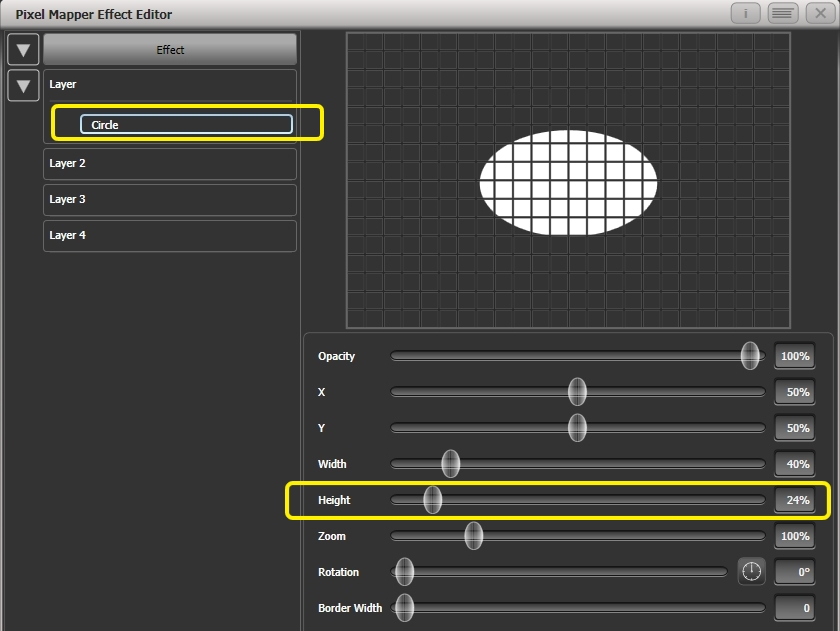
- Double-Click Layer 1 (or press +) and choose Circle from the elements that appear
Double-click is a shortcut to elements and animations
Reduce height to make a rugby ball (or American football if you
insist)
Double-click on Circle (or press +) and select the Zoom animation
Drag <strong>In Time</strong> to 0% and <strong>Out Time</strong> to 100%. (This will make the
effect start large and finish small. Alternatively the same effect can
be created by making <strong>Start Zoom</strong> larger than <strong>End Zoom</strong>.)
Increase <strong>End Zoom</strong> until the element begins by filling the whole
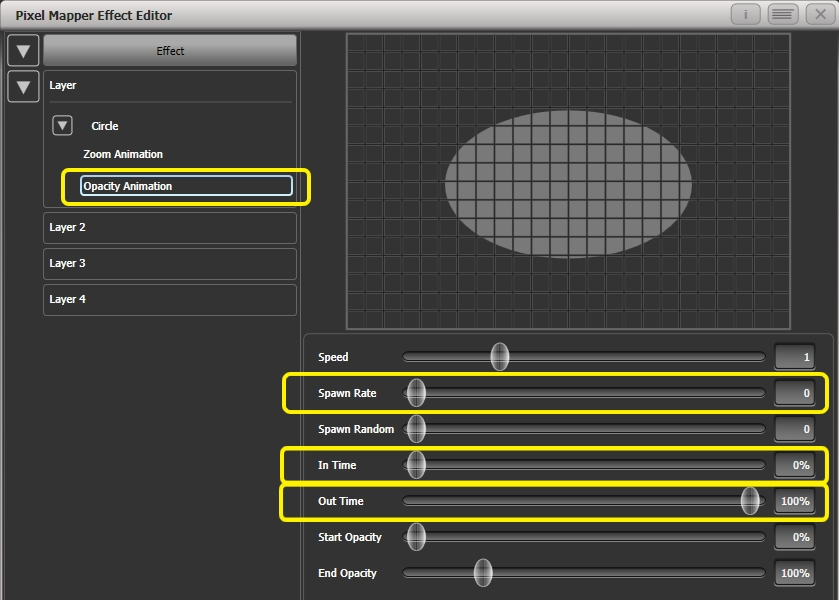
window.Double-click on Zoom Animation (or press +) and select the Opacity animation
Reduce <strong>Spawn Rate</strong> to zero. (This will ensure the opacity only works
on the zoom animation.)
Drag <strong>In Time</strong> to 0% and <strong>Out Time</strong> to 100. (This will make the
effect snap on and fade out as it reduces in size. As with zoom you can
achieve much the same thing by inverting the opacity controls instead.
Using opacity values greater than 100% will create a delay before
fade.)
Click on Effect again and reduce Master Speed to your preference. (Adjusting the global speed control ensures the zoom and opacity animations are synchronised instead of having to manually match the individual values.)
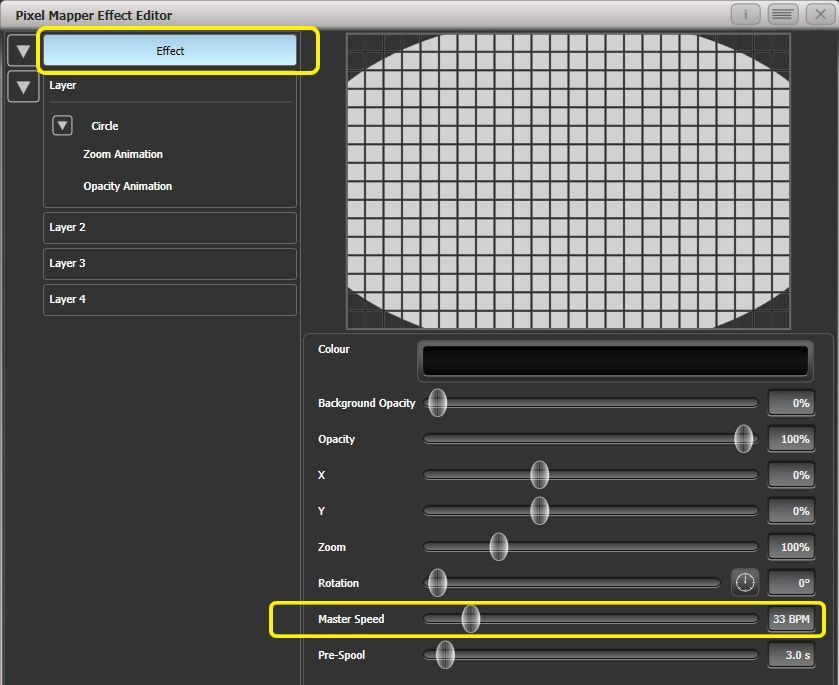
- to a playback
Next we will create the second effect:
Select the same group as used for the first effect and Create Effect
Select Effect and change Background Opacity to zero.
Select Layer 1 and this time add a Spiral element
Increase Zoom so that it's nice and big.
Drag Thinning until it is at 0%. (This will make the lines of the spiral stay the same width. A negative value means the spiral gets thinner towards the outside; a positive value means it gets thinner towards the inside.)
Reduce Turns so we can make a more bold effect. Approx. 3 should work.
Increase Thickness to 50% for chunky lines.
Increase Exponent to around 25%. (This causes the spiral to
expand at a faster rate.)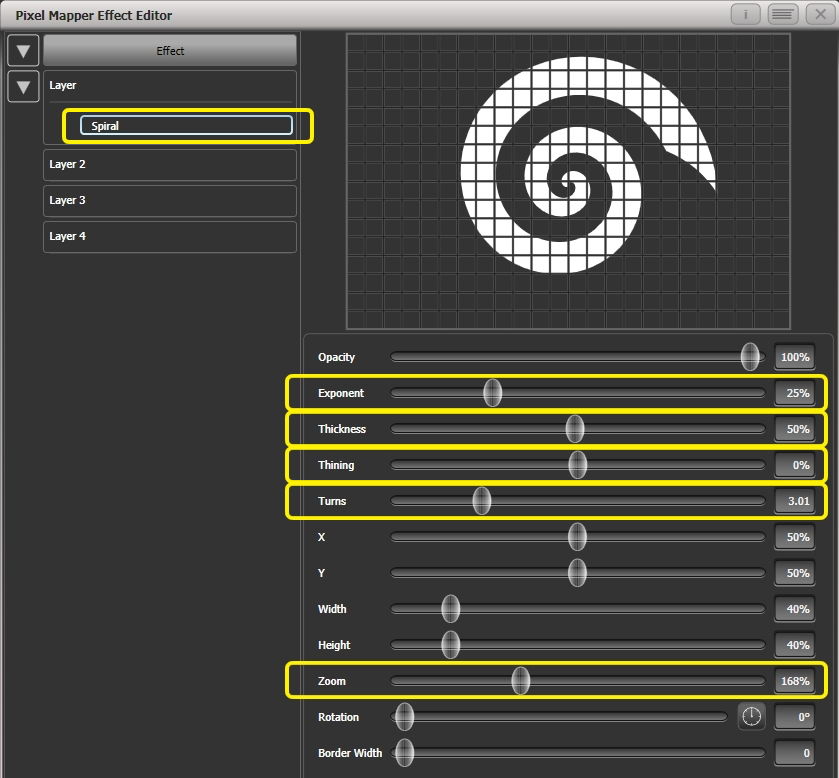
Add a Spin animation for genuine psychedelic effect.
Adjust speed until you are unable to look away from the screen.
Select the Layer to show the layer controls and change the colour to blue using the colour picker.
![]()
- to a playback
Now let's look at how they interact on the playbacks:
Fire the blue spiral effect
Fire the white pulse
Notice how the white takes priority over the spiral. The blue spiral only appears as the white oval fades out and gets smaller.
Kill both effects
Fire the white pulse
Fire the blue spiral
This time the blue spiral sits on top of the white pulse. That is because the playbacks are following a latest takes precedence rule (LTP).
To guarantee the blue spiral always sits on top you can set it to be a higher priority:
Kill both effects
Press Playback Options from the root menu
- Select the blue spiral playback
Press Previous or Next until you can see Priority Normal on the softkeys. Press this to toggle it to Priority High.
Now fire the blue spiral followed by the white pulse.
Even though you fired them in the same order as the first example the blue spiral now sits on top of the white pulse because it has a higher priority.
Displacement and Layer Properties
In this example we create random flashing bars, and use layer controls to make global adjustments to the whole effect.
Create a group and adjust the fixture layout as described in previous examples
Select this group and begin creating an effect
Select Layer 1 and add a Block element.
Adjust the width and height sliders until we have a thin strip that covers at least one cell vertically and the whole grid horizontally.
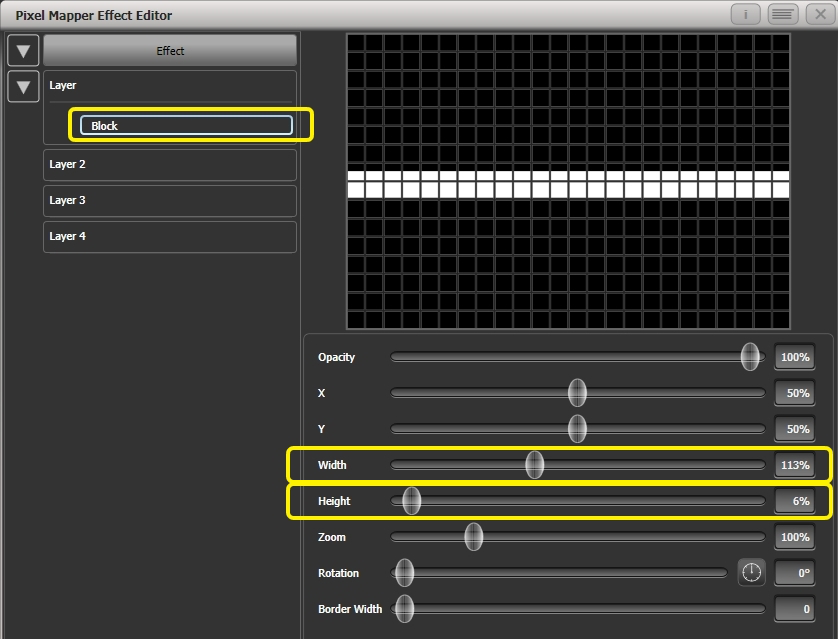Reduce Y until the bar disappears off the top of the grid. (This is in preparation for adding a displacement animation.)
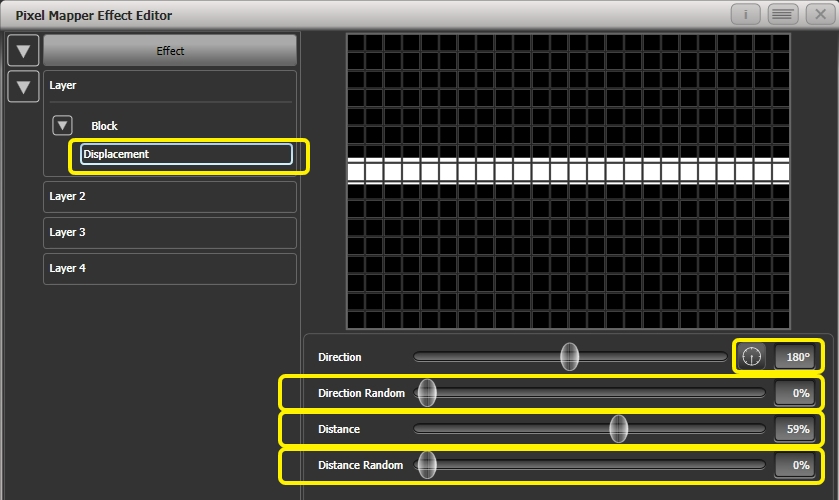
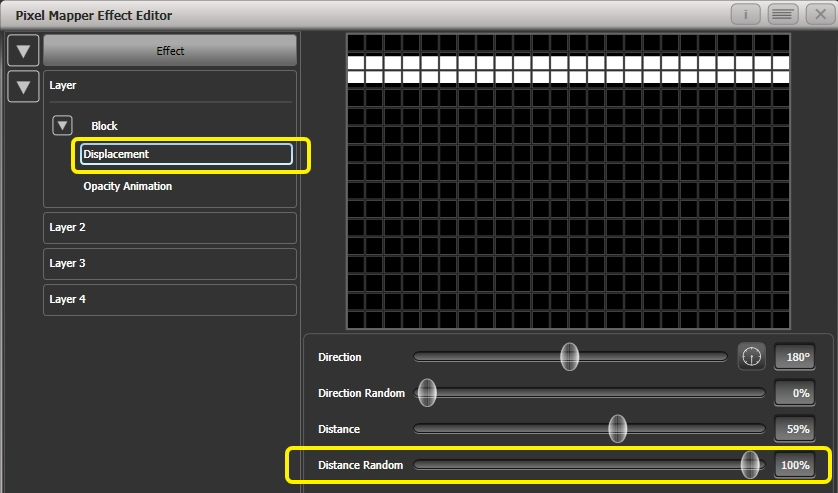
Add a Displacement animation. By default this will offset the original position by anything up to 30% distance. This is because the default value for Distance is set to a maximum of 30% and Distance Random is set to 100% meaning it can use any random value between zero and 30%. Similarly Direction Random is set to 100% meaning it can offset in any direction.
Temporarily set <strong>Distance Random</strong> to 0%. (This is in order to see
exactly what the displacement is doing.)

Set <strong>Direction Random</strong> to 0 degrees. (In this example we do not require a
random direction.) Now the bar will disappear because it is being
displaced upwards in the default settings.

Set <strong>Direction</strong> to 180 degrees. Click on the compass button four times
to get there quickly. Now the bar should reappear on the screen because
it has been offset vertically down from the our off-screen position by
the default 30%.

Increase <strong>Distance</strong> until the bar is approximately in the centre.
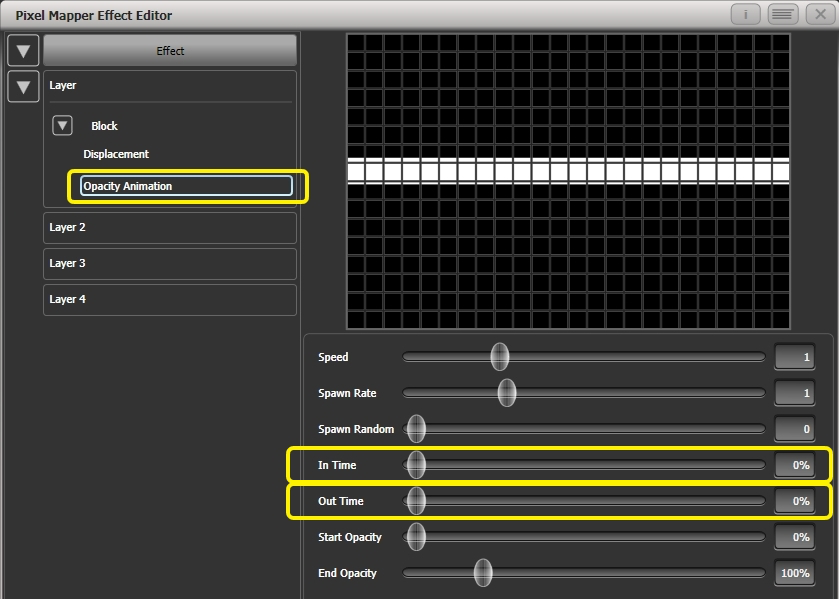
Add an Opacity animation
Reduce In Time and Out Time to create a snapping effect.
Click on Displacement in the Layer to get back to the controls for this animation again.
Now increase <strong>Distance Random</strong> to 100%. (This will make the bar draw
at a random offset around the <strong>Distance</strong> setting, in this case making
it anywhere within the grid.)
Return to the Opacity animation controls and increase speed until you're happy.
At this point you may decide actually the effect would be better if it was a vertical bar. To make this easy we can make adjustments on the layer controls rather than on the individual element and animations:
Select Layer 1 to bring up the layer controls.
Change Rotation to 90 degrees by clicking on the compass button twice.
![]()
Now you have a vertical bar that draws randomly using a horizontal displacement. Similarly you can use the layer or effect controls to make global changes to X/Y position and Zoom allowing quick manipulation of entire effects.
Spawn and Pre-Spool
The director has asked for lots of animated spinning shurikens that slowly move across a backdrop while pulsating. It is a mystery why, but you know how it is with directors.
Select a group with an appropriate layout
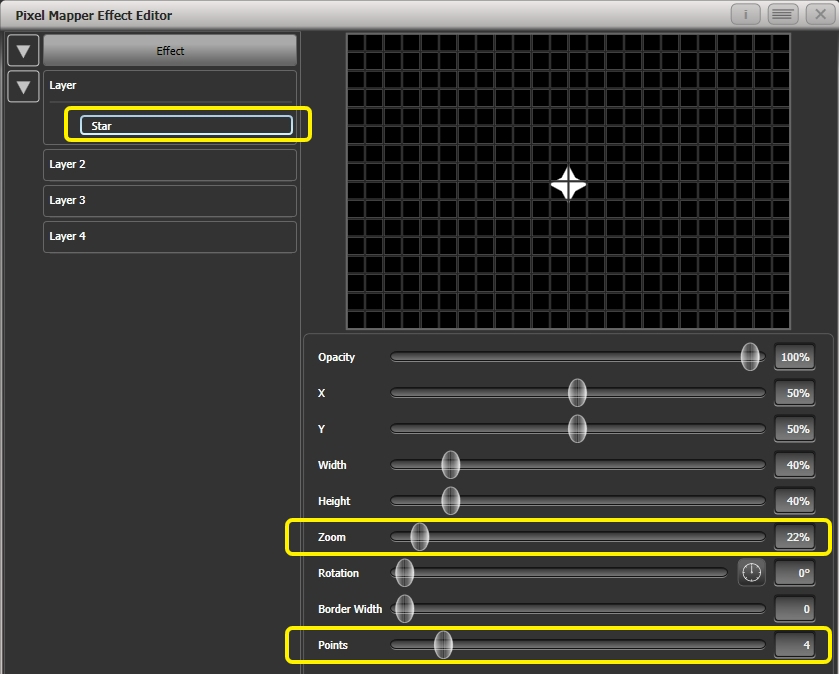
Add a Star element
Change Points to 4 for a classic shuriken.
Reduce Zoom so that we can fit lots of baby shurikens in the grid.
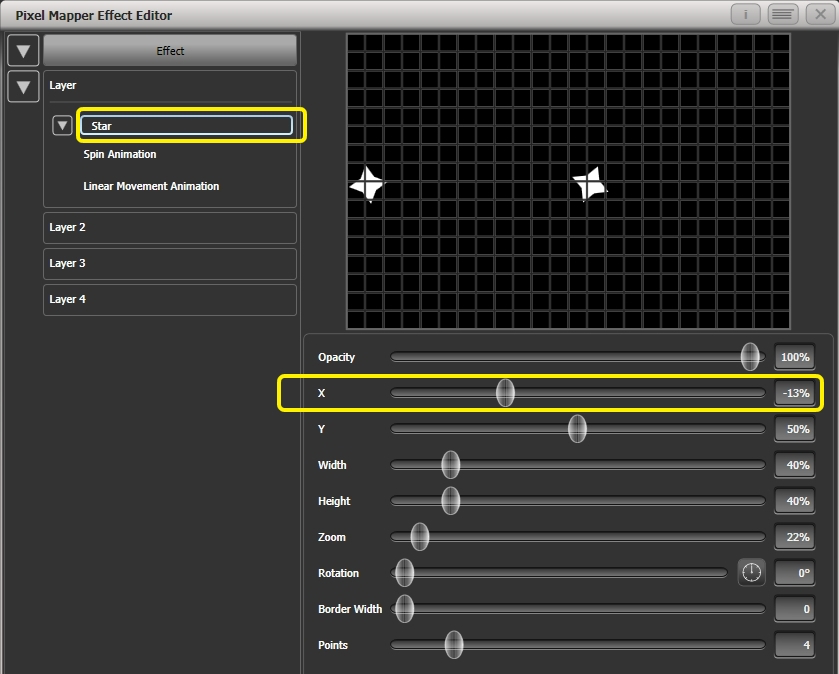
Add a Spin animation
Reduce Speed so they are relatively harmless.
Add a Linear Movement animation
Slow it down so it looks like it is rolling along.
Select the Star element again and change X so the shuriken starts further from the left and rolls along the whole grid.
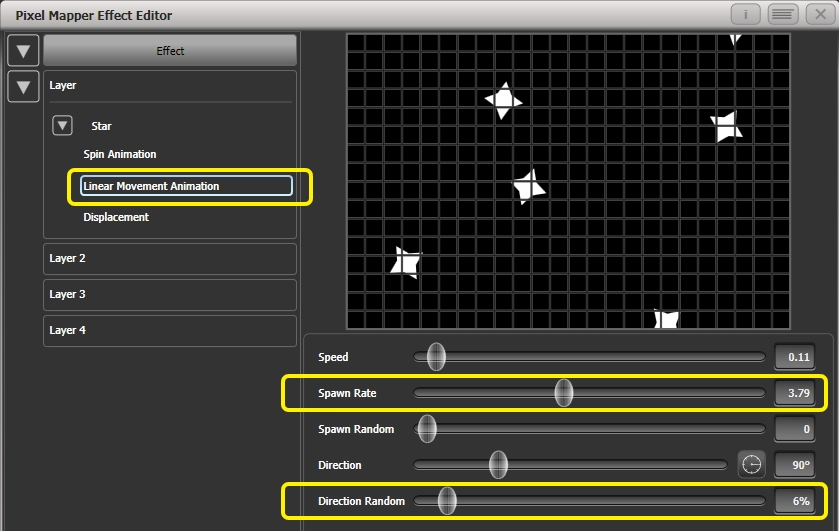
Add a Displacement animation
Now each new shuriken starts rolling at a different height on the grid.
Go back to the Linear Movement animation and increase Spawn Rate so that more shurikens are on screen at once. (This determines how frequently a new element appears.)
Increase <strong>Direction Random</strong> slightly. (This will allow a random
variation in the direction of travel based upon the <strong>Direction</strong>
value.)
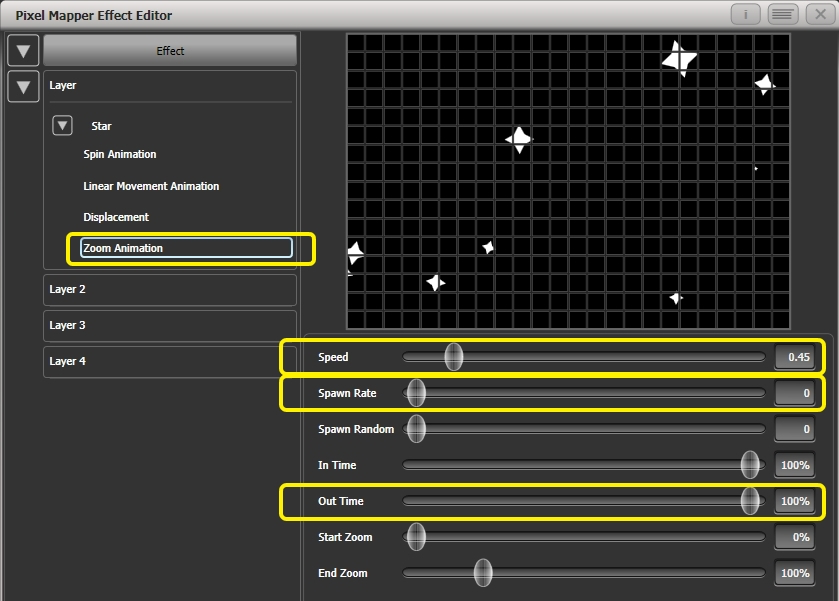
Add a Zoom animation
Reduce Spawn Rate to 0%. (This is a special setting that will allow the zoom animation to run continuously during the life of a shuriken. If the rate is set to 1 it will only run once and the shurikens will quickly disappear as a result.)
Increase Out Time to 100%. (This will make the shurikens pulse in and out with a bounce type effect. I have no idea why they would be doing this in reality.)
Slow the zoom down a bit.
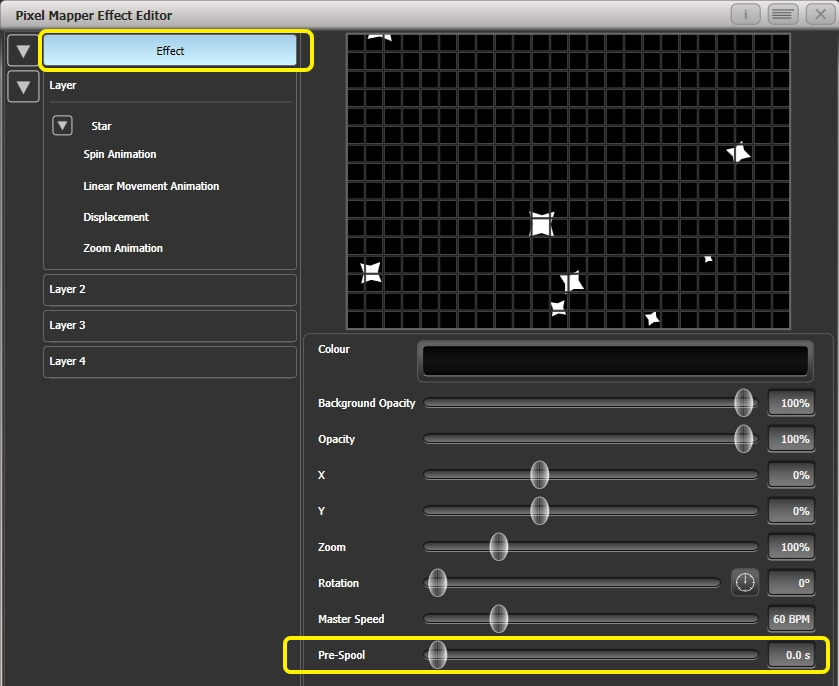
Click on Effect and set Pre-Spool to 0%
This is to demonstrate the purpose of the property.
- to a playback
Press clear, open the Pixel Mapper Preview workspace and fire the cue
You will notice that initially there are no shurikens on the screen and
it takes a while to build up to a nice random collection. To fix that we
can use <strong>Pre-Spool</strong>.- Include the cue and open the Effect Editor workspace if it is not already open
Select Effect and increase the Pre-Spool value to around 20s. (This means the software will pretend 20 seconds has already elapsed when the effect is started.)
- to a playback, Clear, fire and view again in the **Pixel Mapper Preview**
This time there should already be plenty of shurikens on screen.
Pre-Spool is particularly useful for animations that rely on high spawn
rates but run at a low speed.