Editing Shapes and Effects
Editing a Live Running Shape
You can change the speed, size and spread of a live running shape by pressing Connect then Shape (which will flash if any shapes are active). The softkeys will show a list of the currently running shapes, and the cue they are coming from or the programmer.
If the console does not have a Shape button you can access this function using Shapes and Effects, Shape Generator, Edit

By default all shapes are selected. Choose the shapes to control and press Enter or Shape to connect the shapes to the wheels to change the speed, size and spread. If there are more than 3 parameters to control, Softkey G will change the wheels to different options.
If the shapes are in a cue, changes you make here will be automatically stored in the cue (like speed and crossfade are when you are running a chase).
To control other attributes using the wheels while in this mode, press an attribute button. To get back to shape mode press Shape or select the FX attribute in the wheels display.
Editing Shapes and Effects in Cues
Shapes and pixel mapper effects stored in cues can be edited from the Cue View window.
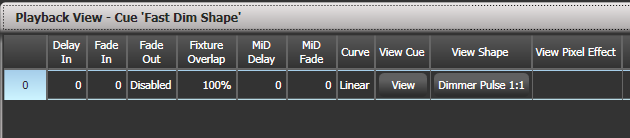
To view and/or edit the parameters of the shape or effect, click on the View Shape or View Pixel Effect button. If more than one shape or effect is stored, the button will show .... A Shape View window or Pixel Mapper Effect View window will open, listing the shapes or effects in the cue. You can then edit parameters of the shape or effect by clicking on the parameter and editing on the softkeys.
In the Shape or Effect View window you can click on View Fixtures to open a window showing a list of the fixtures on which the shape or effect is programmed.
Editing a Shape in a Cue Using Include
You can only edit shapes which are in the programmer; if you fire a cue with a shape in it, the shape will not show up in the list of editable shapes. To get the shape into the programmer you need to use the Include function (see Using Parts of Existing Cues - the Include Function).
Once the cue is loaded into the programmer using Include, if more than one shape is running in the programmer, you can select which one is connected to the control wheels using Shape option Edit.
If you are not in the Shape menu, press Shapes and Effects then
Shape Generator at the top menu.Press Edit.
Press Select shape
By the softkeys is a list of the currently running shapes.
Press a softkey to make the shape active. The active shape is highlighted.
Press Enter to get back to the Shape Generator menu.
If you applied the same shape several times to different fixtures, you can change each copy of the shape independently.
Resynchronise Shapes
The Restart Shapes option in the Shape Edit menu allows you to restart all running shapes, this is useful if you have multiple shapes in a cue and you need to see how they will start up when the cue is fired.
Changing Fixture Order in a Shape
The way a shape spreads across a number of fixtures is set by the order in which you selected them when you create the shape. You can change this order using the Fixture Order function in the Edit menu. The current fixture order is shown in in the fixture touch keys . See Fixture Order and Fixture Layout in Groups for details on how to change the fixture order.
Shapes Linked to Groups
If a shape is created from a group of fixtures, the fixture order or 2D layout in the group will be used when generating the shape. The shape will contain a link to the group and any changes later made to the group such as changing the fixture order or layout will affect the shape.
If you need to add fixtures to the group without breaking the group link, select the fixtures then press , Group handle button,
Merge. To change the fixtures to a new selection, select them then press , Group handle button, Replace. You can also useGroup, Edit Groups.If you want to change the fixture order for a particular shape without changing the order in the group, which might affect other shapes, then you can break the link to the group using the Break Group References button in the Edit, Edit Fixtures/Groups, Fixture Order menu.
See Fixture Order and Fixture Layout in Groups for how to edit the fixture order or layout.
Removing or Adding Fixtures
You can add or remove individual fixtures from a shape using the
Add/Remove Fixtures option in the Edit menu, or use the context menu button in the Shapes Fixture view window. All fixtures currently included in the shape will be selected. You can select or deselect fixtures to add or remove them from the shape.If a fixture group was used to create the shape, removing fixtures from the shape using this option will break the link to the group. A Remove Fixtures confirmation softkey will be shown to warn you of this.
Reversing a Shape
You can reverse the direction of a shape by pressing Reverse Selected Fixtures from the shape menu. The shape will be reversed only on fixtures which are selected, allowing you to run the shape forward on some fixtures and backwards on others.
Deleting Shapes
You can delete a running shape by pressing Delete from the shape menu, then pressing the softkey for the shape you want to delete.