Multi-User Operation
You can connect multiple consoles together to work together on a show. You can also have multiple user setups on a show on a single console to allow different layouts, for example for a support band LD.
Users
Each show can have multiple users. Each user has their own user settings, key profiles and handle layout (known as a handle world). This provides a quick way to switch between preferred user settings and handle layouts, for example at a festival or other event where there are a number of operators.
Users are stored in the showfile and the currently selected user is restored when loading a show. The default user is called "Operator" and the prompt area in the display shows the current user name and selected key profile.

To change or create users, go to the Users menu.
- Press the Disk button.
- Press Users.
- To switch to a different user, press Change Current User and select a new user from the list (the current user is highlighted).
- To create a new user, press Add a User, enter a name for the new user and press OK.
- You can also quickly change user from the root menu by holding Avo and pressing User ...
- If multiple consoles are connected in a collaborative session, any user added to one of the consoles will be available on any of the other consoles.
Handle Worlds
Each show can have multiple Handle Worlds, each having its own layout of handles. This allows each user to have their own layout of cues, palettes and chases which can be easily switched, for example when a support band and headline band are using the same console, or when multiple programmers are working collaboratively on a number of consoles.
When a new user is selected, the handle world they were using is also loaded.
All handle worlds are stored within the showfile, the default handle world is called "Mapping World 1".
Handle Worlds are managed from the Disk menu.
- Press the Disk button.
- Press Handle Worlds.
- To switch to a different handle world, press Select Handle World and select a new handle world from the list (the current one is highlighted).
- To create a new handle world, press Add Handle World, enter a name for the new world and press OK.
- Delete Handle World will delete the world, any handles used only in that world will become unassigned (and can be retrieved using the Show Library if needed).
Items created in a different handle world can be accessed using the Show Library workspace and assigned to handles in the current handle world.
The Follow World Page Change option sets whether the handle page will change if a user using the same handle world on another console changes the page.
Linking to other TitanNet Sessions
If multiple Titan consoles are connected in the same network you can choose to connect them as multi-user, backup, or both.
All consoles to be linked must be running the same version of Titan for networking to work correctly.
For details of how to connect Titan consoles together on a network, see Networking the Console.
- Press the Disk button.
- Press TitanNet Sessions.
- Sessions View opens a window that shows you how your console is connected to others, and what other TitanNet sessions are available. You can touch on another console in the window and click Connect to start a connection, or use the other buttons to leave a session.
- Or select Backup, Multi-User or Backup & Multi-User to show a list of sessions which you can connect to. Click on the session to start the connection.
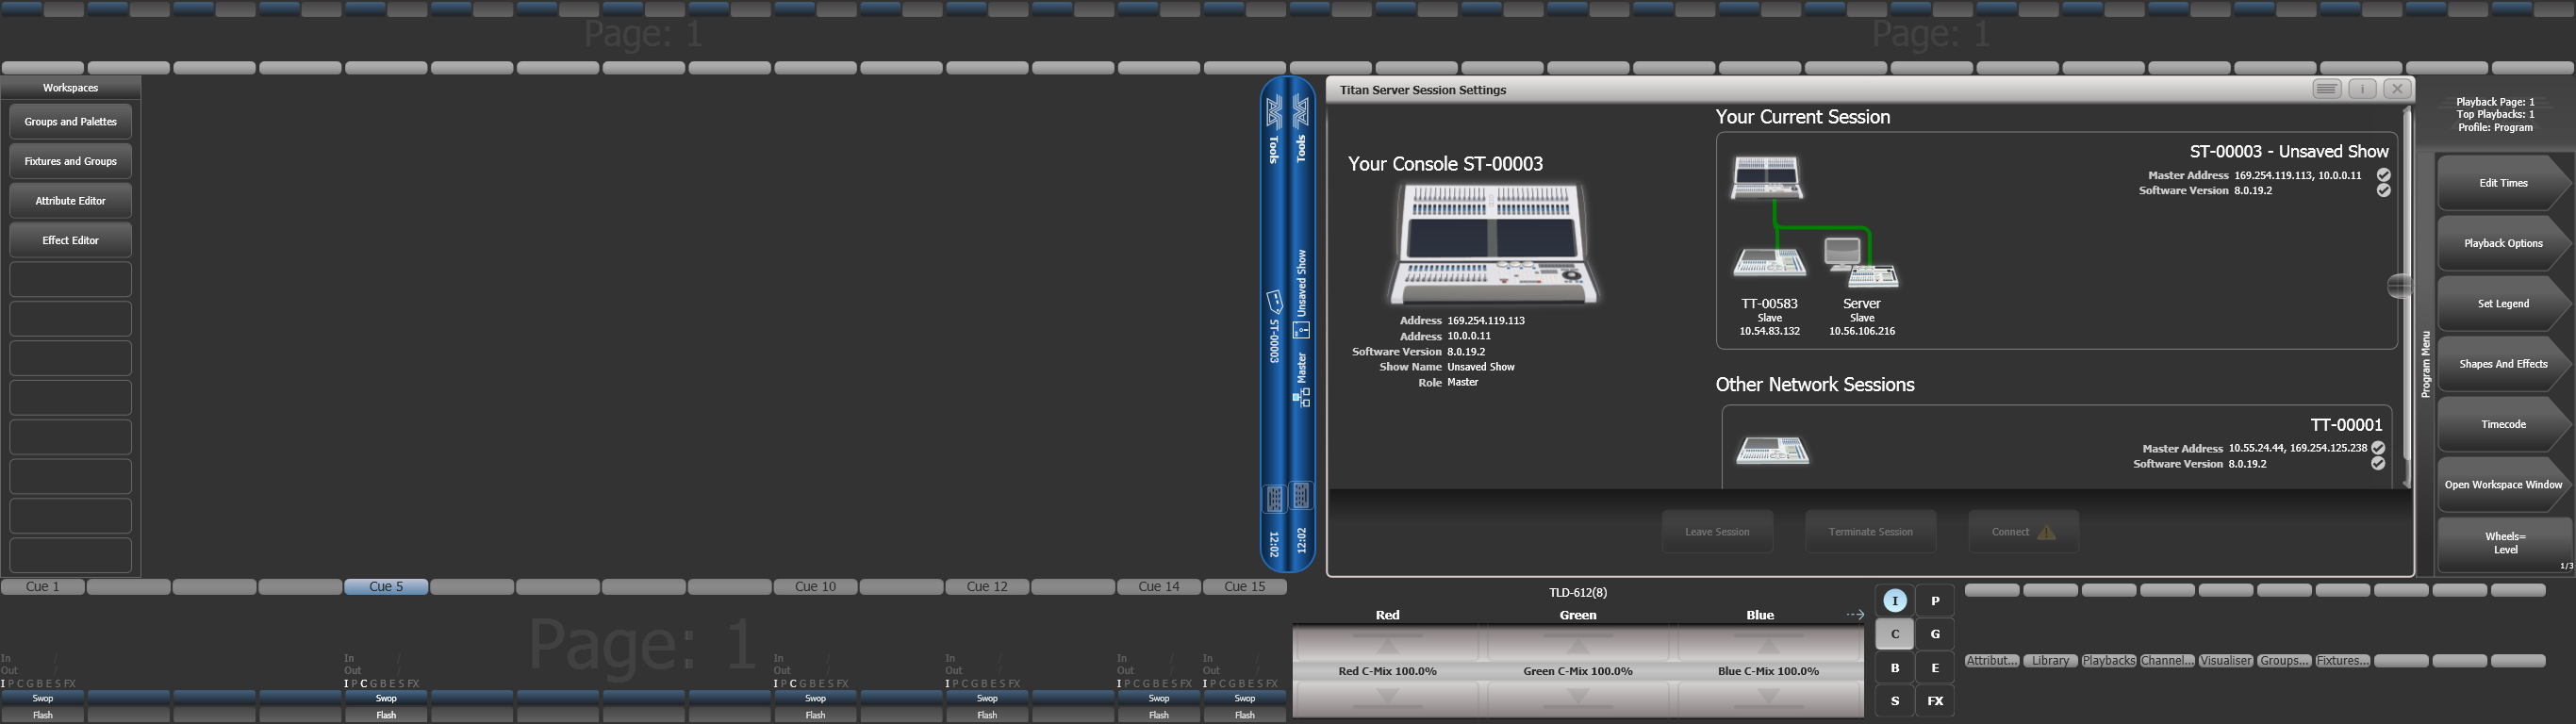
A green line shows a good connection, a dotted red line shows a problem with a connection. Unavailable consoles are shown with a red background.
Initially all consoles are "Master" consoles. If you connect to a session on another console as multi-user you become a "Slave" on that console. The show on the Master is transferred across the network to the Slave. On the Slave you can choose to save the show locally or to save changes back to the Master console.
The toolbar will show details of the master/slave status. Console legends can be changed in the System menu using the Console Legend option.
![]()
Consoles connected in a multi-user session work on the same show. If the same handle worlds are selected then an action on one console is mirrored across them all, for example firing a cue on the slave console will also fire the cue on the master. If the master has motorised faders, the fader will move; if not, fader levels must match before they can take over. If different handle worlds are selected, users can work independently on their own pool of handles.
All consoles in a session using the same user & handle world will share the same connected handle. If this is not the desired behaviour, then the other consoles in the session will require their own user/handle world.
In all situations the master console outputs DMX and channels in a remote programmer are shown with a blue dot on the touch wheel views. If two or more consoles are editing the same fixture, the last console to change any attribute will take over control of the fixture.
Slaves can leave a session using the Leave Session button in the Sessions View or in the TitanNet menu. The console will restore the local show it had loaded prior to joining. Master consoles have the option to Terminate Session.
If a console is running as backup, it has options to Takeover, Sync now and Leave Session. If Takeover is selected, the console will immediately become the master and take over DMX output with the chosen user and handle worlds selected. The console which was master will go into a dormant state with DMX disabled.
Consoles must be running the same version of Titan to join a multi-user or backup session.
Titan Mobile
Network Discovery must be enabled in the Windows User Profile you are using or consoles will not be able to see each other on the network. Ensure the Windows option 'Turn on network discovery' is selected in the Network Sharing options.