Front Panel Buttons
The Select and Flash buttons associated with fader handles, and the macro/executor buttons are configurable and you can use them in various ways.
Select and Flash buttons
Each fader handle on the console has buttons associated with it.
A Select button
B Flash button
On the Diamond 9 the buttons are arranged like this for the rotary faders and the linear faders:
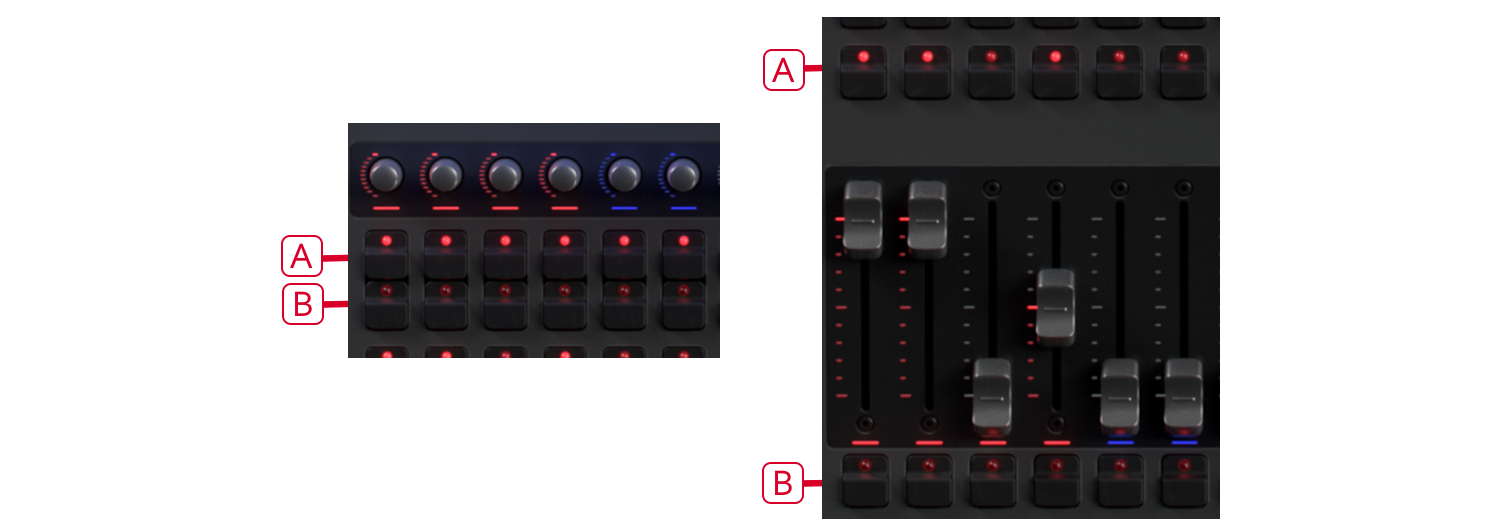
On the Sapphire Touch the buttons are like this for the upper and lower faders. The Sapphire Touch also has a black button with each handle which can be assigned a function using Key Profiles.

On all other consoles, the buttons are arranged like this:
Key profiles
The console allows you to change the function of the Select and Flash panel buttons (and the black buttons on Sapphire Touch). You can also change the way some of the touch keys work. You can save your settings as a Key Profile. Different profiles can be selected for different users or to enhance the operation of the console for a particular use.
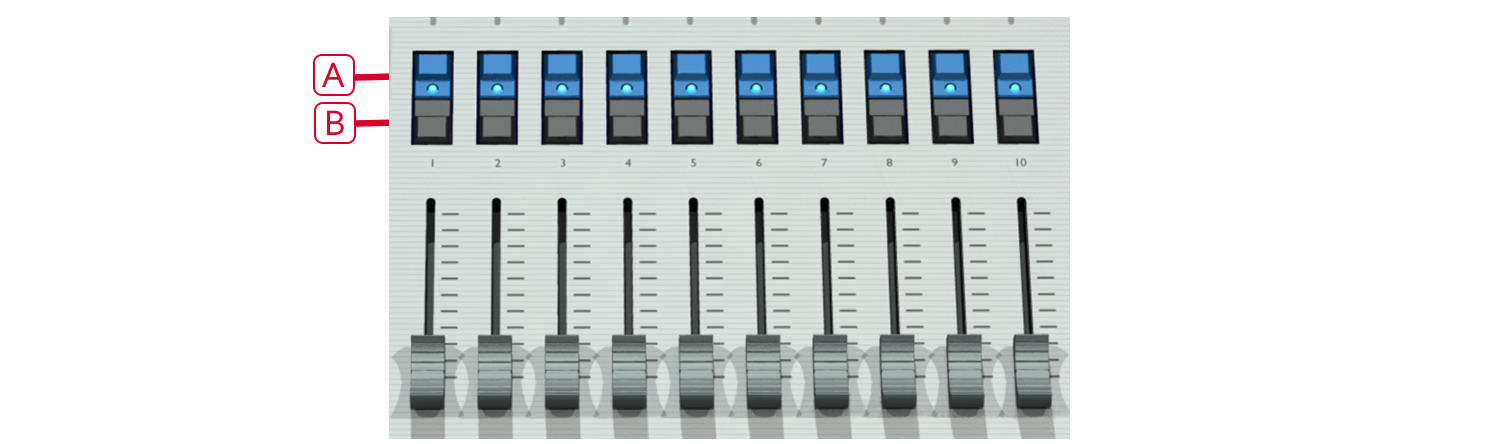
Key macro buttons
Lighting programming can sometimes require a repeated sequence of button presses. You can record sequences of keypresses and play them back with a single keypress - this is called a macro. The macro can reproduce the timing of your button presses (Real Time mode) or just repeat the sequence of buttons with no timing (Full Speed mode).
Real Time mode is useful when you are using a macro to reproduce a lighting effect, for example a sequence of flash buttons. Full Speed mode is more useful for admin tasks such as changing console mode.
Macros can be stored in most workspace windows, on the dedicated Macro/executor buttons and on the handle buttons. There is also a dedicated Macro button window which can be shown in the workspace. The macro/executor/workspace button legends are shown in the Static Playbacks workspace window. The 10 Macro buttons on the Tiger Touch 1 correspond to the first 10 macros in the Macros window.
The Diamond 9 has an additional six macro buttons with dedicated legend display in between the two banks of playback faders.
The Arena also has two additional Macro buttons on the bottom left corner of the console.
To record a macro:
- Press the Macro button (above keypad)
- Select Full Speed or Real Time.
- Press
- Press a suitable empty button on the panel, or an empty button in the Macro window on the screen. Recording starts. The Insert/Macro button flashes during recording.
- Press the sequence of buttons you want to record.
- Press Record Macro to finish recording.
To play back the macro, just press or touch the button where you recorded the macro. The macro will repeat all your button presses, with correct timings if you selected Real Time mode.
Keyboard shortcuts
Many features of the console can be controlled by shortcuts on the keyboard. These are especially useful when using Titan Mobile or Titan Simulator.
The Titan application "captures" the keyboard on start up, meaning that if you try to use other applications at the same time they will not receive keypresses. Pressing Break on the keyboard releases the keyboard for other applications but disables all text entry for Titan including the shortcut keys; changing menus will reconnect the keyboard to Titan.
| Key | Action | Key | Action | |
|---|---|---|---|---|
| F1 | Open user manual | Ctrl X | Cut text | |
| F2 | Activate window | Ctrl C | Copy text | |
| F3 | Minimise/Maximise | Ctrl V | Paste text | |
| Shift F3 | Next window | Ctrl A | Select all text | |
| F4 | Size/Position | Ctrl Z | Undo | |
| Shift F4 | Move to other screen | Ctrl Y | Redo | |
| F5 | Close window | Alt C | Clear | |
| Shift F5 | Close all windows | Alt R | Record menu | |
| F6 | Open Playbacks window | Alt A | Toggle Avo menu | |
| F7 | Open Fixtures window | Alt L | Locate | |
| F8 | Open Groups window | Alt P | Patch | |
| F9 | Open Colours window | Alt ⇑ D | Disk menu | |
| F10 | Open Positions window | Alt ⇑ S | System menu | |
| F11 | Gobos/Beams window | Alt V | Open/View menu | |
| F12 | Open Channel Grid | Alt G | Go | |
| Esc | Exit menu | Alt D | Delete | |
| Enter | Enter | Alt ⇑ C | Copy | |
| Alt 1 | Softkey A | Alt M | Move | |
| Alt 2 | Softkey B | Alt U | Unfold | |
| Alt 3 | Softkey C | Alt I | Include | |
| Alt 4 | Softkey D | Alt ⇑ R | Release | |
| Alt 5 | Softkey E | Alt S | Shape | |
| Alt 6 | Softkey F | Alt ⇑ T | Fixture Tools/ML Menu | |
| Alt 7 | Softkey G | Alt B | Blind | |
| Alt ⇑ F | Fixture | Alt O | Off | |
| Alt ⇑ P | Palette | Alt F | Fan | |
| Alt ⇑ M | Macro | Alt ⇑ O | Attribute options | |
| Alt ⇑ G | Group | Alt ⇑ L | Latch menu | |
| / (num) | Thro | Alt Q | Cue/Connect | |
| * (num) | @ | Alt W | Open Window | |
| - (num) | Not | Alt T | Times | |
| + (num) | And | Alt ⇑ U | Update | |
| Alt ← | Previous fixture | Alt ⇑ I | Select If | |
| Alt → | Next fixture | |||
| Alt ↑ | All | |||
| Alt ↓ | Highlight |
⇑ means shift
(num) means on the numeric keypad
Locking the console
You can place a simple lock on the console controls to prevent people fiddling with it while you're not looking. Hold down Avo and press , then type a password (numbers or letters). To unlock, enter the password again, or restarting the console will also unlock it. After a few seconds, the "Enter password" prompt will fade out but will appear again if you press buttons or touch the screen. This is not a high-security lock, it's just to prevent passing idiots messing with it.
You can set a background image for the lock screen from the Lock Screen Background option in the Display (v13: General) tab of User Settings (hold Avo, press User Settings). The image can be either loaded from a picture file or drawn using the touch screen.
If you load a picture file, the menu option Scaling Mode sets how the picture will be scaled to fill the screen:
- None: Image is displayed 1:1
- Letterbox: scales the image until it fills either the width or height of the screen, leaving black bars on the other edges of the screen.
- Fill: scales the image until it fills the whole screen, keeping the aspect ratio
- Stretch: scales the image until it fills the whole screen, ignoring the aspect ratio
The Clear softkey will remove the image.
While the console is locked, all functions are disabled except the DMX outputs and currently running playbacks.