Playback Options
To set options for a cue, chase or cue list, press Options (or the Options softkey on the top level menu), then press the Select button of the playback to be edited. The Options window will open allowing you to set a wide range of options for how the playback will work, including Times. (You can also set the options using the softkeys.)
You can also set Times for the playback, using the Time button or the Times softkey rather than Options.
The options are split into different categories using tabs down the left hand side. Click on the i button for a help window on each setting. The options shown below in the pictures are for a normal cue, for cue lists and chases the options are different (and are described in the Cue List chapter and the Chases chapter).
You can select multiple playbacks if you want to set the options the same on all of them. If the current option settings are the same on all selected playbacks, then the display shows the current option selected; otherwise a star is shown next to the options and no option is shown selected.
Handle Tab
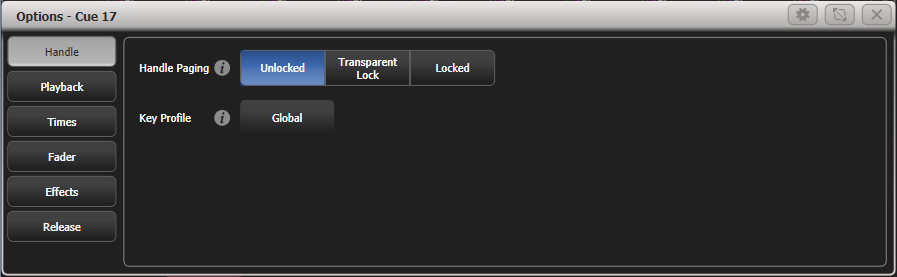
Handle Paging
Allows you to lock the playback on a handle so that it always appears on that handle no matter what page is selected. This is useful if you have some general playbacks you want on every page, without having to copy the playback onto each page.
| Setting | Action |
|---|---|
| Unlocked | This playback will change with the pages as normal |
| Transparent Lock | This playback will appear on all pages where the handle is unprogrammed |
| Locked | This playback will appear on all pages. Playbacks programmed on this handle on other pages will not be accessible. |
Key Profile
Sets the key profile individually for this playback. Global sets the back to the global default setting for playbacks. A shortcut to change the key profile for a playback is to hold the Options button down while pressing the handle select.
Playback Tab

Blind
Sets this individual playback to Blind mode. The playback will then output only to Visualiser, not to the stage. This can be very useful if you need to program and test a cue during a live show.
Cross Fade HTP
If on, makes the HTP (dimmer) channels in this cue override other HTP channels, obeying the priority settings. Normally if a dimmer channel was up in another cue, the highest dimmer setting would continue to be output, but this option lets you create a playback that will override this behaviour, so if you specifically need some fixtures to be at 50%, this option will let you do that.
Priority
Allows you to configure how playbacks will behave if you turn on two playbacks controlling the same fixture. The priority can be set to Low, Normal, High, Programmer or Very High (Programmer gives the same level as manually set attributes in the programmer). If a fixture is being controlled by a playback and you turn on a playback of the same or higher priority, then the new playback will take over. However, if the new playback is set to lower priority than the first playback, the fixture will not change.
This is useful if, for example, you've programmed looks using all your fixtures, then you decide you want a couple of them to spotlight a singer. If you set the spotlight playback to be high priority, then while it is active no other playback will affect the spotlight fixtures.
Priority is useful when using Swop buttons for strobe-type effects where you want to black out everything else. If you have a position shape running on other fixtures, you don't want that to stop during the Swop, or it will look messy when you release the Swop button. So set the shape playback to have a higher priority than the strobe playback, and it will keep going during the strobe and continue smoothly when you release the Swop button.
Attributes set by manually applying a palette to a fixture will override all playback priorities except Very High.
Run On Startup
Sets this playback to run when the console powers on. This can be globally disabled by the Run Startup Playbacks option in User Settings (turned on by default).
This can be very useful for unattended applications to set up an initial lighting state.
Power on playbacks show a Power symbol watermark in the playback information area above the fader. If you open the Show Library window there is a context button to Show Startup Playbacks which allows you to list all the playbacks which are set to run on startup.

Times tab

Delay In / Fade In / Fade Out
Sets the delay time before fade, and the fade in and fade out times for the playback. These times can also be set using the TIME button.
Fixture Overlap
Fixture overlap creates an effect where the fixtures in the cue are changed in sequence rather than all at the same time. This is described in more detail in Cue Timing.
Flash Fade In / Flash Fade Out
Sets the fade in/fade out time for this playback when it is fired using the flash button. By default these are set to "As In" and "As Out" which will use the fade time set for the playback in the Times menu. This option allows you to set a different flash action for the playback. Note that the Key Profile for the flash button must be set to Timed Flash for this to work.
Speed
Default speed for shapes/effects in this playback in BPM. This can be overridden by a Rate or BPM master.
Fader Tab
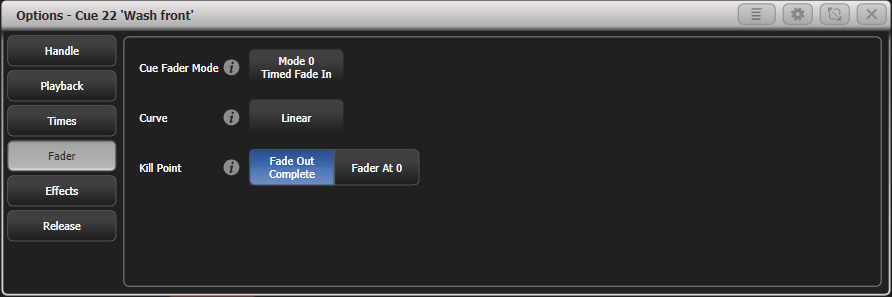
Cue Fader Mode
Sets how the fader position affects the cue output.
| Setting | Action |
|---|---|
| Mode 0 | Channels fade in as set by the fade time. The Fade Out time is ignored. If times are set to zero, the HTP channels fade in with the 0-100% position of the playback fader and the LTP channels will snap. |
| Mode 1 | HTP channels fade in and out as set by the fade out times (LTP channels fade in but then remain as set in the cue). If times are set to zero, the HTP levels will fade in and out with the fader and the LTP channels will snap when the cue is fired. |
| Mode 2 | Both HTP and LTP channels follow the fader position. Useful when used with a pan/tilt cue for manually tracking a spot across a stage or down a catwalk using the fader position or for mixing colours on RGB fixtures. |
| Mode 3 | Crossfade cue. All channels, including intensity channels, will fade to the settings in the new cue. All other cues fade out and all other active playbacks become inactive; if you need to re-fire a playback, take the fader to zero and put it up again. Useful for setting a video playback state. |
This is the same as the Fade Mode option in the Edit Times menu.
Curve
Allows you to set a different curve shape for this playback - curves are listed on the softkeys. The various curves are illustrated in the Curves section.
Kill Point
Sets where the console will start the Release process on this cue, causing LTP channels to be released back to their previous state. Normally this is set to happen when all fades have completed so the fixture won't change until it has dimmed to zero.
| Setting | Action |
|---|---|
| Fade Out Complete | The cue is killed when all fades have completed. |
| Fader at 0 | The cue is killed when the fader reaches zero. |
Effects Tab
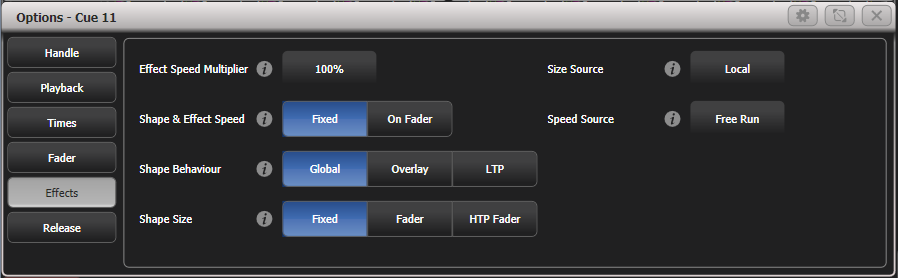
Effect Speed Multiplier
Lets you modify the speed of the effects programmed into this playback.
Shape & Effect Speed
Sets whether the fader position modifies the speed of shapes in this playback. If set to On Fader then the speed will change from 0 with the fader at 0, up to the programmed speed with the fader at full. You can use the multiplier option above to get faster speeds than the programmed speed.
If you have a cue which contains only shapes to overlay on other cues, set the cue to Size on Fader and allocate a Speed Master. You can then create lots of different looks out of the shape by varying the size and speed at show time using the playback fader and the speed master.
Shape Behaviour
Controls the behaviour of Key Frame Shapes in this playback:
| Setting | Action |
|---|---|
| Global | Use global setting from User Settings |
| Overlay | Shape continues to run over changes to attributes |
| LTP | If attributes are changed, the shape will stop running on those attributes |
Shape Size
Sets whether the fader position modifies the size of shapes in this playback
| Setting | Action |
|---|---|
| Fixed | No effect |
| Fader | Size of all types of shape set by fader position (from 0 up to the programmed size) |
| HTP Fader | Only dimmer shapes are controlled by fader position |
Size Source
Allows you to allocate a Size Master to control the size of shapes running in this playback.
Speed Source
Allows you to allocate a Speed Master to control the size of shapes running in this playback.
Release Tab
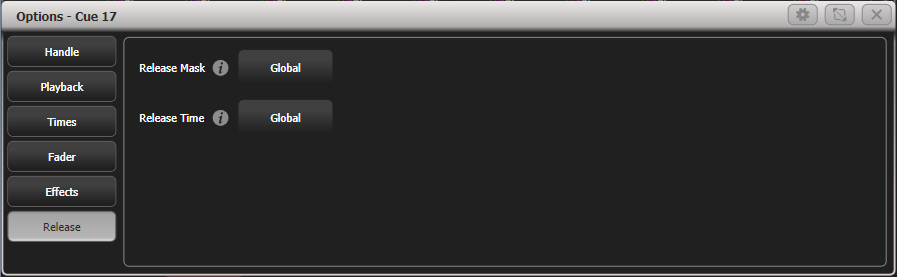
Release Mask
Lets you specify which attributes will be released to their previous state when this playback is killed (you lower the fader to zero).
Normally using the LTP rules, attributes will stay in their last state when you kill a playback. This is not always what you want (for example with a strobe cue, you don't want the strobing to carry on when you kill the cue).
Click the Global button to toggle the mask to Local, then select which attribute types you want to release. You can also use the Attribute Bank buttons to set the mask.
Global release uses the Global Release Mask.
Release mask is useful when creating a temporary strobe effect on a playback. Set Mask to Local then Intensity to Include. Now when you turn off the playback the shutter channel will release to its previous state and the strobe will stop.
You can also use Key Profiles to allocate one of the handle buttons to release this playback.
Release Time
Sets a release fade time for this playback. Enter a blank time to return to global (Global release time is set in the User Settings.)