Cue Playback
Because it's possible to play back a large number of cues at the same time, the console has to have rules on how it combines the output from different cues. These are called HTP and LTP rules.
Combining Cues with HTP and LTP
Control channels are handled in two ways:
Dimmer or intensity channels work on the principle of "Highest Takes Precedence" (HTP). If an HTP channel is active at different levels in several cues, the highest level will be output. When you fade out a cue, the HTP channels fade out with it.
All other channels work on the principle of "Latest Takes Precedence" (LTP). The latest change takes over from any other values, so the most recent cue to be turned on is the one which is output. When you fade out a cue, LTP channels retain their values until changed by another cue.
Playing Back a Cue
To fire (play back) a cue, raise the fader. (Make sure there are no values in the programmer by pressing the Clear button, because anything in the programmer will override the playback).
You can fire several cues at once.
The HTP levels in the cue will be mastered by the fader level; for example if you set the fader at 50% then all HTP levels will be 50% of their programmed values.
LTP channels are triggered as soon as the fader goes above 0%. If a fade time is programmed the LTP channels will start to fade; if there is no fade time they will snap to position (unless the cue is set to Mode 2 in which case they fade with the fader position; see the timings section Fader Modes for details of modes).
You can Flash the cue by pressing the Flash button. You can Swop (solo) the cue by pressing the Select button (all other active cues will turn off while the button is pressed). This assumes you haven't reassigned the function of the buttons using Key Profiles, see below.
You can Preload the cue by assigning the Preload function to one of the handle buttons using Key Profiles. Preload sets the attributes of fixtures in the playback which are not currently active in any other playbacks. This is useful to avoid the fixtures visibly moving into position or changing colours or gobos when you raise the fader of the cue.
To assign Preload, hold Avo and press Edit Key Profile, then press the button you want to assign (also see Key Profiles). Note that this will assign the function to all buttons of the same type.
You can fire a one-shot cue with timings by assigning the Go function to one of the handle buttons using Key Profiles. This allows you to fire the cue without needing to hold down a button while the timing completes. You can also fire the cue again without needing to release it.
You can set playbacks to high priority if you do not want them to be overridden by other playbacks using the same fixtures. For example, if you have a couple of fixtures acting as a spotlight, but they are also programmed into some colour washes, you probably want the spotlight cue to take priority over the colour washes. See Priority in playback Options.
Changing Playback Pages
The console allows multiple pages of playbacks. Page buttons are provided near the faders or you can also touch the top and bottom of the roller graphic on the screen. If you touch the middle of the roller graphic you can jump to a page number by entering the number.
If you have stored cues on the touch select buttons, you select different pages using the Playbacks page touch buttons.
If you change to a new page while some playbacks are fired, the playbacks on the old page remain active. The way playback faders behave across different pages can be set with the Playback Paging user setting. The settings are Always Hold or Never Hold, and these options work differently depending on whether your console has motorised faders or not.
Consoles without Motorised Faders
The default mode is Always Hold. If you want to fire a cue on a fader which is already up from a previous page, lower the fader to zero then raise it again. The cue from the previous page will stop and the cue from the new page will fire.
If changed to Never Hold then you can have active faders on multiple pages by level matching the fader. To fire a playback on a new page you have to return the fader to zero (the playback on the old page will continue). When you raise the fader, the playback on the new page will fire. If you return to a page with an active playback, the fader will not resume control of the playback until it matches the current level of the playback. This prevents the playback level jumping when the fader is first moved. If a playback is active from another page the display area is purple and shows the page number at the top in light blue.
The setting Normal gives the default state, for consoles without motorised faders this is Always Hold.
Consoles with Motorised Faders
The default mode is Never Hold. When you change pages the playback faders will move to show the state of the playbacks on that page and you can directly control all playbacks on the page. If you want to kill a playback on a previous page you need to return to the page it is on and lower the fader back to zero. If a playback is active from another page the display area is purple and shows the page number at the top in light blue.
If changed to Always Hold then each fader can be active only on one page at any time - so the console behaves as if it did not have motorised faders, see above.
The setting Normal gives the default state, for consoles with motorised faders this is Never Hold.
You can set a legend for each playback page. The legend is shown on the 'Pages' roller on the screen. Use Set Legend from the main Program menu then Page Legends. While in this menu you can change the page to set legends for different pages.
If your console features the 20 executor buttons on the top right of the console, they can be paged using two of the macro buttons. The page change macros are part of the fixture library; if you do not see the macros, download and install the latest library. The same applies to the 10 static playback faders on the Tiger Touch.
Viewing Active Playbacks
The Active Playbacks window shows details of which playbacks are active. When you have a number of layered playbacks with different effects, this provides an easy way to see which playback is causing which effect. Each button shows the playback legend, which page they are from and which attributes are affected. To show the window double press Open/View then press Active Playbacks from the window select buttons which pop up.
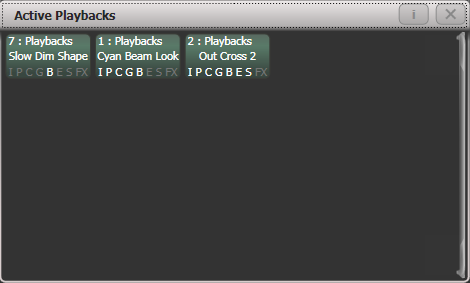
Click on a playback to instantly kill it. You can also press Options followed by the playback in this window to change parameters of the playback.
Speed and Size Masters
Playbacks can be assigned to Speed and Size Masters which allow you to modify the speed and size of shapes or effects stored in a cue using a separate master fader (or in the case of chases, to modify the speed of the chase). This is really useful to modify the look when several playbacks are running at the same time.
You can also assign the fader of the playback the effect is stored in to control shape speed or size using the Fader Settings in playback Options.
See Speed and Size Masters for more details.
Release
Normally when you kill a playback by lowering the fader, the LTP attributes will be left in the last state set by the playback. Sometimes you don't want this, for example if you have a strobe cue, you don't want the strobing to carry on when you kill the cue. The Release function lets you set how attributes will return to their previous values.
You can set a mask so that some or all attributes will automatically release from the playback when the playback is killed - see Release Mask below. For a cue this will happen when all fade times have completed, unless you change the Kill Point option in the cue options.
Attributes will go back to the state set in the most recent previous playback until no playbacks are left to be released. If the Release to Home setting on the Release menu is Enabled, channels will go to the power-on state, which you can program (see Programming the Release / Power On State). If the option is disabled, channels will remain in the state of the last playback.
You can also configure the key profile so that the handle buttons can be used to release the playback using Key Profiles.
Channels will always release with a fade time, this defaults to 2 seconds but you can change it using Master Release Time in the Release menu. You can also set an individual release time for the playback from the Release tab of playback options.
You can kill a playback by pressing Avo + the Select button of the playback, which has the same effect as pulling the fader to zero. For a cue, the fade out times will still apply and the cue will release when the fades are completed. This can also be useful for Cue Lists which (depending on their options) may stay fired even when the fader is lowered to zero.
You can instantly release a running playback by pressing Release, then the Select button of the playback to be released. This uses a Temporary Release Mask as described below. Fade out times of cues will be ignored and the release will start immediately, but will use the set release time.
You can Release All running playbacks by double pressing Release. The user setting Release Priority sets which playback priority levels will be released. You can protect against unintended Release All by setting the Release Priority to Low - this would only release playbacks with Low priority, if you had any set up.
Release Mask
You can configure which attributes will release from a playback when it is killed using the Release Mask. There is a Global release mask which is the default setting, or you can set a Local release mask which overrides the global mask for a particular playback. If you start a release using the Release button then a Temporary release mask is used which just affects the current release operation.
Global Release Mask
If no local release mask is set for the playback, attributes release according to this mask when the playback is killed. The default is for no attributes to release, so all LTP attributes will remain at their last value.
Set the Global Release Mask from the Release Menu by pressing Release then Global Release Mask. The softkey and the lit Attribute Bank buttons show which attribute groups are enabled - use the Attribute Bank buttons or the softkeys to enable or disable attribute groups.

There are also separate Timeline release settings which override the normal release settings (including the Local release mask) when playbacks are being fired by a timeline. These are set in the options for the timeline.
Local Release Mask
Set a local release mask if you need to have specific settings for that playback. The mask for a playback is set in the Release tab of the playback options.
Temporary Release Mask
If you are releasing a playback (or the programmer) using the Release button then a temporary mask is used. This starts off with everything set, so all attributes will release. Press the Attribute Bank buttons to set a different mask - when you press the first button all the other attribute groups will clear.
- You can type a release time on the keypad before you press Release to override the global release fade time.
Other release operations
Releasing a page of playbacks
You can use the Release function to release a whole page of playbacks in one operation. Press Release then the Goto Page button, or touch the current page in the playbacks view. You will get the following options:
Release this Page - releases all active playbacks on the current page and playback fader group
Release Playbacks Not On This Page - releases any active playback on the same fader group from another page
Release All Playbacks In This Group - releases any active playback in the fader group.
The release will use the Temporary Release Mask as described above.
"Fader Group" refers to a particular area of the console, for example the main faders below the screen on a Tiger Touch or the top row on the left hand side of the Arena.
Releasing the programmer contents
You can release the programmer contents by pressing Release, then set the attributes you want to release in the temporary mask, then press Clear. You can type a release time on the keypad before you press Release to override the global time.
You can release a single attribute on a wheel from the programmer by pressing Release then the Wheel @ button. This can be useful during programming if you accidentally set a value you didn't want, or when busking a show to gently remove a temporary fixture change you made.
Releasing a master
You can reset a master to default state by pressing Release then the Select button of the master. You can reset all masters to default state by pressing Release then Release all Masters. This will set the level of the master so that it has no effect (full for intensity masters, 100% for speed masters, and so on).
Programming the Release / Power On State
You can program the state which fixtures will go to at power on, or when all playbacks are released. It can be useful to program this as a general lighting state so that there is some light on the stage when the console powers up, or when all playbacks are released.
The release state can be programmed in Shared mode or Individual mode. In Shared mode you just have to set the desired state for one of each type of fixture, and that state will be used for all fixtures of that type. In Individual mode, the state of each fixture will be recorded individually as you have set it.
- Set up the look you want.
- Press , then Release.
- Select Shared values or Individual values.
- Press the softkey.
- The Release state is saved.
To test, fire some playbacks, then release them by pressing Release followed by the select button of the playback. The fixtures should return to your programmed release state.
Turning Off Individual Fixtures
You can turn off individual fixtures or certain attributes of them using the Off menu. The programmed values will remain in the playback but will not be applied when the playback is recalled. You can, however, re-enable the values in the cue view.
Press Off button followed by a playback to open the \'Off Playback with Mask\' menu. Select the fixtures to be turned off, set mask as required and then press Off to turn the fixtures/attributes/shapes off.
On Titan consoles that do not have separate Release and Off buttons, pressing Off followed by a playback will release it which is not what you want. On these select the softkey Off Playback Values then select the playback.
Playback Groups
Playbacks can be assigned to groups. This allows you to create a set of playbacks which automatically switch off other playbacks in the same group. This can be useful when you have playbacks setting colours on executor buttons so only the most recent playback stays active, or to make life easier when busking so you don’t end up with lots of playbacks fired which have superseded each other.
This is described in detail in the chapter on Running the Show, see Playback Groups.
