Key Frame Shapes
Key frame shapes allow you to create your own shape sequences. You store a series of attribute settings as key frames and the shape fades between them.
Creating a Key Frame Shape
A key frame shape is created a bit like a chase, but the shape is more flexible because you have lots of control over the way the attribute changes between key frames, and you can change the way it spreads across multiple fixtures. It's also (unlike chases) easy to save in cue lists.
You can create the key frames either in Channel Mode by manually setting up a state and pressing Add Frame, or in Quick Build mode by selecting palettes or cues which will be automatically saved as a frame as you select them. Use the Record Mode softkey to select the mode.
In this example we'll create a colour shape, but you can create key frame shapes for any attribute or mixture of attributes. If you create key frames using palettes, the key frames will update if the palette is changed.
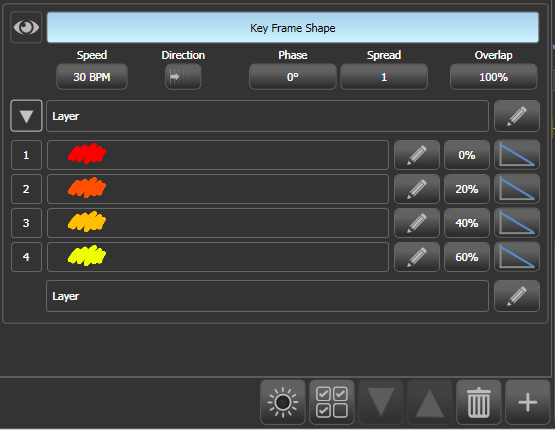
- At the main menu press Shapes and Effects then Key Frame Shapes
- Press Create to start a new shape
- Select fixtures and set the colours for the first key frame
- Press Add Frame. An automatic legend for the first key frame
will show above the first playback fader. (Press Playbacks Display
Visible/Hidden to return the playback faders to normal, if you want to
select one in Quick Build mode).
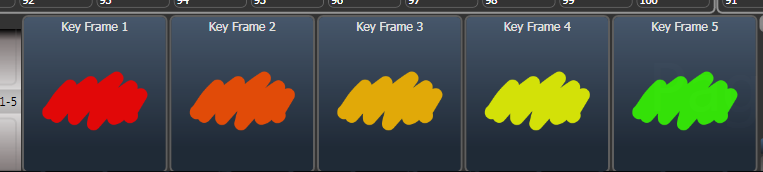
- Continue to set colours and press Add Frame until you have created all the steps you want
- Press Finish Recording Frames when you've finished
- Use the Effect Editor window to change the Spread, Overlap (see below)
- Save the shape to a cue if you want to use it in a show (see Saving a Key Frame Shape to a Cue)
You can also use the Unfold button to switch the playbacks between normal mode and key frame display mode.
Setting the Frame Number softkey to an existing frame number allows you to Replace or Delete a frame. Clicking the frame legend or the select button of the playback will also set the current frame number.
If the shape is not visible because fixtures are not lit up, the locate dimmer button at the bottom will light up fixtures used in the shape.
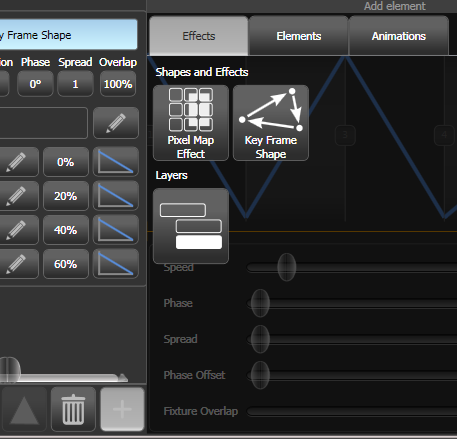
Changing Shape Parameters in the Effect Editor
Once you have finished creating a key frame shape it will be shown in the Effect Editor window.
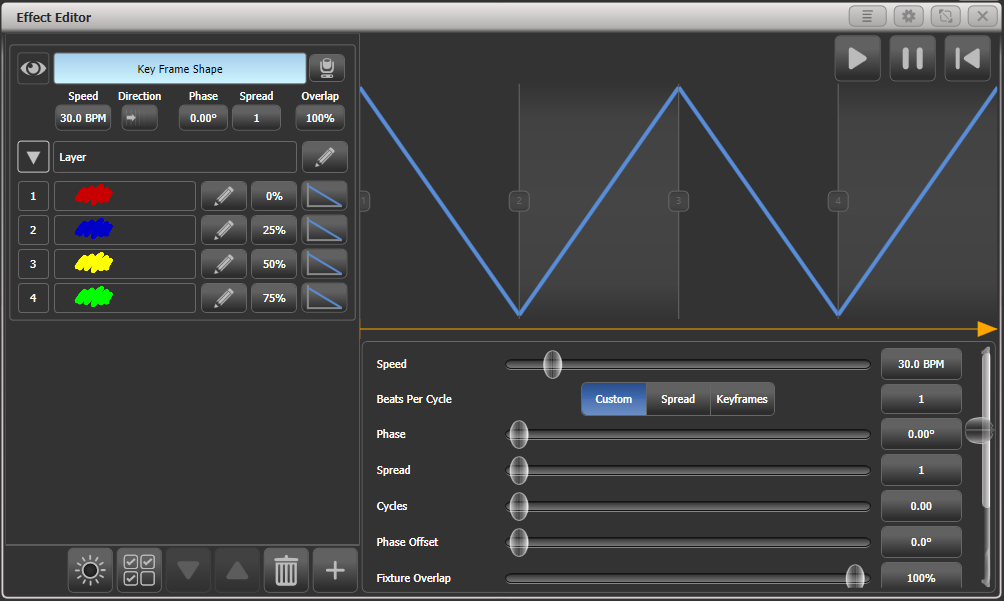
The controls at the top of the left hand pane are the global shape properties which affect the whole shape, controlling speed, direction (using 2D group layout), phase/spread and fixture overlap.
The eye icon in the top left corner "collapses" the shape preview in the effect editor window, this allows you to expand only the shape you want to work on if you have created multiple shapes. The fixture icon button on the right allows you to change the fixtures the key frame shape shape applies to.
The top of the main area shows a graphical version of the fades in the shape, which you can drag around to change the timings. The yellow arrow shows the phase offset (start position) for the layer, you can drag this to change the start point of the shape relative to other layers (or use the Phase Offset slider below).
Shape/Layer Controls
To start with (or when you click on the Layer name) the sliders to the right of the main area are independent controls for the layer.

You can click on the buttons to the right of the sliders to enter values from the keyboard, and when the button is clicked on the wheels can also be used to adjust the value. A Reset to default value softkey is also provided when you click the buttons, or double-clicking the buttons will reset to default value.
The Beats per Cycle control lets you set how the programmed speed will trigger the shape. It defaults to 1 which makes the shape run at normal speed. Higher numbers will divide the count, for example 4 will make the shape run at quarter of the speed - useful to synchronise different types of shapes which are running together.
Spread sets the beat count to be the same as the current Spread setting for the shape. This is useful when using dimmer shapes with movement shapes as it will make each fixture turn on for a full cycle of the movement shape.Key Frame sets the beat count to match the number of key frames in the shape.Custom resets the Value option to the last entered value. > Each key frame and each layer can have its own **Beats per Cycle** setting.The Cycles option lets you create a shape which runs for a set number of cycles then stops. By default this is set to 0, which means the shape will not stop. You can set this either for the whole shape, or for individual layers - if you set it while the whole shape is selected, then all layers will be affected, but if you set it while only one layer is selected, then the cycles will be set for the selected layer only. This means you can have individual layers running continuously or for different numbers of cycles.
Key Frame shapes can run across sub-fixtures (cells). This is turned Off by default, but you can select On (Group) which uses the layout set for the group, or On (Linear) which ignores the layout and just uses the cells in numerical order.
The Phase Master option lets you control the phase of the shape using the intensity of a video layer from an Ai server. See Phase Control of Key Frame Shapes from Ai for more details.
Parameters for Individual Frames
By clicking on individual key frames on the left, you can change parameters for each individual frame:
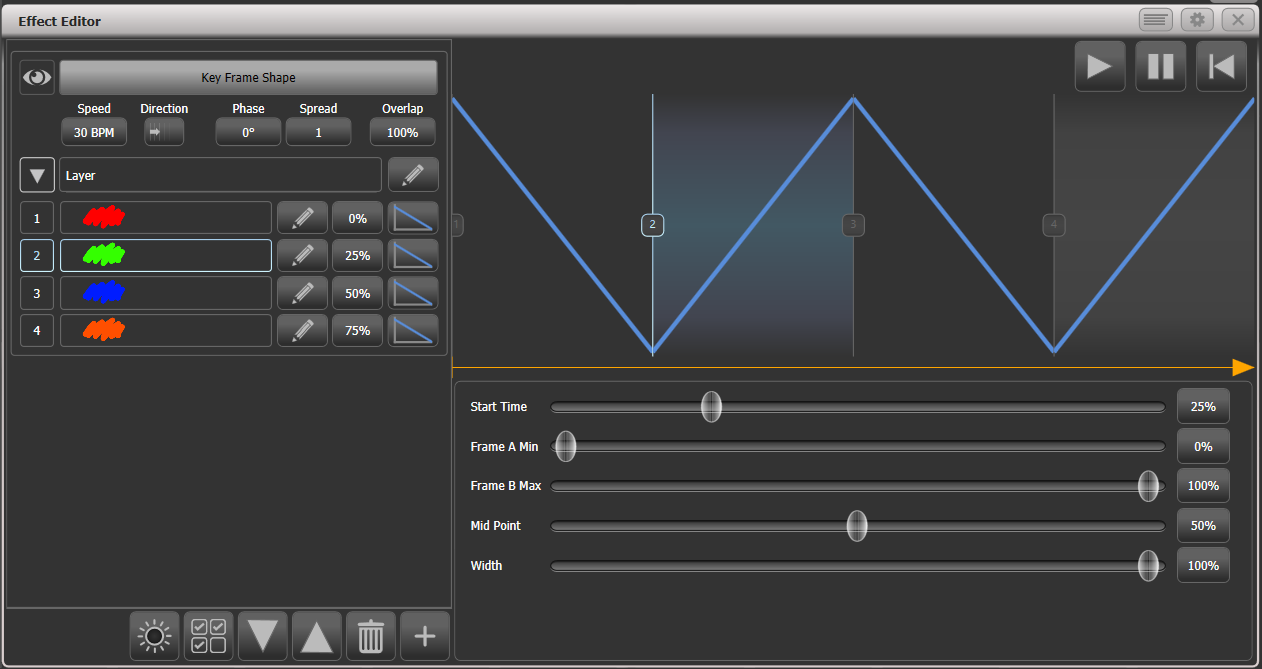
Timing: use the Start Time slider or drag the step positions in the window
Frame A Min / Frame B Max: Sets how close the attribute gets to the programmed value. For example if you've saved a dimmer flash at 100% you could make it only flash to 80%.
Mid point: sets where the mid point of the fade is
Width: sets how much of the frame time is taken up by the fade. For example you could fade in 20% of the frame time then hold for the remaining 80%
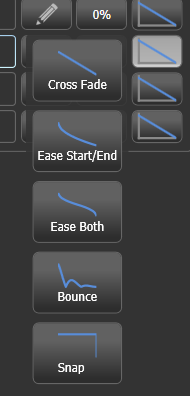
You can change the style of the fades between steps by clicking the curve button to the right of each step. The new curve will be shown in the fade graphic in the main window.
Editing Frames
You can also edit the sequence of the key frame shape using the Effect Editor window.
To add more frames to a key frame shape click the button to the right of the layer name.
To edit a key frame click the button to the right of the frame name.
To delete a key frame select the frame in the list then click the at the bottom
To change the order of the frames, select a frame then use the up and down arrows at the bottom.
To change multiple key frames at the same time, click on the multi-select button at the bottom of the window, or you can drag a selection box over the frames.
Multiple Effects
Key frame shapes can have multiple layers where different effects run simultaneously. To add another layer, click the + button at the bottom, then select Layers. The new layer will appear in the list on the left.
You can also add a completely separate key frame shape or a pixel map effect. Pixel map effects will be shown at the top of the shape list on the left, you can use the eye icon to hide the pixel map effect when you want to work on the key frame shapes.
Saving a Key Frame Shape to a Cue
By default when a key frame shape is saved to a cue, the playback fader will fade the shape. If the playback is set to have Speed on Fader, the fader will master the speed of all layers in the shape.
When a key frame shape is running in a playback it can behave as Overlay or LTP. A global value for Shape Behaviour is in the User Settings, but you can also set the mode in playback Options for each playback.
In Overlay mode (default) the shape will have control of the programmed attributes regardless of whatever else you do. For example if a key frame shape is controlling fixture colour, firing another playback, recalling palettes or changing colour using the wheels will have no visible effect. Once the shape is stopped, the changes you made will become visible. This means that if you want to you can preset what will happen when you stop the shape.
In LTP mode, changes of the same or higher priority will override the shape output. For example if your key frame shape is set to normal priority, firing a playback with normal priority will block the shape output. Killing the playback will restore the shape output. Quick Palettes and manual changes (the programmer) have High priority. Setting the shape priority to "Very High" would prevent the programmer taking over (see Priority in playback Options).
For details of how Key Frame Shapes behave in Cue Lists, see Shape Tracking in Cue Lists.
- If you create a Mask Shape using the Mask FX function, this will also stop Key Frame Shapes.