Creating a Timeline
You can create a timeline by using Live Record mode, by entering triggers manually at specified times, or a combination of the two.
Programming a Timeline using Live Record
Live record is useful to capture a busked show, where you are operating the playbacks manually in time with music or other live cues. You can do a live record multiple times on the same timeline to build up a more complex show.
Live record does not record the following elements:
Recall of Palettes will not be recorded. You need to save looks to a playback to use them on a timeline.
The state of Masters is not recorded, so Group, BPM, Size, Rate and Intensity masters will be recorded as if at 100%. If you play back the timeline after changing masters then it could look different - you can release all masters before recording the timeline to see what is actually being recorded. Masters can then be used to modify the timeline playback for live/busking use.
Actions triggered via the Scene Master are not recorded.
This is how you program a timeline using Live Record, from playbacks which you have previously programmed:
- If you have external timecode source selected but want to use internal timecode for recording, tap the "Timecode Disconnect" button so it shows a broken link.
- Press , Timeline, then the Select of the blank fader where you want to store the timeline. The Timeline View window will automatically open.
- Press the button in the top left of the Timeline View window.
- Select which track on the timeline you want to record onto using the Track softkey or tap on the flashing dotted area of the track you want to use.
You can add triggers to an existing track or create a new track by tapping on the blank area at the bottom. Or if you just press again then recording will start using the current track selection.

- Tap again on the track to start recording (or press the Start Live Record softkey). The workspaces will be outlined in red but recording will not begin until the timecode is started.
- For internal timecode source, press the button in the top left of the timeline window to start the timecode running. If you are using an external timecode source, start it.
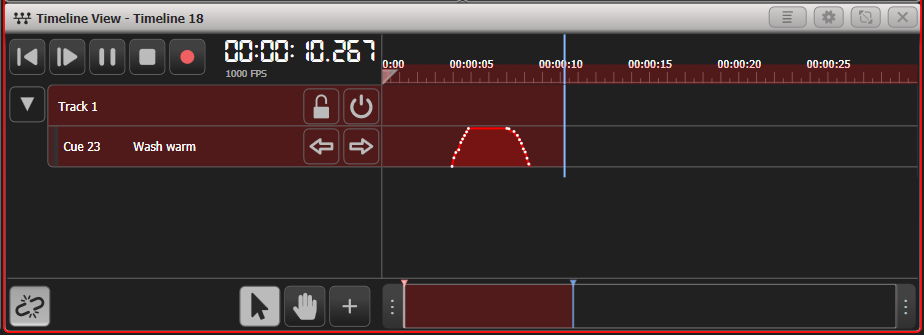
- Now when you make any of the above trigger actions on the console, you will see a trigger recording appear on the timeline. The time range you have recorded is highlighted in red on the timeline view.
- When you have finished recording press the button again and stop the timecode.
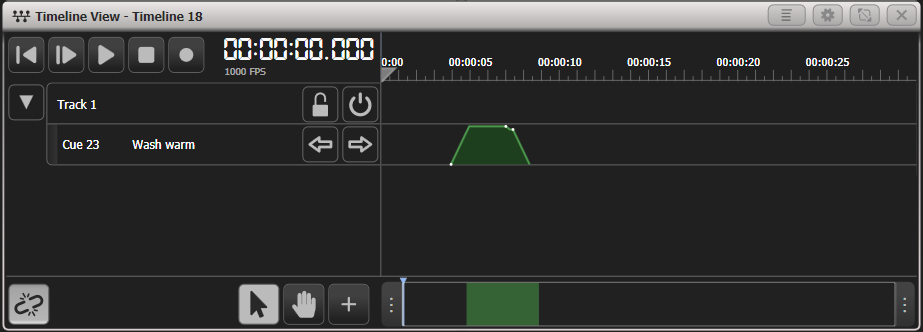
You should now see all the triggers you have created laid out on the timeline.
To add more triggers to an existing timeline you can repeat the live record by pressing then the Select button of the timeline fader.
When using internal timecode, pressing then will automatically start Live Recording.
To quickly add live record triggers to a particular track you can press then tap on the track you want to use in the Timeline view.
While you are in Live Record, the console will follow the Timeline Release settings as you've programmed them in the Timeline Options - Release tab, which may make playbacks behave differently to how they are programmed. A warning is displayed in the system prompt area to show you what release settings are in effect. This is because the Global Release Mask and and Global Release Time are per-user settings, and Timelines execute as their own "user", so have their own settings.
Auto Simplify
Normally while you are recording, the Auto Simplify softkey option is enabled. When you stop the recording, this will simplify your fader movements to a few trigger points with linear fades rather than a large number of points which are difficult to edit. If you really need to capture an exotic fader movement you can turn this option off, but to help keep your timeline easy to edit you should leave it on where you can.
Trigger with multiple points during Live Record:
The same trigger after Auto Simplify:
You can simplify triggers after recording by selecting the triggers (draw a marquee box over them) then using the Tools - Simplify Selected Triggers context menu option.
You can also make a smooth fade between adjacent triggers by selecting the triggers and using the Tools - Smooth Selected Triggers context menu option. The picture below shows triggers before and after the smooth function has been used.

Adding manual triggers
If you are programming a show where you have been given a list of timecodes for each cue point, you can enter the triggers manually at those specific times.
- Press , Timeline, then the Select button of the fader where you want to store the timeline. The Timeline View window will automatically open.
- Press the + button at the bottom of the timeline tracks.
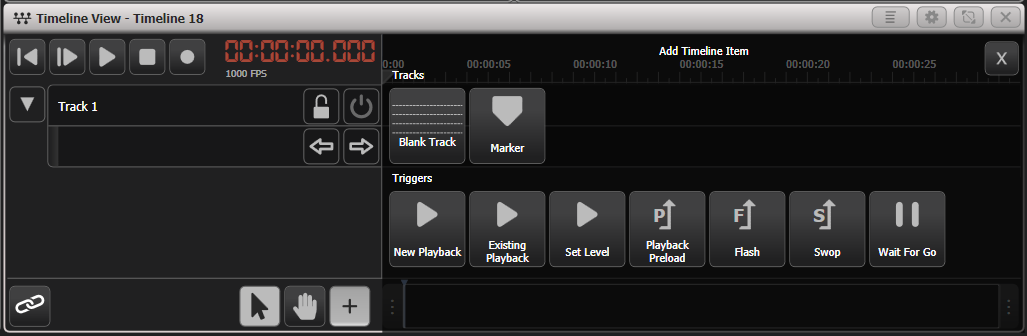
- Select the type of trigger you want to add.
- New Playback will create a playback from the current programmer contents and trigger it at 100% for 2 seconds then off.
- Existing Playback lets you select a playback you've programmed previously, and inserts it at 100% for 2 seconds then off.
- Set Level inserts a trigger to set an existing playback to a specified level.
- See the Triggers section for details of the other types of trigger.
- If you are using an existing playback, press the Select button of the playback you want to fire. (You can skip step 3 and just select a playback straight after pressing the + button - Titan will behave as if you pressed Existing Playback.)
- Set the time you want the trigger to fire at. There are several ways to do this:
- Type in the time using the Reference at hh:mm:ss.fff softkey and press Enter. Use the . button as a separator, for example typing "1 . 05" will enter 00:01:05:000 or "2 . 2 . 20" will enter 02:02:20.00. You can also use the arrow buttons to move between fields in the time display.
- Use the current Live Time (blue cursor position) using the Reference at Live Time softkey.
- Tap on the Timeline View on the screen at the place where you want the trigger (you can adjust this later).
- Repeat from Step 2 to add more triggers.
You can directly add a playback by pressing Copy, the select button of the playback, then tapping on the Timeline track where you want the trigger to be.
Existing Playbacks added to the timeline will be referenced (linked) copies of the playback. If you want to create a playback that you can edit separately, use the softkey option Create New Playbacks after you select the playback to be added.
The Table View can be easier to work with than the graphical timeline when entering timecodes manually as it lets you see the numbers you have entered.
Importing markers
Using the context menu option Tools - Import Markers you can import markers from an audio editor. This can help you position triggers when programming to a track.
- When creating the exported markers file, ensure the audio editor is set to export Hours:Minutes:Seconds:Frames and not beats or measures.
This is an example of how to load markers from the audio editor software Reaper:
- In Reaper, set the timeline to be displayed in HH:MM:SS:FF.
- Load the audio track and create your markers as needed.
- Open Region/Marker Manager.
- Right-click in Region/Marker manager and select Export Project Regions/Markers, save as CSV.
- Copy the CSV file to a USB stick and load the file using the Titan Import Markers context menu option (On Titan PC Suite copy the file to Documents\Titan folder).